Its time for the final screenshot thread! Show us what ya got here!
Forum Announcement, Click Here to Read More From EA_Cade.
Build Lower Level Decks
 RRArtie
Posts: 204 Member
RRArtie
Posts: 204 Member
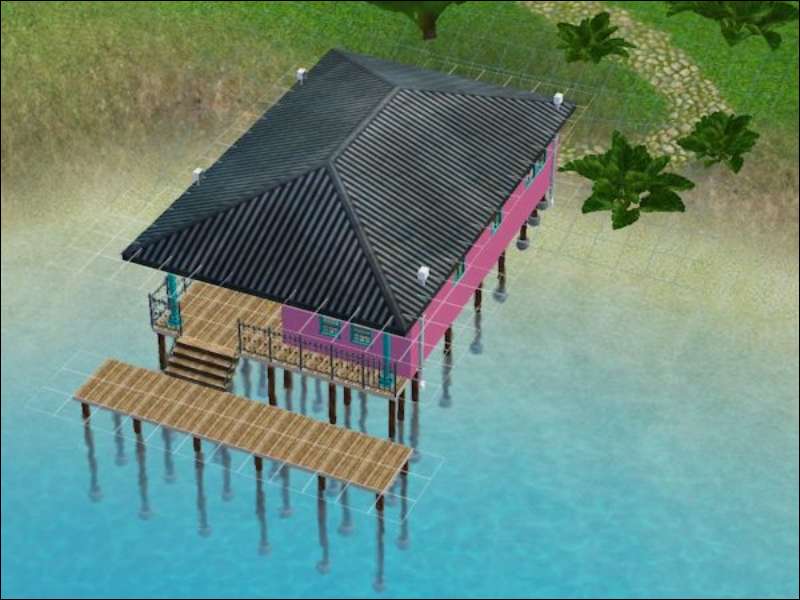
Island Paradise has a lot, Sea House, with a small house and a deck which is at a lower level than the house. This deck is 2 set of steps (8 steps) below the primary deck for the house. This is a nice configuration for a slightly sloping seaside lot.
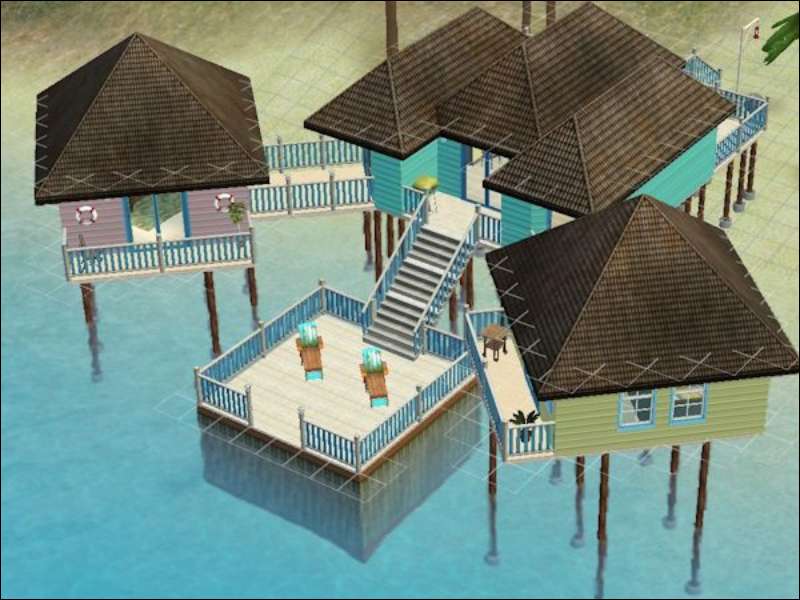
The house pictured below from IP called Spirit of the Sea is a similar configuration. It has all the living quarters on piers at the same level, and then a lower level deck on a foundation. The deck is a full flight of stairs (16 stairs) down from the living area. This plan is better suited to a steeper sea side lot.
I have placed a copy of both of these houses in my world, Housenfluke Rest, but it is difficult to get the terrain to conform to the lot. I would prefer to build this type of house from scratch, but have wondered how to do this type of building. In this post I will present a procedure I use to build this kind of house. The screen shots are from Edit Town in the game, but the process is the same in Edit in Game for Create a World.
The screen shot below shows a 20 x 30 lot placed on sloping seaside terrain. About 1/3 of the lot is under water.

An initial pier is built on the land. The size of this pier is not imortant because you can add to it later. The pier should extend out over the water.
The pier must be build by dragging from the highest land you want to build on and toward the ocean (sea, lake, valley). This direction is important. My initial attempts failed when I tried to drag from the ocean over the higher ground.

Enter the cheat “testingcheatsenabled on” and then the cheat “constrainfloorelevation false”.
Go to the build stair menu and pick any stair and build it so that some of the deck over the water is depressed. This first set of stairs is 4 steps and is foundation depth.

Use the level terrain tool to level some more of the deck to be at the level of the first set of depressed steps.

Keep on leveling the whole deck area that you want depressed. Notice how the pilings stick up above the deck. I quit at this point a couple of times, but it can be fixed.

Insert another set of steps to depress the lower deck another 4 steps (8 total = a half wall). Don’t worry about the orientation of these steps. It is only important that the depressed areas be in the area you want lower and not in the main building area.

Use the level terrain tool to level some of the deck to the lowest level.

Keep on leveling until the entire deck that was intended to be lower is at the same level. There will be slanted tiles which will form a transition from the lower deck to the main level. Don’t try to level them.

After all the lower deck is level, then enter the cheat “constrainfloorelevation true”.
Now delete all the slanting tiles that connected the main level with the depressed deck.

Also, delete the stairs. The picture below shows the two decks and the lack of stairs. At this point we are ready for cleanup and building.

Use the foundation tool to replace some or all of the deck with the pilings sticking through it. You can just drag the new deck over the old deck. At this point you may also add to the decks or delete some of the decks. However, you must leave that one tile space between the two decks.

The lower deck has been expanded to the side and into the water and all deck with piling sticking through has either been replaced or deleted.

Insert any stairs you like at this point. I have placed a 2 wide set of steps with railings. You will get eight steps between the two levels. It is a little tricky to get the steps to connect these two levels. Here is the approach – select the steps you want and width, then move the cursor from the sea (lower level) toward the higher level (main level) deck. When the cursor gets over the first square of the main level, the stairs will look like the picture and are ready to be placed by clicking there.

Add walls, front stairs, and railings and you are ready to build a new house.

Some Alternatives:
First alternative - Lower the deck to the same level as the houseboat docks and build it out of foundation material (like the second IP example above).
To do this first draw a new deck starting over water.

Delete all the railings and stairs from the higher deck. Enter the cheat “constrainfloorelevation false” and then using the level terrain tool, level the higher deck to the level of the lower deck (the houseboat dock level). When you release the terrain tool button, the pilings will again stick up through the deck.
Note that a short cut of just putting in the lower level deck and then trying to level the first deck before decreasing it with the sets of steps never worked. The stairs would never connect the lower and upper levels.

After leveling - set the cheat “constrainfloorelevation” to true and replace the deck with sticking up pilings with foundation. The little 5 x 2 deck can be deleted or plastered over with foundation.

Insert steps and you are ready to build. Notice how the steps accommodate the height difference. There are fourteen steps which are 2 less than a full flight of steps. As before, you can expand this deck or delete portions of it.

Second Alternative – This technique works with other foundations and on land
The screen shot below shows a sloping 20 x 30 lot.

Start by drawing a foundation on the lot. As before, the exact size and location are not critical. You will be able to add or delete tiles from them once the two levels are established.

Then as above set constrainfloorelevation to false, depress the foundation four times (16 steps or a full floor), level the lowest level, set constrainfloorelevation to true, delete the steps and delete the slanted connecting foundation. The foundation at two levels is shown below.

Add stairs which will be a full flight of stairs.

And build on each foundation. The buildings are separated by one tile and walls will not connect, but roofs look close to give the impression of a split level house.

Acknowledgement - All the tutorials on CFE helped me figure out how to do this.
The house pictured below from IP called Spirit of the Sea is a similar configuration. It has all the living quarters on piers at the same level, and then a lower level deck on a foundation. The deck is a full flight of stairs (16 stairs) down from the living area. This plan is better suited to a steeper sea side lot.
I have placed a copy of both of these houses in my world, Housenfluke Rest, but it is difficult to get the terrain to conform to the lot. I would prefer to build this type of house from scratch, but have wondered how to do this type of building. In this post I will present a procedure I use to build this kind of house. The screen shots are from Edit Town in the game, but the process is the same in Edit in Game for Create a World.
The screen shot below shows a 20 x 30 lot placed on sloping seaside terrain. About 1/3 of the lot is under water.
An initial pier is built on the land. The size of this pier is not imortant because you can add to it later. The pier should extend out over the water.
The pier must be build by dragging from the highest land you want to build on and toward the ocean (sea, lake, valley). This direction is important. My initial attempts failed when I tried to drag from the ocean over the higher ground.
Enter the cheat “testingcheatsenabled on” and then the cheat “constrainfloorelevation false”.
Go to the build stair menu and pick any stair and build it so that some of the deck over the water is depressed. This first set of stairs is 4 steps and is foundation depth.
Use the level terrain tool to level some more of the deck to be at the level of the first set of depressed steps.
Keep on leveling the whole deck area that you want depressed. Notice how the pilings stick up above the deck. I quit at this point a couple of times, but it can be fixed.
Insert another set of steps to depress the lower deck another 4 steps (8 total = a half wall). Don’t worry about the orientation of these steps. It is only important that the depressed areas be in the area you want lower and not in the main building area.
Use the level terrain tool to level some of the deck to the lowest level.
Keep on leveling until the entire deck that was intended to be lower is at the same level. There will be slanted tiles which will form a transition from the lower deck to the main level. Don’t try to level them.
After all the lower deck is level, then enter the cheat “constrainfloorelevation true”.
Now delete all the slanting tiles that connected the main level with the depressed deck.
Also, delete the stairs. The picture below shows the two decks and the lack of stairs. At this point we are ready for cleanup and building.
Use the foundation tool to replace some or all of the deck with the pilings sticking through it. You can just drag the new deck over the old deck. At this point you may also add to the decks or delete some of the decks. However, you must leave that one tile space between the two decks.
The lower deck has been expanded to the side and into the water and all deck with piling sticking through has either been replaced or deleted.
Insert any stairs you like at this point. I have placed a 2 wide set of steps with railings. You will get eight steps between the two levels. It is a little tricky to get the steps to connect these two levels. Here is the approach – select the steps you want and width, then move the cursor from the sea (lower level) toward the higher level (main level) deck. When the cursor gets over the first square of the main level, the stairs will look like the picture and are ready to be placed by clicking there.
Add walls, front stairs, and railings and you are ready to build a new house.
Some Alternatives:
First alternative - Lower the deck to the same level as the houseboat docks and build it out of foundation material (like the second IP example above).
To do this first draw a new deck starting over water.
Delete all the railings and stairs from the higher deck. Enter the cheat “constrainfloorelevation false” and then using the level terrain tool, level the higher deck to the level of the lower deck (the houseboat dock level). When you release the terrain tool button, the pilings will again stick up through the deck.
Note that a short cut of just putting in the lower level deck and then trying to level the first deck before decreasing it with the sets of steps never worked. The stairs would never connect the lower and upper levels.
After leveling - set the cheat “constrainfloorelevation” to true and replace the deck with sticking up pilings with foundation. The little 5 x 2 deck can be deleted or plastered over with foundation.
Insert steps and you are ready to build. Notice how the steps accommodate the height difference. There are fourteen steps which are 2 less than a full flight of steps. As before, you can expand this deck or delete portions of it.
Second Alternative – This technique works with other foundations and on land
The screen shot below shows a sloping 20 x 30 lot.
Start by drawing a foundation on the lot. As before, the exact size and location are not critical. You will be able to add or delete tiles from them once the two levels are established.
Then as above set constrainfloorelevation to false, depress the foundation four times (16 steps or a full floor), level the lowest level, set constrainfloorelevation to true, delete the steps and delete the slanted connecting foundation. The foundation at two levels is shown below.
Add stairs which will be a full flight of stairs.
And build on each foundation. The buildings are separated by one tile and walls will not connect, but roofs look close to give the impression of a split level house.
Acknowledgement - All the tutorials on CFE helped me figure out how to do this.
See my Sims 3 island world, Housenfluke Rest, at
http://forums.thesims.com/en_US/discussion/743962/housenfluke-rest-fixes-ghosts-and-new-download-urls, see the second world, MayanMysteries, at http://forums.thesims.com/en_US/discussion/904991/mayanmysteries-final#latest Art
http://forums.thesims.com/en_US/discussion/743962/housenfluke-rest-fixes-ghosts-and-new-download-urls, see the second world, MayanMysteries, at http://forums.thesims.com/en_US/discussion/904991/mayanmysteries-final#latest Art
Post edited by EA_Solaire on
0
Comments
Some Examples from my world (Housenfluke Rest – final mid June)
I built this beach lot with a large bathroom on a sloping lot and placed stairs. Only Indiana Jones would have the courage to go up those stairs 8). So I broke up the stairs with two landings as shown in the second screen shot. Using the techniques above, I expanded the foundation and depressed part of it two levels, then depressed another portion two more levels, deleted unneeded tiles and added stairs and railings.
This house on a steep seaside lot had a seaside deck far below it. The only way to the deck was for Sims to run up and down the steep lot. I used these techniques to build a new deck with a connecting staircase.
This house has a deck only one set of stairs below it. The deck is above the water by about 5 steps, so it could have been lowered more.
This deck has been depressed by 3 sets of stairs and the original cement pilings of the foundation have been replaced by wood pilings under the deck.
These lots as well as three mountainside lots are in my Housenfluke Rest update. I have finished all the landscaping, cured routing and tears and am ready for a week of test. I will release it some time around June 11 - 15.
http://forums.thesims.com/en_US/discussion/743962/housenfluke-rest-fixes-ghosts-and-new-download-urls, see the second world, MayanMysteries, at http://forums.thesims.com/en_US/discussion/904991/mayanmysteries-final#latest Art