Forum Announcement, Click Here to Read More From EA_Cade.
Decorating Hacks!
 emorrill
Posts: 8,127 Member
emorrill
Posts: 8,127 Member
Hello my fellow simming friends. 
In my 18 years of playing the Sims I have seen a lot of super creative decorating (and building) "hacks" in the game, on the forums, or on YouTube by such creative players and I thought to myself, "Why not have a thread where people can share all the sweet decorating hacks they've discovered - all in one place - and pass them on so that others can enjoy the same hacks in their game."") (I mean, if you feel like sharing.
(I mean, if you feel like sharing.  )
)
So let's get it started everyone!
*Show me some decorating hacks you saw, or invented on your own, that you now use often when decorating or building your sim's houses.*
I'll start us off.
MoveObjectsOn (MOO) is such a powerful hack tool that can really turn two, or more, items into one stunning piece of furniture, art, etc. (I know most of y'all know this already, I'm just sayin'. ) It gives so much more flexibility in creating something decorative you saw in real life in your sim's homes.
I'm always looking for ways to add a little decorative touch, or clutter, above the toilet tank. (Maybe it's because my mom always had a doily with some kind of decorative greenery on the top of the tank growing up. 🙃 ) Why EA did not provide slots for decorative items to rest on top of the toilet, I'll never know. (And yes I know about OMSP, but I wanted to showcase a non-cc way of doing it.
 ") )
)
So here's a recent look that I attempted...
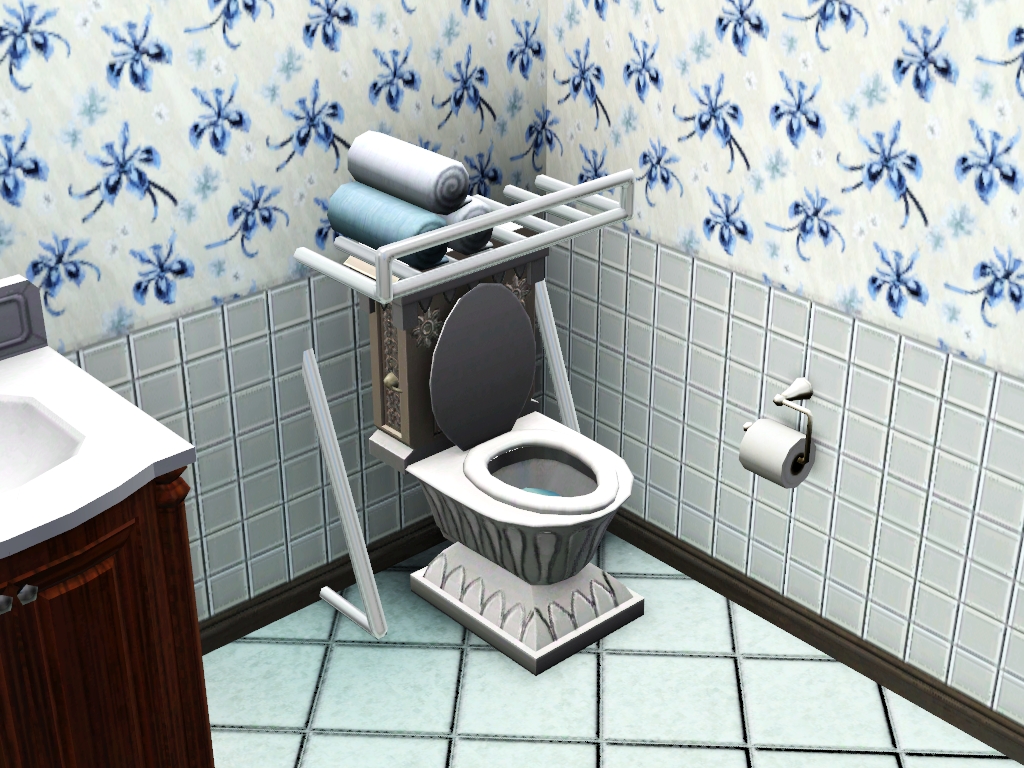
Cute right? Now, it's important to make sure that sims can still use the toilet when you are attempting any decorating hacks above or beside the toilet using MOO.  So I went ahead and tested that out:
Success!
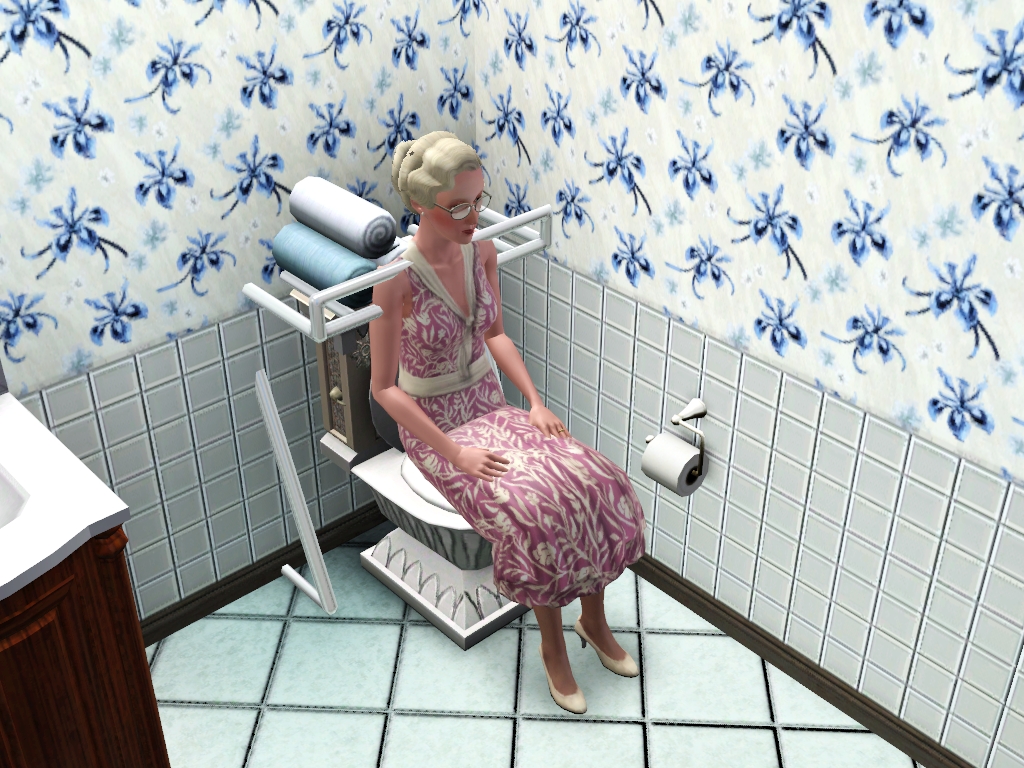
^Granted her arms and shoulders are going into the bar, but it's all good! At least it looks stylish! 👍🏻
----
The second decorating hack was one that was shared with me when I was building and decorating a home for the Disney Magic Kingdom world collaboration. I was on a simoleon budget and boy was that a challenge!!!
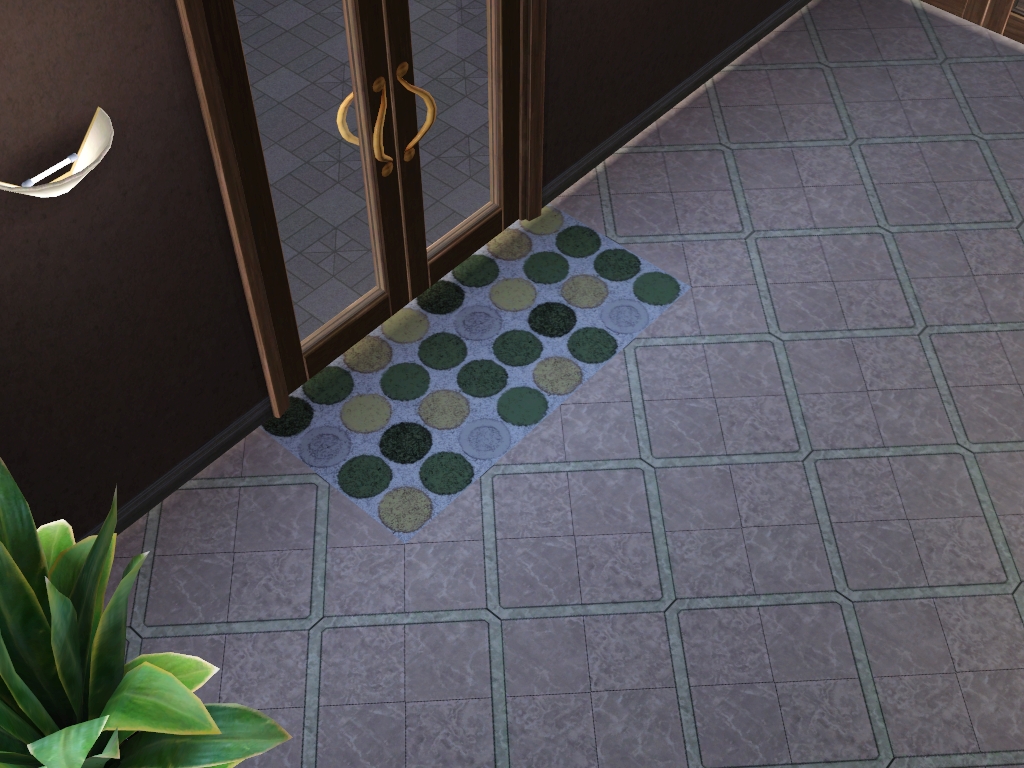
It was getting down to the wire and I wanted some rugs for the rooms, but alas, rugs are an expensive luxury (in that case ) and I did not have the funds for them when other items were needed in the home. So, after given this tip, I recolored the FREE floor tiles I used to give off a rug look in all the areas I wanted rugs.  👍🏻 Genius right? I really wish I could take the credit for it. Lol! But nah, it's cool.
This is also a great hack when you're NOT on a budget and just want a nice square, or diamond shaped, rug in the pattern of your liking that you can't quite get from the rugs provided in game. 👍🏻
Sorry the lighting isn't great in this picture, but in the foyer area of this home I changed a couple of the tiles on the floor with a cc fabric pattern I have and created one cute and stylish doormat rug.
Let me do a zoom out here so you can see the whole room:
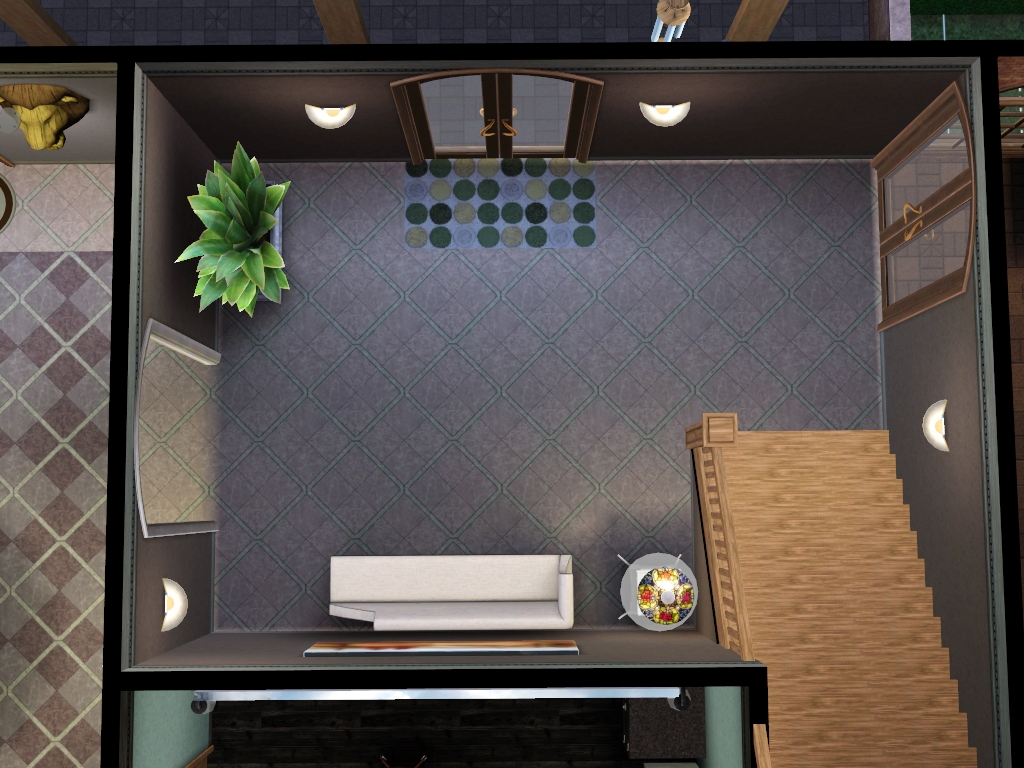
But yeah that was like a 4 simoleon cost for that "rug" as opposed to 25-50 simoleons for buying a normal rug in that size. And of course you can make rugs MUCH bigger in a room using this method compared to the average size of large rugs. 👍🏻 WIN!
Well that's it from me with decorating hacks. Who's next? (I know y'all have better ones than these. )
Bring your very best! I wanna see them all!
In my 18 years of playing the Sims I have seen a lot of super creative decorating (and building) "hacks" in the game, on the forums, or on YouTube by such creative players and I thought to myself, "Why not have a thread where people can share all the sweet decorating hacks they've discovered - all in one place - and pass them on so that others can enjoy the same hacks in their game."
So let's get it started everyone!
*Show me some decorating hacks you saw, or invented on your own, that you now use often when decorating or building your sim's houses.*
I'll start us off.
MoveObjectsOn (MOO) is such a powerful hack tool that can really turn two, or more, items into one stunning piece of furniture, art, etc. (I know most of y'all know this already, I'm just sayin'.
I'm always looking for ways to add a little decorative touch, or clutter, above the toilet tank.
So here's a recent look that I attempted...
Cute right?
Success!
^Granted her arms and shoulders are going into the bar, but it's all good! At least it looks stylish!
----
The second decorating hack was one that was shared with me when I was building and decorating a home for the Disney Magic Kingdom world collaboration.
It was getting down to the wire and I wanted some rugs for the rooms, but alas, rugs are an expensive luxury (in that case
This is also a great hack when you're NOT on a budget and just want a nice square, or diamond shaped, rug in the pattern of your liking that you can't quite get from the rugs provided in game. 👍🏻
Sorry the lighting isn't great in this picture, but in the foyer area of this home I changed a couple of the tiles on the floor with a cc fabric pattern I have and created one cute and stylish doormat rug.
Let me do a zoom out here so you can see the whole room:
But yeah that was like a 4 simoleon cost for that "rug" as opposed to 25-50 simoleons for buying a normal rug in that size.
Well that's it from me with decorating hacks. Who's next?
Bring your very best! I wanna see them all!

5
Comments
In this living room, I used this combination: https://www.canva.com/colors/color-palettes/sunset-sightings/
The main couch is Fuchsia #A30052, the armchairs are black #26161F, the wood and the base of the lamp are Champagne #F9E9D0 and the lamp shade is Tiger Lily #DB8780.
I have more examples using clothes, though.
I also found this site: https://kaycan.com/news/what-siding-colors-are-trending-for-2022/
They have examples of the colors combinations for different colors of sidings.
My recolor of the Greenwood's Eco Home is an example. I checked the favorite combinations for a siding color and copied the hex colors of the accents and trim, but I took a screenshot and used GIMP to find out the hex color. For their house I chose Ivory for the siding and the option with beige for the trim and cabot brown for the accents.
My favorite decorating hack: Don't decorate. A plain wall can also have its serene beauty. And my frame rate says "Thank you".
(Sorry!
I like my rooms to have texture and interest whether it's in wallpaper, artwork, shelves, lights or plants. Of course, more objects mean longer load time...
I recommend LazyDuchess' Smooth Patch which helps CAS load a bit faster.
If you have different size frames you can arrange them by height and create a wall collage. I also like to put shelves on the wall and arrange plants or little decor items on it.
Here are some of my favourite builds:
https://graceymanorsims3.tumblr.com/
@coco Lovely home, that.
Quick question. You know how in sims 4 you just hold a specific button; can't remember exactly which one it is, because I don't really play the sims 4 hardly, then you press another key while holding down the other key and you have more rotation control, you can move objects anywhere like paintings for example. You can put multiple paintings in one spot at once or even overlap objects, except I think the move objects is a cheat isn't it.
How do I do something similar in the sims 3??? I tried looking it up, but it kept giving me answers for sims 4 despite my being specific that I'm looking it up for sims 3.
I find that converting 2 1/2 to 3 feet per "square" works well most of the time. It's better to err a little on the large side when converting.
To move things around without the objects snapping to the "grid" you have Moveobjects on, and use the Alt key. For better control, and to avoid objects to snap to slots on tables and shelves, you use an OMSP (One More Slot Please) Then you can adjust the exact height and rotation.
Buckley's OMSP Resizers are also handy. Sometimes an object is too big or too small, so with these resizers you can change the size of objects: https://buckleysims.tumblr.com/post/165179396007/ive-received-a-few-inquiries-about-this-recently
Tipsy OMSPs are good if you want to tip over the objects. 15º, 45º, 75º and 90º angles are available: https://modthesims.info/d/470232/tipsy-omsp.html
If a sim is moved around with Moveobjects on or put on an OMSP, remember to always remove the sim from the OMSP, and Shift-click somewhere on the lot and teleport the sim. That will resynch the sim to the "grid" in the game. If you don't, then the sim can fall off the world and enter the Twilight Zone.
I’m not a huge decorator, so I have just this small tip: a few of the paintings in Buy Mode actually have variants that change the image itself, not just the frame. An example is this painting from University Life (Courtesy of SimsVIP):
TS4 Sims in TS3
How do you rotate a floor tile? I forgot how to do that...
@Turjan ^
@bklienhart I also use real life floor plans when attempting to build a home because I am not very good at building. Lol!
^Same!
@coco Girl where do you find the bulk of your cc?
@Cororon Great idea with experimenting with color temperatures! 👍🏻
@TinySpaceFox Oh yes, I was definitely using the Alt button - along with MOO - to fit that rack to the toilet just right. 👍🏻
I love wall pictures/paintings that have different images that you can choose from. When I first discovered that years ago I was one happy camper.
@stickykisses I forget how to do that as well...
I *think* you use the arrow buttons when doing it < > but I'm not 100% sure...
1. Use M-O-O cheat for gazebos when it comes time to placing columns, so that they'll merge with whatever railing you've used as an edge.
2. Place two or more columns, create a roof trellis with super short railing (looks like a flowerbed border), then M-O-O to place heather over it to look like ivy.
3. If you want to make it look like petals have fallen around your bushes, use the painting tool to spot-paint terrain paint of the same flower around the base of plant. So, for example, say you put a bunch of purple hydrangea (?) bushes in your yard. Go to terrain paints, pick the paint with purple flowers and spray here and there. It looks better if you mix in with clover paint.
I think it is the <(,) and >(.) keys if I recall correctly, I can't remember if you need to hold shift or ctrl too.
My very basic tips:
We may all love a bit of MOO but it is best used sparingly otherwise it starts impacting routing, unless that's just my pc.
Using the dirt brushes around buildings, garden furniture/ decorations and the base of plants creates a nice realistic depth/shadow effect.
My other tip would be remember the all in one toilet/shower does not count as a sink, my theatre in Al Simhara now has a fridge full of burnt pizza which could have been avoided by installing a sink or even a bin but noooo my level 10 cook has burnt every pizza she has made there on the first attempt because I forgot to place them.
Rotating a floor tile requires the < and > keys.
If you want to cut a floor tile into quarters (sometimes necessary if you have diagonal walls) you need to hold down the Ctrl key and hit the F key.
https://www.youtube.com/channel/UCuW44b3uCMtCSaq4gwC8EZg
I looked in my folders and found links for a lot of buy/build cc. Bear in mind that a lot of this 5+ years old, but some of the creators still update.
Pocci https://mega.nz/folder/qJMEEKBJ#k-Obuo4yFQKAJhNqyCyDCQ
Simply Styling https://archive.liquidsims.com/mirror/SimplyStyling/www.simplystyling.de/Sims3/objects.html
ATS https://aroundthesims3.com/index.html
Awesims https://www.liquidsims.com/downloads/ts3/awesims-downloads-sets/
Simpothecary https://simpothecary.tumblr.com/tagged/sims 3 cc
Milla https://millascreativecornerblog.tumblr.com/
Granny Zaza https://simfileshare.net/folder/50774/ or https://simfileshare.net/folder/49138/
Simstardust https://simstardust.tumblr.com/tagged/ts3cc
Simcredible https://sims3.simcredibledesigns.com/
Simlicious https://www.simlicious.com/
Baufive https://www.b-5studio.com/search/label/sims 3
pyszny16 https://www.thesimsresource.com/artists/pyszny16/downloads/browse/category/sims3/skipsetitems/1
Kalethegrey https://kalethegrey.tumblr.com/tagged/s3cc
n-a-n-u https://www.thesimsresource.com/artists/n-a-n-u/downloads/browse/category/sims3/skipsetitems/1
ShinoKCR https://www.thesimsresource.com/artists/ShinoKCR/downloads/browse/category/sims3/skipsetitems/1
SilverOwl https://silverowlblog.tumblr.com/dlts3preview
Paisley Avenue https://paisleyavenueredux.tumblr.com/tagged/Downloads/
You Lust https://you-lust.tumblr.com/
Pleyita https://pleyita.tumblr.com/downloads
Marcussims91 https://marcussims91downloads.tumblr.com/
Narukiisims https://narukiisims.tumblr.com/tagged/ccpa
pitheinfinite https://pitheinfinite.tumblr.com/tagged/my cc
Gosik https://www.thesimsresource.com/artists/Gosik/
Grandelama https://grandelama.tumblr.com/
If you see something specific in my pictures that you want let me know
Also, you can easily extend the basement room to the edge when you want a walkout basement:
I liked a lot of the rugs and the wood flooring in your pictures, as well as those curtains that flowed outward a bit.
@simmerorigin Ok, that is cool!
@Karritz and @dothesmustle thank you both! I will try again using your suggestions. I remember trying some of those (probably wrong combination) and still not getting anything to move. Will try again, thank you!!
So I took that standalone wall sink and used MOO to add an endtable underneath it to create this "farmhouse sink" look for the kitchen. (Keep in mind that I also held down the Alt button for proper placement to ensure it would be functional. 👍🏻 )
And of course it's always important to play-test merged objects before sharing/adding to builds you plan to upload/etc.
Success!
Enjoy everyone.
The "NIKKEI_SIMMER SCHOOL OF DECORATING"
Bedroom:
a) Pick wall-covering, pick carpet.
b) Stick bed down (headboard against wall). Stick end tables on either side of the bed near the headboards. Stick lamps on end tables. Stick desk...computer, chair.
Voila...done.
Always "River McIrish" ...and maybe some Bebe Hart. ~innocent expression~
Always "River McIrish" ...and maybe some Bebe Hart. ~innocent expression~
I admittedly stole this from an EA build in Isla Paradiso but I thought it was such a fun little decorative trick.
I also like to take the short kitchen cabinet that came with Into The Future (under Surfaces -> Cabinets, called "Geminisi Overhead Cabinet by Van Allen Decor") and place it on the wall that my fridge is on so that I can have cabinets above the fridge that obviously don't clip or interfere. Sure, the styling doesn't match the other cabinets but if you recolor it to match it blends in and helps give a more complete look to your cabinetry set.