Forum Announcement, Click Here to Read More From EA_Cade.
A Guide to Showcasing - Tips, Hints and Tricks to Better Photographs
 kimwriter75
Posts: 1,837 Member
kimwriter75
Posts: 1,837 Member
A Guide to Showcases - Tips, Hints, and Tricks to Better Photographs
Hello, talented community! I am amazed all the time at the creativity I see in these threads in Creative Corner. One thing I think about a lot is the only way we have to introduce our creations, is through pictures in showcase threads. I am by no means an expert with photographs, but in my time with Sims, I have received a lot of excellent advice and I'd like to share that with you.
Showcasing a build is an important way to ensure you are supplying people who download a quality product. Essentially, it can make or break your success with downloads. You should be proud of your creation, and the quality of your showcasing should reflect that. I am going to give a few tips on how to make your showcase thread go from good to great.
You've dedicated the time to building your creation, now it's time to give the showcasing the same respect. What do people want to view in a showcase thread? How much is too much? How little is too little? There is a fine line. There is no definitive way to answer that. I always ask myself how much time I want to spend looking at a build and go from there. The choice of how many pics is up to you, but...make sure they are quality.
Checklist -
• First, make sure walls are UP when you start your pictorial process. Only a few things irk me more than walls down in showcase threads.
• Time of day is important as well for exteriors. You will have better luck capturing a great photograph of the exterior is the sun is in front of the build to avoid shadows.
• Have a sim in game. No one wants to see showcase pics in build mode.
• Play around with your angles in camera man mode. This accomplishes two things. It allows you to plan your documentation process. Also, it helps you see if you've missed something, like CASing an object, or placing ceilings. (I can't tell you how many times I have done that and had to start over.) Speaking of camera man mode, maybe we ought to do a quick run through.
Camera Man Mode -
If you are new to this, it can seem daunting at first, but once you adapt, it becomes second nature.
• Enter camera man mode by pressing 'TAB'
• 'W' moves the camera forward.
• 'A' moves the camera left.
• 'S' moves the camera back.
• 'D' moves the camera right.
• 'Q' moves the camera down.
• 'E' moves the camera up.
• 'Z' Zooms out.
• 'X' Zooms in.
To accomplish angles...
• 'Shift A' angles left.
• 'Shift D' angles right.
You can also move around with the mouse in camera man mode. I always hold the right mouse button, but holding left works too.
Practice a bit to get comfortable with it. The tool is relatively straight forward.
Starting Out-
Now that the basics are covered, it's time to get down to business. We will use a basic 20x20 build for this tutorial. It has one bedroom, one bath, kitchen, laundry area, and living/computer space for the interiors. Exteriors are basic parking space and some landscaping. Ask yourself what you want others to see in your showcase. Are you particularly pleased with certain areas? How many pictures do you want of the space? How many will you present? This lot is very small, so one pic per area should be sufficient. For larger lots, I usually do two pics per room if they are large, and one for the rest.
If you have ever watched a home channel or read a design magazine, you may be familiar with a home tour. I try to document my showcase as if I were doing a live tour of the home, starting with the front of the home and catching a couple, give or take, pics of the exterior, then straight into the home. Once inside, I try to photograph the area as if I were walking through it with a potential buyer. Let's begin with the pictures.
The Exterior -
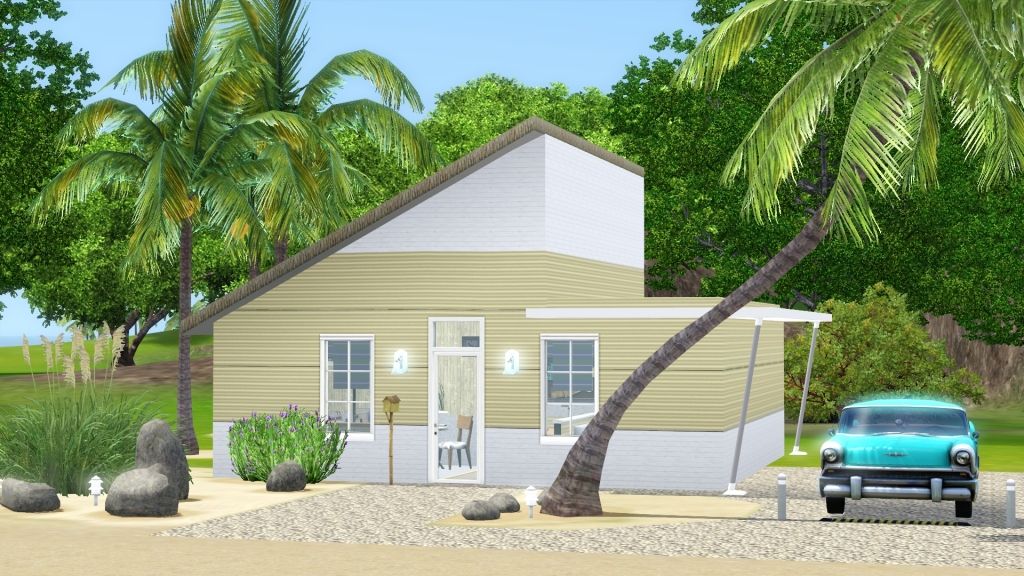
I did this at eye level, for a sim that is. Some people choose to go overhead and look down, but I feel that works with larger builds, not so much with small. Some things, like the trees, are cut off, but that is okay. We want an intimate shot to start things off, sort of inviting your sims to walk in and see more. Next, I would do a couple more exteriors, but for the purpose of this guide I will skip to interiors.
Interior Showcasing -
This will be picture intensive and a tad lengthy as there is much to cover. I will discuss with you how to get the most aesthetically pleasing pictures for your build. With that, what not to do will be covered as well.
This is not rocket science and there is plenty of room for personal preferences. How I do it is not indicative of the way it is supposed to be done, it is merely a suggestion to help guide you into better showcasing. Going back to the reference of a home tour, I like to include the entry way as part of my starting out procedure.
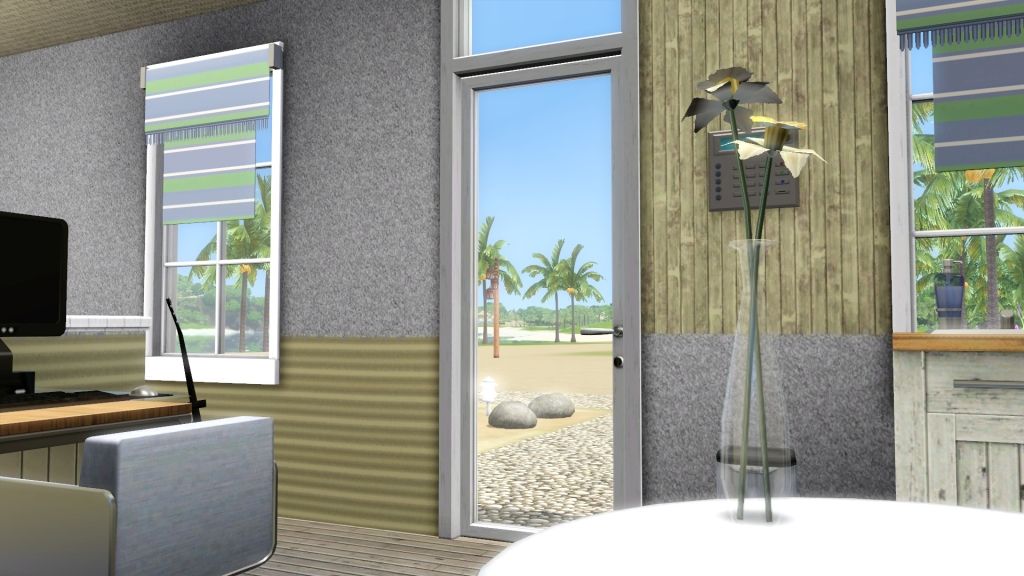
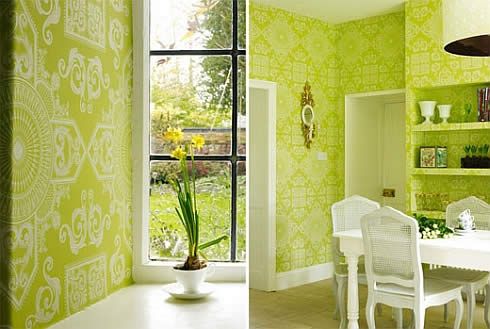
If you notice, I included a flower in the shot. This adds interest, and shows perspective and depth. It is not needed, but is encouraged. Let's move on to the living space.
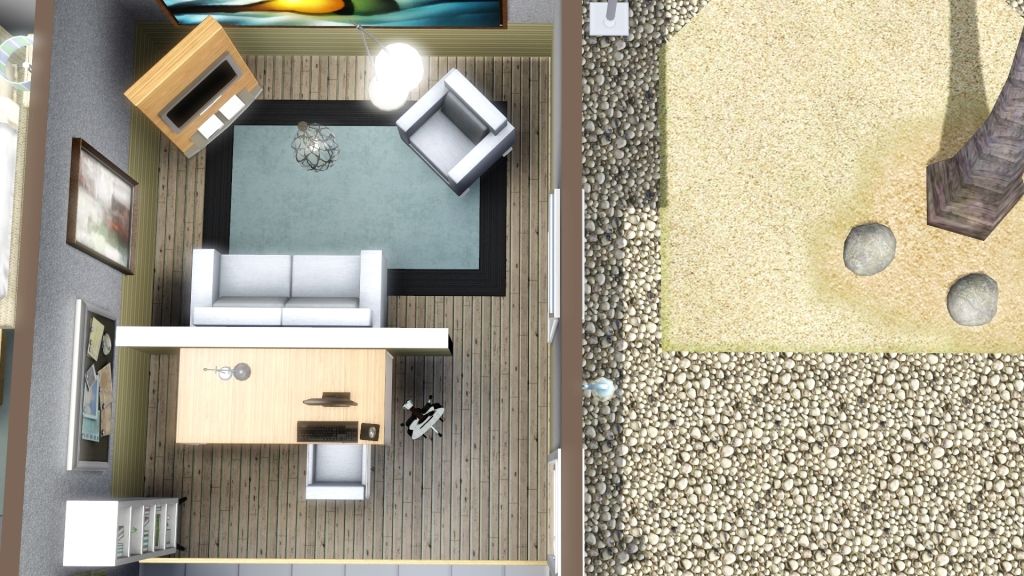
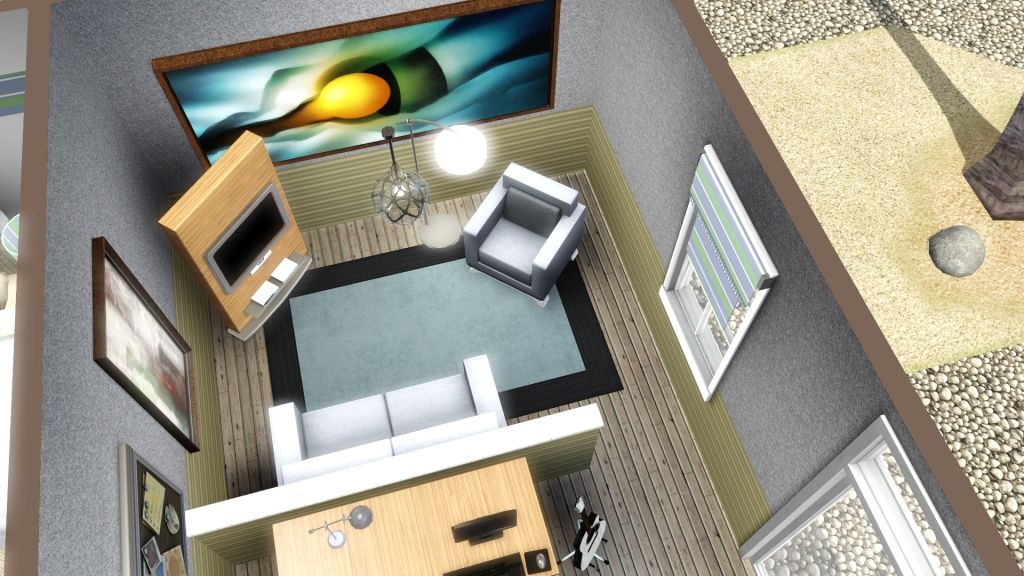
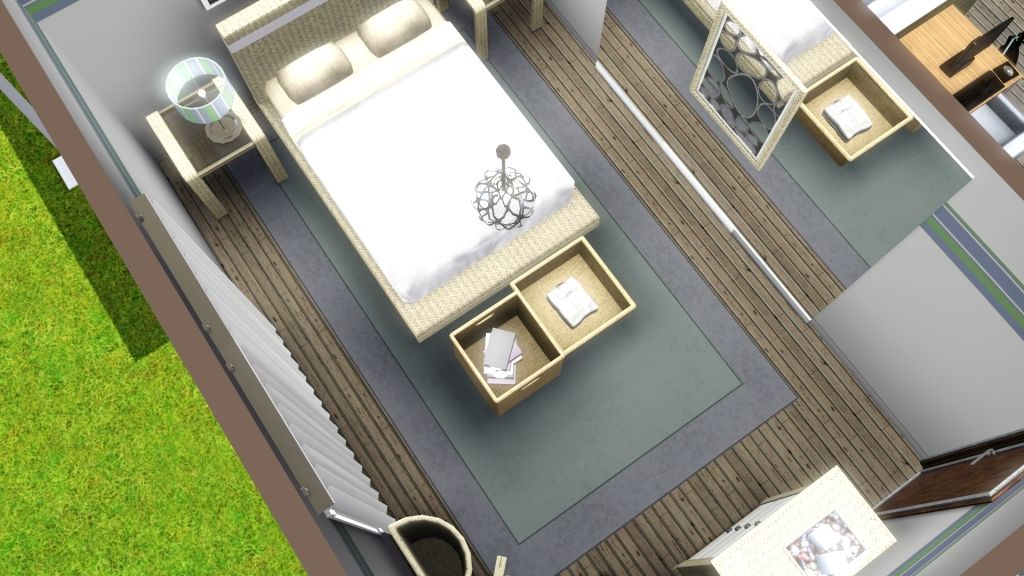
Here is an overhead of the space for reference. It's a bit awkward because it is a small space with angled furniture. Ask yourself now, 'how do I fully represent that space in a pleasing way?' There are so many ways to capture this. I will start with a few of what not to do.
The Fishbowl Effect -
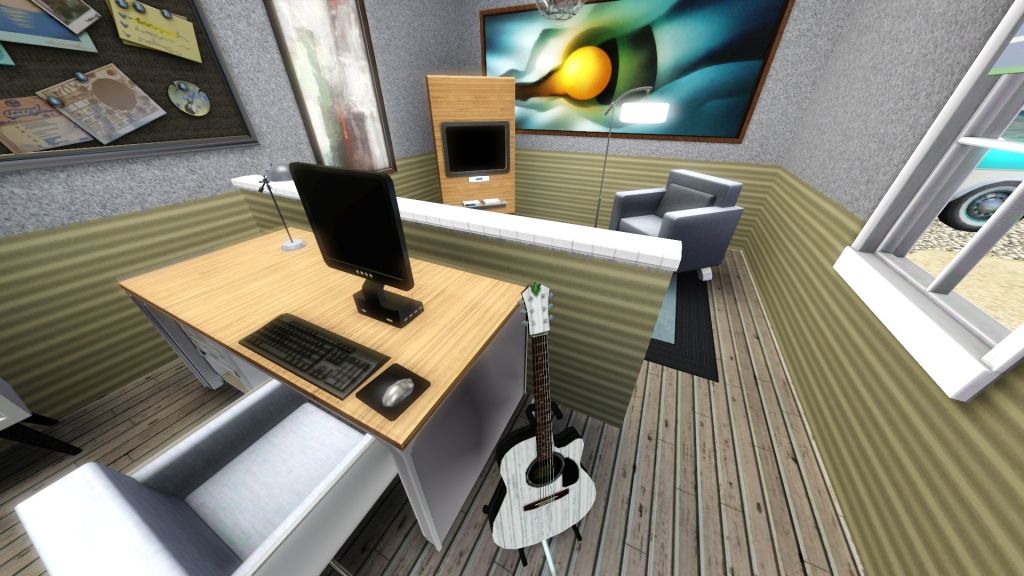
Here is an example of what happens will people try to get the entire shot in one pic. The pic is zoomed out all the way and you notice the computer chair and wall hangings are distorted, disproportionate and stretched. This is not a good picture to include in showcasing. Here are some more examples of the fishbowl effect...
The bathroom is a common spot for fishbowling. It is usually the smallest room and very difficult to capture. There is an easy correction for this effect. Zoom all the way in. Move your camera back a touch. Do not try to capture the whole room. Instead, focus on a feature of the room. Keep you pics tight.
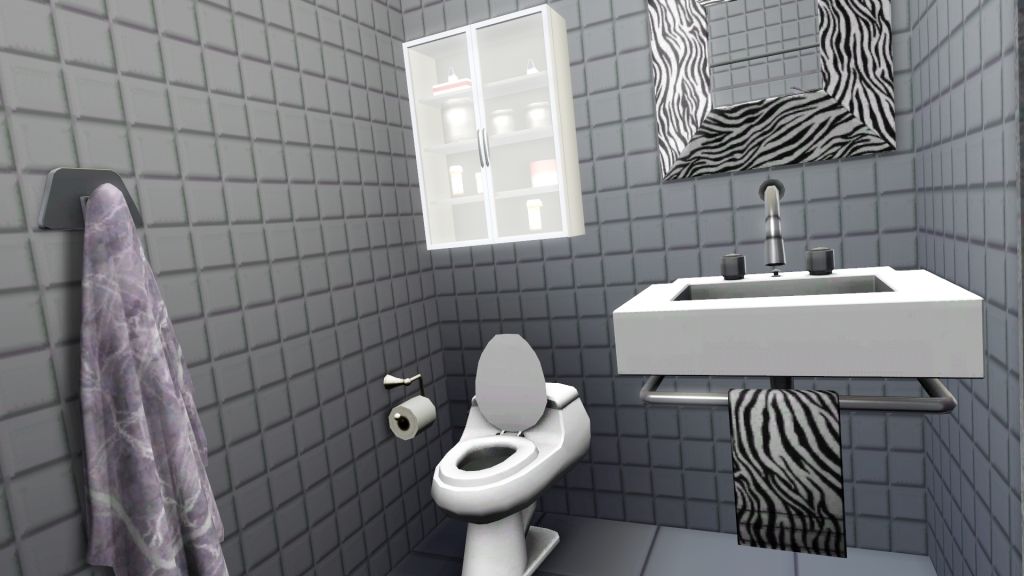
Angling the camera allows you to get a bit more detail in as well as add some character to your pics. Also raise and lower the camera, taking many pictures of the same subject with different angles and heights. Soon, you will learn to just "feel" the pic, and not need to take so many.
One thing I have not discussed much is lighting. Too bright a room or too dark will muck up your showcase. For a dark room, you can add in buydebug lighting. That is accessed by pressing CTRL - SHIFT - C and typing into the cheat window 'TestingCheatsEnabled True', then 'buydebug'. The lights are only visible in buy/build mode, not in play mode.
They are a great way to add more lighting without overdoing it with buy mode lights. For too much light, you can click on any light fixture and select intensity. Make a certain light(s) dim or select all. One other trick I like to do is changing the colors of the lights. For contemporary and modern builds, generally I will use white lighting. But the color choice of flame casts great shadows and creates a romantic ambiance.
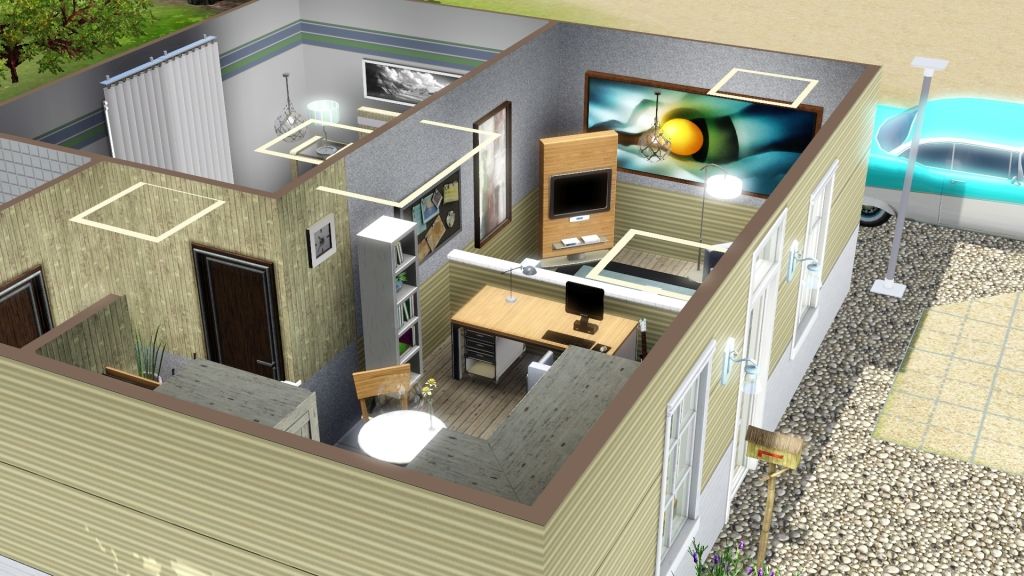
Overhead Shots -
These pictures are great for showing the entire layout of a build, but for individual rooms, I would not recommend doing this in your showcase thread.
They leave out so much aesthetic value. If you flip through a design magazine, you almost never see overhead shots like this. There is a reason.

Walls Down -
Don't do this!
Do not think about it!
You spent time covering the wall, adding art, show it off.
The Right Way -
I've shown you what not to do. Now we will cover the correct way, or quality way to capture a good pic.
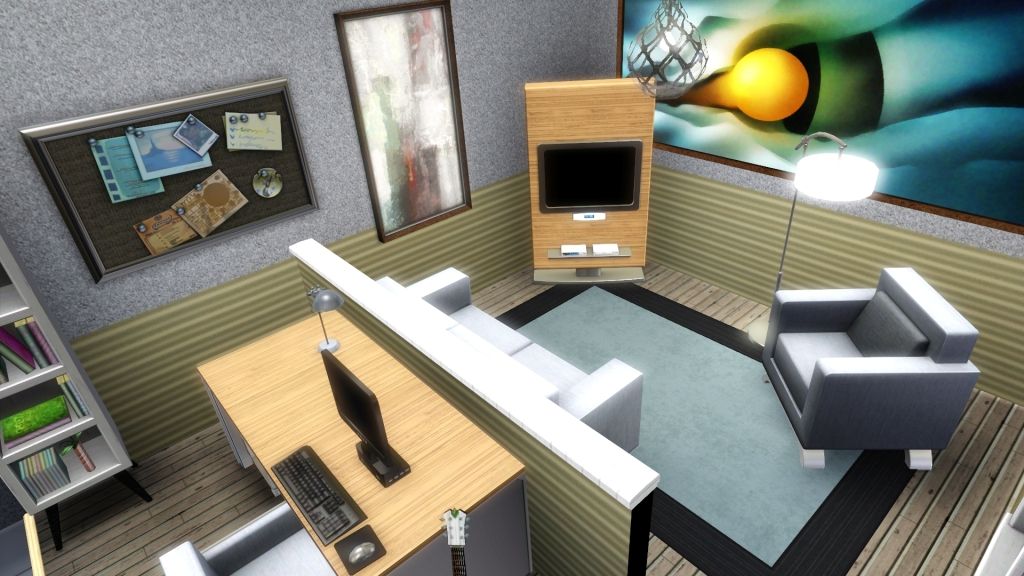
Living Space -
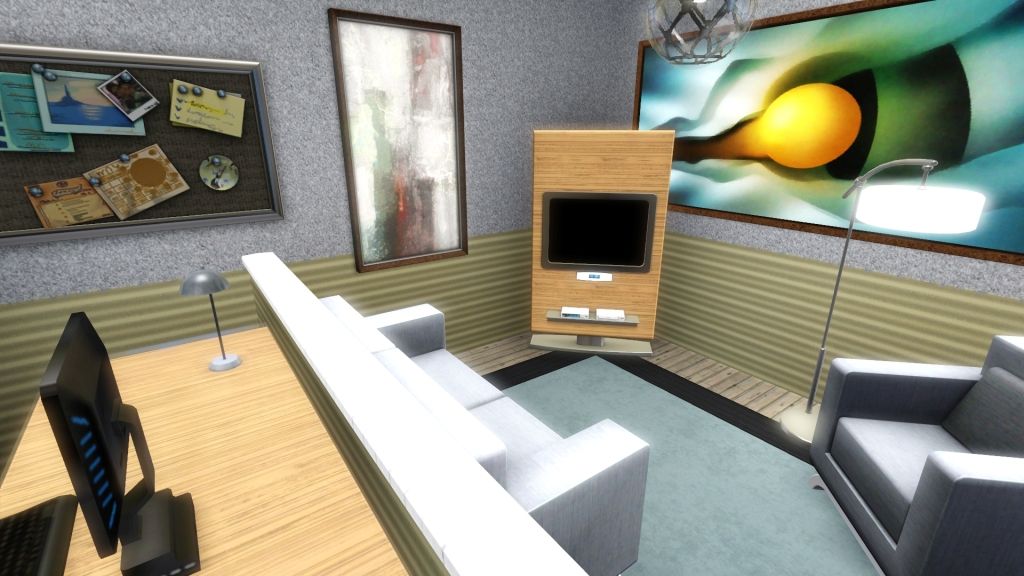
I've centered the photograph between the computer desk and the sitting area. No need to get every little bit of objects. People are smart and their brain will fill in the missing pieces.
Kitchen/Dining /Laundry -
Here is a straight on shot on the three areas in one. Notice, no fishbowl and no overhead. It is intimate, yet shows just enough. I did this by a lot of trying to find the 'sweet spot'. In camera man mode, move the camera around. Keep your zoom all the way in. Rely on moving forward, backward and side to side. If you feel you need to zoom out, move back a touch and see if you can capture what you want that way. There is no harm in zooming out. Just be sparing with it. It's not black and white. There is room for grey.
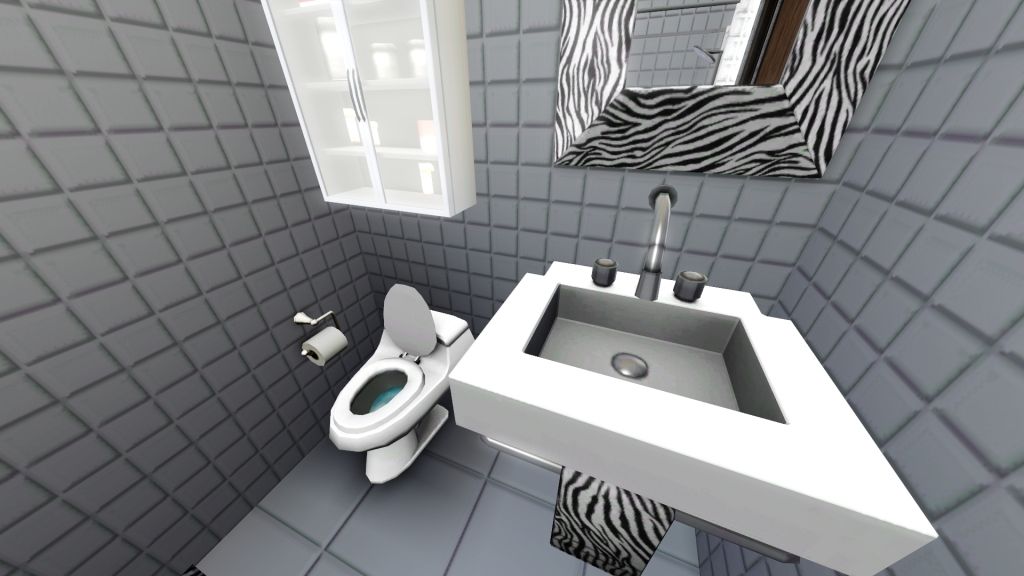
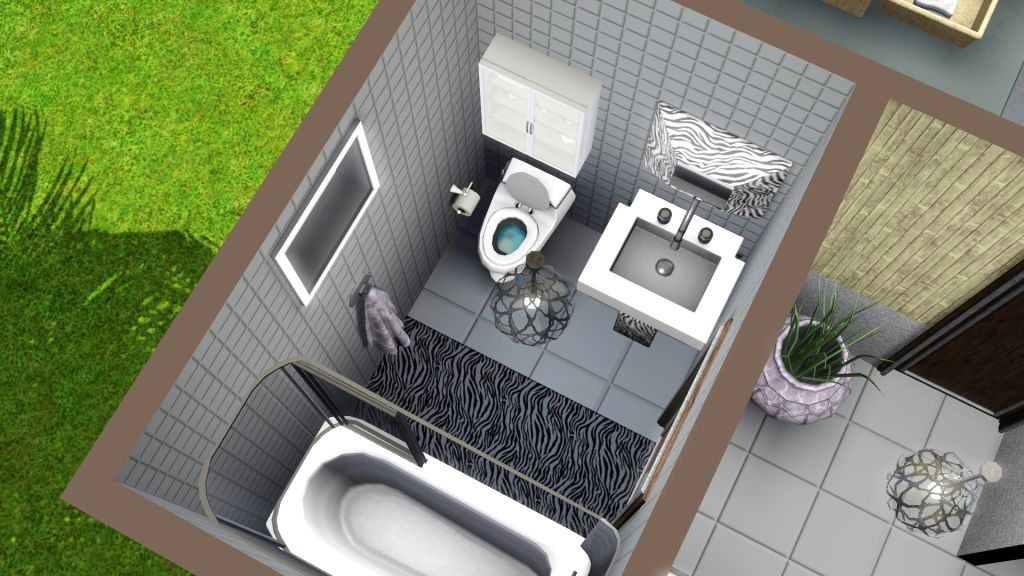
Bathroom -
This shot is slightly overhead, but if you notice, I did not show any rooms besides the bath. I went with an angle to include as much information as possible, without fishbowling as well. How I accomplished this is by going up and back as far as I could without leaving the room, using 'W and E'. Then, I angled the camera to the right. By using 'SHIFT D' I did not need to zoom out at all.
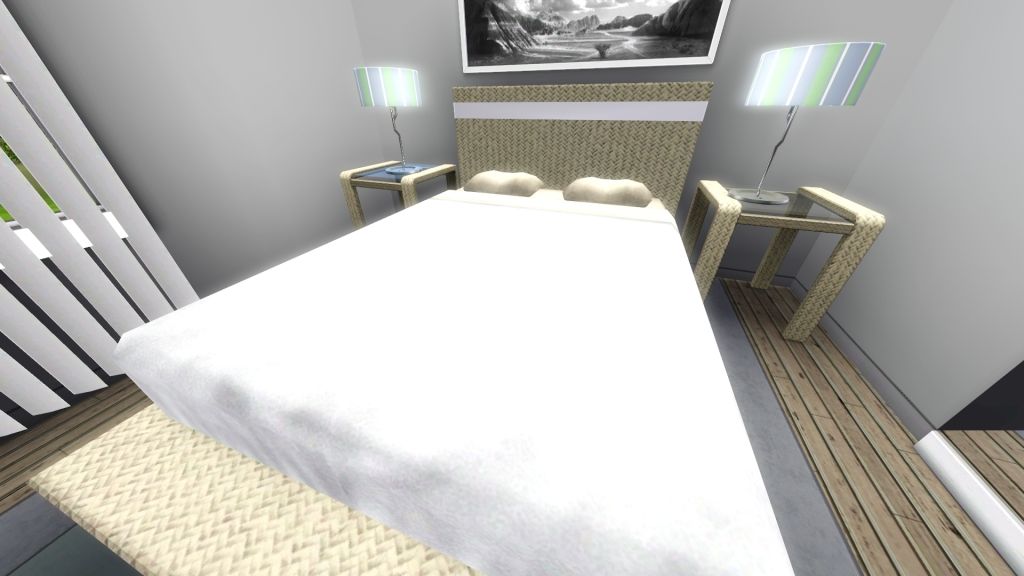
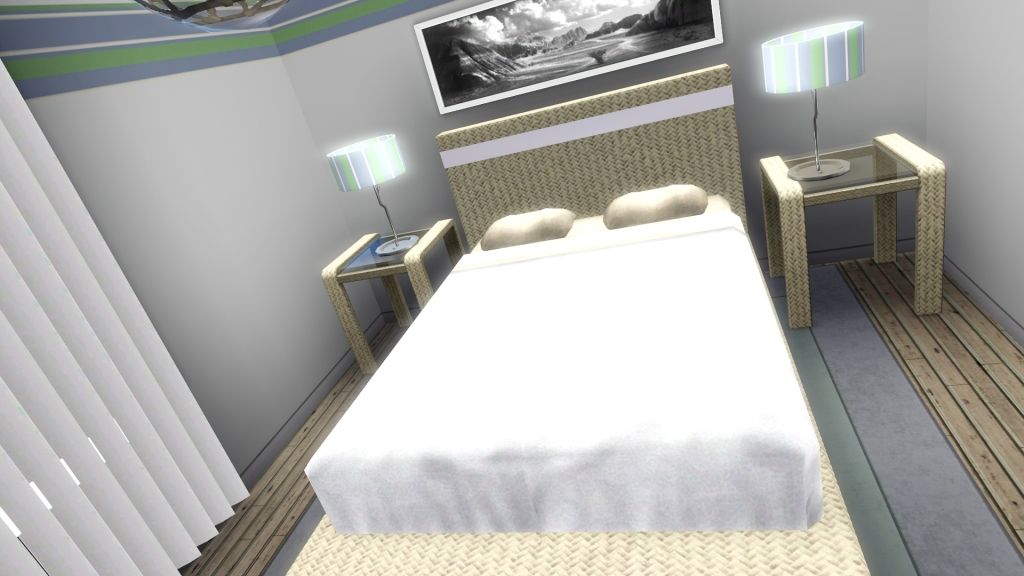
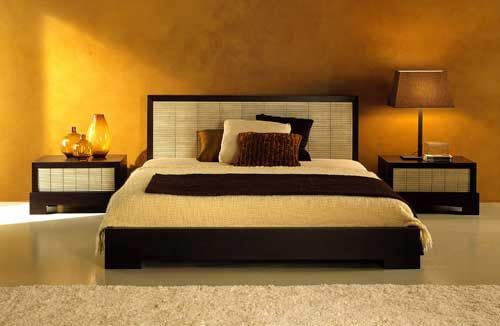
Bedroom -
Even though this is a small area, I decided to go with two photographs to properly document this space. Typically, most of my showcases have two pics per bedroom. For the first pic, I simply found the position I wanted by utilizing the 'W', 'A' and 'D' keys. I did zoom out a slight tad, just enough that my proportions are intact. Seeing as I have a wall with mirrors, I used that to my advantage to show the other side that the camera will not catch. Look for things like that within your own builds as well. Mirrors are always a great way to capture large amounts of information. In the second, I cut out a great space of the bed as it has already been seen in the previous. I included just enough to act as a place holder for the space. Also, I focused on the opposite side as I did in the previous pic and angled ever so slightly to create more interest.
Your Showcase Thread -
First and foremost, this is yours and you can do as you please. I've seen builders use the same threads, and others have a new thread for each build. What you do is entirely up to you. I like to keep it simple. My format is...
• Title
• Brief description of the build
• Four to Five pictures
• A link to a slideshow and/or Youtube video
• Last, the download link.
Honestly, I do not want to spend more than five minutes viewing at a time. Sometimes more is less. Other times, I do want to see more than a cover shot and links to other media, but like I said, it is individual preferences.
Wrapping it Up -
I hope you have enjoyed this guide and found some use for it. Quality pictures are not hard to do once you understand the steps. Plus they add so much more to your showcase. There are so many talented builders out there and I hope others will share their advice on this thread as well. If you have any questions, I will keep my eyes open. Feel free to ask, I will help how I can.
Hello, talented community! I am amazed all the time at the creativity I see in these threads in Creative Corner. One thing I think about a lot is the only way we have to introduce our creations, is through pictures in showcase threads. I am by no means an expert with photographs, but in my time with Sims, I have received a lot of excellent advice and I'd like to share that with you.
Showcasing a build is an important way to ensure you are supplying people who download a quality product. Essentially, it can make or break your success with downloads. You should be proud of your creation, and the quality of your showcasing should reflect that. I am going to give a few tips on how to make your showcase thread go from good to great.
You've dedicated the time to building your creation, now it's time to give the showcasing the same respect. What do people want to view in a showcase thread? How much is too much? How little is too little? There is a fine line. There is no definitive way to answer that. I always ask myself how much time I want to spend looking at a build and go from there. The choice of how many pics is up to you, but...make sure they are quality.
Checklist -
• First, make sure walls are UP when you start your pictorial process. Only a few things irk me more than walls down in showcase threads.
• Time of day is important as well for exteriors. You will have better luck capturing a great photograph of the exterior is the sun is in front of the build to avoid shadows.
• Have a sim in game. No one wants to see showcase pics in build mode.
• Play around with your angles in camera man mode. This accomplishes two things. It allows you to plan your documentation process. Also, it helps you see if you've missed something, like CASing an object, or placing ceilings. (I can't tell you how many times I have done that and had to start over.) Speaking of camera man mode, maybe we ought to do a quick run through.
Camera Man Mode -
If you are new to this, it can seem daunting at first, but once you adapt, it becomes second nature.
• Enter camera man mode by pressing 'TAB'
• 'W' moves the camera forward.
• 'A' moves the camera left.
• 'S' moves the camera back.
• 'D' moves the camera right.
• 'Q' moves the camera down.
• 'E' moves the camera up.
• 'Z' Zooms out.
• 'X' Zooms in.
To accomplish angles...
• 'Shift A' angles left.
• 'Shift D' angles right.
You can also move around with the mouse in camera man mode. I always hold the right mouse button, but holding left works too.
Practice a bit to get comfortable with it. The tool is relatively straight forward.
Starting Out-
Now that the basics are covered, it's time to get down to business. We will use a basic 20x20 build for this tutorial. It has one bedroom, one bath, kitchen, laundry area, and living/computer space for the interiors. Exteriors are basic parking space and some landscaping. Ask yourself what you want others to see in your showcase. Are you particularly pleased with certain areas? How many pictures do you want of the space? How many will you present? This lot is very small, so one pic per area should be sufficient. For larger lots, I usually do two pics per room if they are large, and one for the rest.
If you have ever watched a home channel or read a design magazine, you may be familiar with a home tour. I try to document my showcase as if I were doing a live tour of the home, starting with the front of the home and catching a couple, give or take, pics of the exterior, then straight into the home. Once inside, I try to photograph the area as if I were walking through it with a potential buyer. Let's begin with the pictures.
The Exterior -
I did this at eye level, for a sim that is. Some people choose to go overhead and look down, but I feel that works with larger builds, not so much with small. Some things, like the trees, are cut off, but that is okay. We want an intimate shot to start things off, sort of inviting your sims to walk in and see more. Next, I would do a couple more exteriors, but for the purpose of this guide I will skip to interiors.
Interior Showcasing -
This will be picture intensive and a tad lengthy as there is much to cover. I will discuss with you how to get the most aesthetically pleasing pictures for your build. With that, what not to do will be covered as well.
This is not rocket science and there is plenty of room for personal preferences. How I do it is not indicative of the way it is supposed to be done, it is merely a suggestion to help guide you into better showcasing. Going back to the reference of a home tour, I like to include the entry way as part of my starting out procedure.
If you notice, I included a flower in the shot. This adds interest, and shows perspective and depth. It is not needed, but is encouraged. Let's move on to the living space.
Here is an overhead of the space for reference. It's a bit awkward because it is a small space with angled furniture. Ask yourself now, 'how do I fully represent that space in a pleasing way?' There are so many ways to capture this. I will start with a few of what not to do.
The Fishbowl Effect -
Here is an example of what happens will people try to get the entire shot in one pic. The pic is zoomed out all the way and you notice the computer chair and wall hangings are distorted, disproportionate and stretched. This is not a good picture to include in showcasing. Here are some more examples of the fishbowl effect...
The bathroom is a common spot for fishbowling. It is usually the smallest room and very difficult to capture. There is an easy correction for this effect. Zoom all the way in. Move your camera back a touch. Do not try to capture the whole room. Instead, focus on a feature of the room. Keep you pics tight.
Angling the camera allows you to get a bit more detail in as well as add some character to your pics. Also raise and lower the camera, taking many pictures of the same subject with different angles and heights. Soon, you will learn to just "feel" the pic, and not need to take so many.
One thing I have not discussed much is lighting. Too bright a room or too dark will muck up your showcase. For a dark room, you can add in buydebug lighting. That is accessed by pressing CTRL - SHIFT - C and typing into the cheat window 'TestingCheatsEnabled True', then 'buydebug'. The lights are only visible in buy/build mode, not in play mode.
They are a great way to add more lighting without overdoing it with buy mode lights. For too much light, you can click on any light fixture and select intensity. Make a certain light(s) dim or select all. One other trick I like to do is changing the colors of the lights. For contemporary and modern builds, generally I will use white lighting. But the color choice of flame casts great shadows and creates a romantic ambiance.
Overhead Shots -
These pictures are great for showing the entire layout of a build, but for individual rooms, I would not recommend doing this in your showcase thread.
They leave out so much aesthetic value. If you flip through a design magazine, you almost never see overhead shots like this. There is a reason.
Walls Down -
Don't do this!
Do not think about it!
You spent time covering the wall, adding art, show it off.
The Right Way -
I've shown you what not to do. Now we will cover the correct way, or quality way to capture a good pic.
Living Space -
I've centered the photograph between the computer desk and the sitting area. No need to get every little bit of objects. People are smart and their brain will fill in the missing pieces.
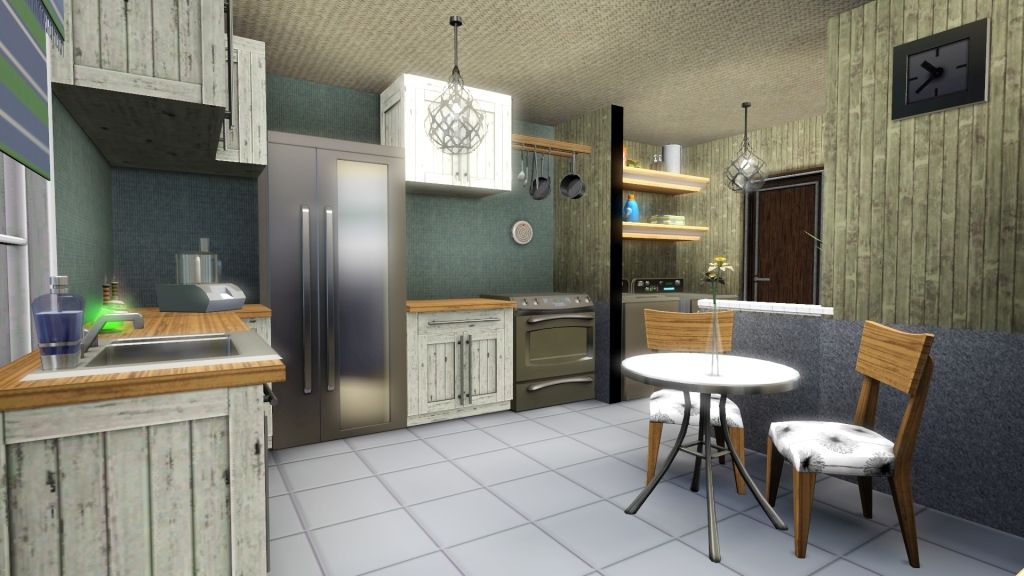
Kitchen/Dining /Laundry -
Here is a straight on shot on the three areas in one. Notice, no fishbowl and no overhead. It is intimate, yet shows just enough. I did this by a lot of trying to find the 'sweet spot'. In camera man mode, move the camera around. Keep your zoom all the way in. Rely on moving forward, backward and side to side. If you feel you need to zoom out, move back a touch and see if you can capture what you want that way. There is no harm in zooming out. Just be sparing with it. It's not black and white. There is room for grey.
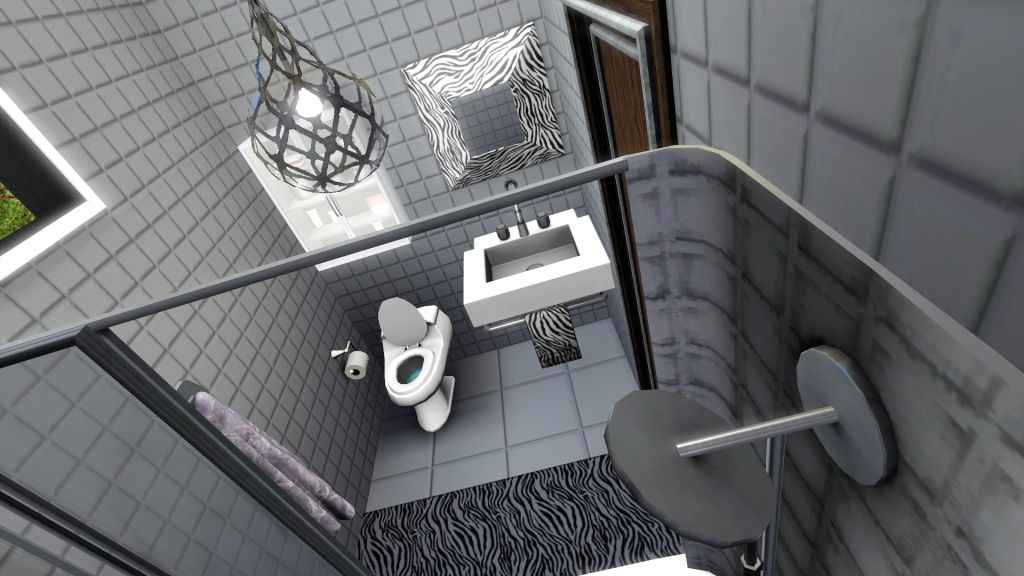
Bathroom -
This shot is slightly overhead, but if you notice, I did not show any rooms besides the bath. I went with an angle to include as much information as possible, without fishbowling as well. How I accomplished this is by going up and back as far as I could without leaving the room, using 'W and E'. Then, I angled the camera to the right. By using 'SHIFT D' I did not need to zoom out at all.
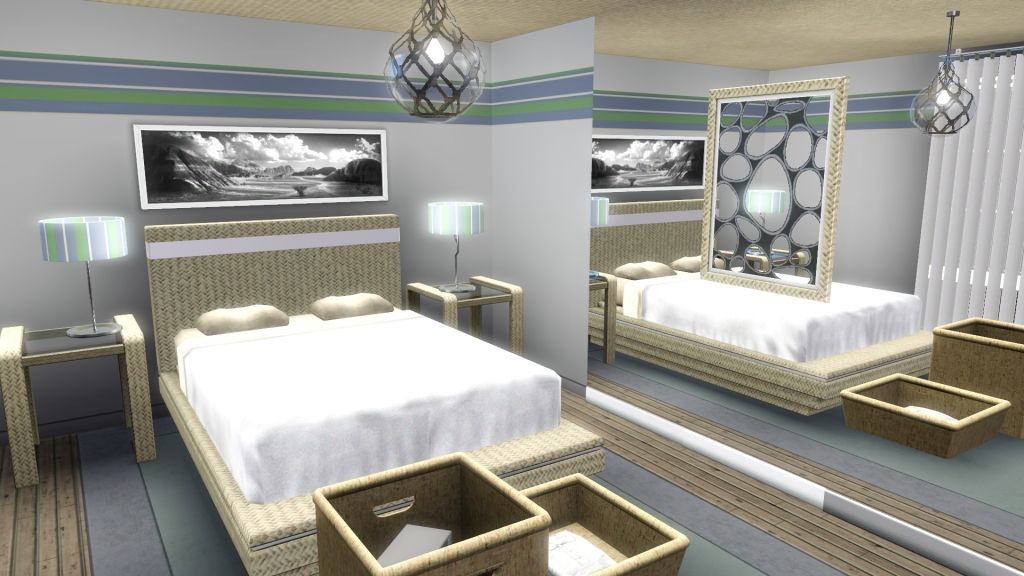
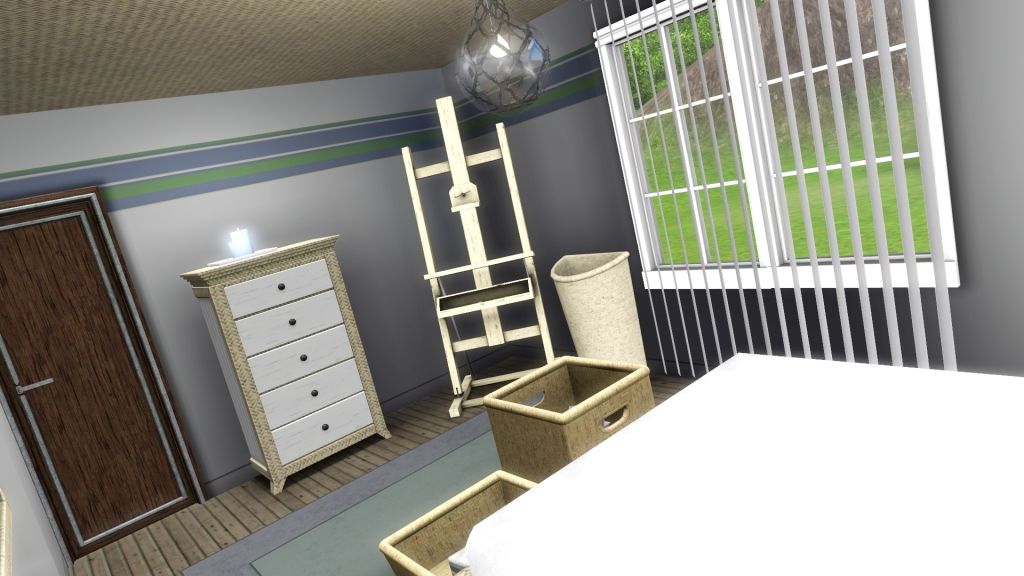
Bedroom -
Even though this is a small area, I decided to go with two photographs to properly document this space. Typically, most of my showcases have two pics per bedroom. For the first pic, I simply found the position I wanted by utilizing the 'W', 'A' and 'D' keys. I did zoom out a slight tad, just enough that my proportions are intact. Seeing as I have a wall with mirrors, I used that to my advantage to show the other side that the camera will not catch. Look for things like that within your own builds as well. Mirrors are always a great way to capture large amounts of information. In the second, I cut out a great space of the bed as it has already been seen in the previous. I included just enough to act as a place holder for the space. Also, I focused on the opposite side as I did in the previous pic and angled ever so slightly to create more interest.
Your Showcase Thread -
First and foremost, this is yours and you can do as you please. I've seen builders use the same threads, and others have a new thread for each build. What you do is entirely up to you. I like to keep it simple. My format is...
• Title
• Brief description of the build
• Four to Five pictures
• A link to a slideshow and/or Youtube video
• Last, the download link.
Honestly, I do not want to spend more than five minutes viewing at a time. Sometimes more is less. Other times, I do want to see more than a cover shot and links to other media, but like I said, it is individual preferences.
Wrapping it Up -
I hope you have enjoyed this guide and found some use for it. Quality pictures are not hard to do once you understand the steps. Plus they add so much more to your showcase. There are so many talented builders out there and I hope others will share their advice on this thread as well. If you have any questions, I will keep my eyes open. Feel free to ask, I will help how I can.
Imagination > Knowledge
1
Comments
Thanks Yanti!
--Wibble
Hope it helps and Thanks!
I put a ton of work into this. It hurts to see it fall to the waste side. If it helps one person, I will be happy.
Thanks so much!
Kirk
Thanks Walkingstick. It's not my favorite thing either, lol. And thanks for the compliment on the house!
I have been slaying demons in Diablo III for the last 2 months. Time just kind of got away from me <hangs his head in shame>. I am getting back into Victorian building again, and hope to have something up in a couple weeks. As for GW2, I had a hard time getting into it. I'll dip in and out from time to time to see if it "grabs me", but it seems so slow paced. I have missed everyone, however, and the demons may have to wait a bit as I'd like to get into building again.
Take care,
Kirk
I usually take about 100 pics, then slowly go through the ones I like but I tend to over share.
Thank you, again, for the tricks!
-Snow
I know I saw somewhere the code that removes the plumbob from the tester sims head. Anyone know what it is!
I am bookmarking this! Picture taking is always a bit of a chore for me!
Thank you very much!
Taryn
I used to do a lot of overhead shots for smaller rooms until I learned all the functions of camera man mode. I still don’t like taking pix, but I think mine have definitely improved since then. Lots of other very useful and practical tips here, too! Thank you for taking the time to do this, Kim.
Taryn, the code you’re looking for is hideHeadlineEffects [on/off]. If you’re like me and always forget it, lol, just type help in the cheat window. That’s one of the many codes that will pop up there for you.
Gallery Link
Sims 3 Studio
Hey Kirk! Glad you're building again. Wish you'd give GW2 another chance, maybe play with us a bit. We are all over Tyria raising havoc!
Hey Jessa, my Gemini twin! Taking pics can be a chore, I agree. Mostly because most of us are perfectionist and get frustrated when they don't come out just right, lol. Thanks so much!
Hi Snow! Wow! That is a LOT of pics! It's nice to see that you put so much work into showcasing. That says bunches.
Hi there, Taryn! I see Starguru answered your question. And that was an excellent question. I'm sorry I didn't include that. Thanks for bookmarking. So many people are saying that pics are a chore. *racks brain for way to maybe make it more fulfilling*
Hi Starguru! Thanks for quickly answering Taryn's question. And thank you so much for your comments!
Thank you!
Hello Corwim! Your post made me very happy to read.
I'm hosting a Secret Santa in GG and I was posting tips to help people out and one of the things I was posting about is taking better pictures and this is perfect. Thank you so much!!
Abandoned Kids Challenge and Toddler Mania Challenge stories are complete.
Most people do that within an editing program like Photoshop or Gimp. You can even do some in paint. Is that the answer to your question, or am I reading it wrong?
Thanks so much Rawr, Lily and Karen!
I do have one question.....is it possible to take 2 storey shots using cameraman mode? I've got a couple of 2 storey rooms using TheJim07's amazing Versailles Arches and really want to show them off!!