Its time for the final screenshot thread! Show us what ya got here!
Forum Announcement, Click Here to Read More From EA_Cade.
Tutorial: How To Turn An Image Into A Sticker Ready For CAP
 BlueMurder
Posts: 418 Member
BlueMurder
Posts: 418 Member
I have been asked many questions about using CAP and one that is often asked is how to make a sticker.
Before beginning there are two things essential that your image alteration programme can do, it must have a transparent option for a new file and it must have an option is save as for a PNG file type. Without those available this tutorial is useless to you. I am using photoshop elements 2.0! It's ancient but does everything I need it too. Gimp is a free image editing programme and will have the options needed but my photos for this tutorial are from my geriatric photoshop. Most image manupulation programmes will have similar if not identical tools which will allow you to follow this tutorial.
Click the tutorial images to see the full size version.
Step 1. Chose your image carefully, I suggest an easy, strong outlined one at first.
Open the image in your photo manipulation programme. <br> <br>Select the rectangular marquee tool and drag it over the whole of the image. Then press Ctrl C on your keyboard. this will copy the image.
Step 2.Now choose “new” from the file menu. The dimensions there are the size of the "copied" image. Make it larger by at least a hundred pixels each way so you have room to add or change things. You MUST choose “Transparent”. you can use grayscale or rgb colour from the options too.

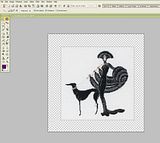
Step 3.Now press Ctrl V on your keyboard, this will paste it into the new file and it will be right in the centre. Close the original version. Now go to "view" and either choose fit on screen or zoom in so you have a large clear view to work with.
<br>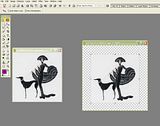 <br>
<br>
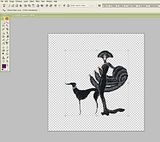
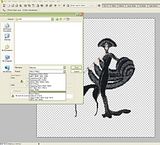
Step 4.Choose the magic wand tool

This tool selects an area of the same colour, the options tolerance, anti-aliased and contiguous are important! 100 tolerance is usually too high and will *** off far too much from the outline, it's a case of experimentation here! anti-aliased gives a sharper edge. This is needed with CAP as an imported sticker shape always has a dark outline effect so this does not look good if it has a fade out edge. Unselect contiguous and the tool will select all of the colour range chosen throughout the whole image. When contiguous is selected the magic wand will only highlight an area of colour that is all touching but you can hold down the shift key and click on the other areas you want.. you have more control this way. On this image I'd select the background and then the bits under the ladies arm and between the bands of black hanging from her arm, etc holding down the shift key the whole time. Now you can choose "cut" from the edit menu or press Ctrl x
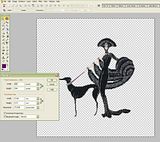
Step 5. Now tidy up the image, as you can see my image needed a new lead placed between the dog and lady. the magic wand tool is very easy but you can lose more than you want to.

You may want to experiment with the lasso tools! The polygonal lasso is far more time consuming but more precise if you have a good eye and a steady hand! There is also the magnetic lasso which is the squiggly looking icon on the right of the polygonal. Pull it along close to the edge and it will snap to it, hence the magnetic name.<br>You can use the eraser to get rid of any left over background and the clone tool can help you repair any areas that have been eaten into too much. You can also use the pipette to get the exact colour needed and then choose a brush and paint what you need back in.
There are a ton of things you can fiddle about with here to get your perfect image. play around, the undo button is your friend! lol!
Step 6. Now you have a finished image use the crop tool to take away some of that extra space you gave yourself. never crop too close or in CAP you will get horrid black lines showing that you won't be able to get rid off. cropping to a square is best, it makes lining up in CAP easier and you won’t distort the image by stretching it out wrong. CAP uses 256 x 256 images at most, however I leave my stickers at a large size and CAP will convert them to the right size as it imports. I’ve found it’s visually better quality this way.
Step 7. Time to save.. choose save as from the file menu.. name it (CAP will not accept anything that is over 23 characters long) You must save it as a PNG file as this will keep it as a stencil layer with no background. Now you have an stencil ready to be imported as a sticker in Create A Pattern.
Now all you have to do it open CAP and click the add new sticker button, choose your image and that's it ready to be used in pattern making.

Please bear in mind this is only how I do things, it may not be the right way or the best way but it’s my way. it works and I like it!
Feel free to ask any questions, make suggestions, etc.
I'd be happy to add a section about other aspects of using photoshop to prepare images if anyone is interested. how to make seamless backgrounds etc.
Thank you for taking the time to read this.
<a href="http://www.thesims3.com/mypage/BlueMurder">
My Page, come and say Hi!
</a>
if you would like to see my thousands of patterns please click here..
<a href="http://www.thesims3.com/mypage/BlueMurder/mystudio">
My Studio</a>
<a href="http://forum.thesims3.com/jforum/posts/list/433072.page#6320685">
My Easy View Pattern showcase, see all in on one page!</a>
<a href="http://forum.thesims3.com/jforum/posts/list/236007.page">Tutorial: How to share your patterns & How to get your patterns into your game</a>
Before beginning there are two things essential that your image alteration programme can do, it must have a transparent option for a new file and it must have an option is save as for a PNG file type. Without those available this tutorial is useless to you. I am using photoshop elements 2.0! It's ancient but does everything I need it too. Gimp is a free image editing programme and will have the options needed but my photos for this tutorial are from my geriatric photoshop. Most image manupulation programmes will have similar if not identical tools which will allow you to follow this tutorial.
Click the tutorial images to see the full size version.
Step 1. Chose your image carefully, I suggest an easy, strong outlined one at first.
Open the image in your photo manipulation programme. <br>
<br>Select the rectangular marquee tool and drag it over the whole of the image. Then press Ctrl C on your keyboard. this will copy the image.Step 2.Now choose “new” from the file menu. The dimensions there are the size of the "copied" image. Make it larger by at least a hundred pixels each way so you have room to add or change things. You MUST choose “Transparent”. you can use grayscale or rgb colour from the options too.

Step 3.Now press Ctrl V on your keyboard, this will paste it into the new file and it will be right in the centre. Close the original version. Now go to "view" and either choose fit on screen or zoom in so you have a large clear view to work with.
<br>
 <br>
<br>Step 4.Choose the magic wand tool
This tool selects an area of the same colour, the options tolerance, anti-aliased and contiguous are important! 100 tolerance is usually too high and will *** off far too much from the outline, it's a case of experimentation here! anti-aliased gives a sharper edge. This is needed with CAP as an imported sticker shape always has a dark outline effect so this does not look good if it has a fade out edge. Unselect contiguous and the tool will select all of the colour range chosen throughout the whole image. When contiguous is selected the magic wand will only highlight an area of colour that is all touching but you can hold down the shift key and click on the other areas you want.. you have more control this way. On this image I'd select the background and then the bits under the ladies arm and between the bands of black hanging from her arm, etc holding down the shift key the whole time. Now you can choose "cut" from the edit menu or press Ctrl x

Step 5. Now tidy up the image, as you can see my image needed a new lead placed between the dog and lady. the magic wand tool is very easy but you can lose more than you want to.
You may want to experiment with the lasso tools! The polygonal lasso is far more time consuming but more precise if you have a good eye and a steady hand! There is also the magnetic lasso which is the squiggly looking icon on the right of the polygonal. Pull it along close to the edge and it will snap to it, hence the magnetic name.<br>You can use the eraser to get rid of any left over background and the clone tool can help you repair any areas that have been eaten into too much. You can also use the pipette to get the exact colour needed and then choose a brush and paint what you need back in.
There are a ton of things you can fiddle about with here to get your perfect image. play around, the undo button is your friend! lol!

Step 6. Now you have a finished image use the crop tool to take away some of that extra space you gave yourself. never crop too close or in CAP you will get horrid black lines showing that you won't be able to get rid off. cropping to a square is best, it makes lining up in CAP easier and you won’t distort the image by stretching it out wrong. CAP uses 256 x 256 images at most, however I leave my stickers at a large size and CAP will convert them to the right size as it imports. I’ve found it’s visually better quality this way.

Step 7. Time to save.. choose save as from the file menu.. name it (CAP will not accept anything that is over 23 characters long) You must save it as a PNG file as this will keep it as a stencil layer with no background. Now you have an stencil ready to be imported as a sticker in Create A Pattern.

Now all you have to do it open CAP and click the add new sticker button, choose your image and that's it ready to be used in pattern making.
Please bear in mind this is only how I do things, it may not be the right way or the best way but it’s my way. it works and I like it!
Feel free to ask any questions, make suggestions, etc.
I'd be happy to add a section about other aspects of using photoshop to prepare images if anyone is interested. how to make seamless backgrounds etc.
Thank you for taking the time to read this.
<a href="http://www.thesims3.com/mypage/BlueMurder">
My Page, come and say Hi!
</a>
if you would like to see my thousands of patterns please click here..
<a href="http://www.thesims3.com/mypage/BlueMurder/mystudio">
My Studio</a>
<a href="http://forum.thesims3.com/jforum/posts/list/433072.page#6320685">
My Easy View Pattern showcase, see all in on one page!</a>
<a href="http://forum.thesims3.com/jforum/posts/list/236007.page">Tutorial: How to share your patterns & How to get your patterns into your game</a>
Post edited by EA_Solaire on
0
Comments
Send me a friend request for Simport
Oh, question: what size pixel square do you suggest saving .png as? How much larger than 256 do you go?