Forum Announcement, Click Here to Read More From EA_Cade.
How to Build 2-D and 3-D Platform Tombs
 bunbunnyny
Posts: 3,678 Member
bunbunnyny
Posts: 3,678 Member
This tutorial will teach you how to create a tomb with a 2-D view. This style of tomb-making is somewhat similar to a retro 2-D platformer game, such as the original Mario Bros. or Donkey Kong!
Read the second post to learn how to build a 2-D Platform tomb inside of a tomb instead of on an open wall.
Read the third post to learn how to build a 3-D Platform tomb inside of a tomb instead of on an open wall, or outside of a tomb on an open wall.
Read the fourth post for tips on filling your tomb with triggers and traps inside of any type of 2-D Tomb!
Here's what you will need:
•The Sims 3: World Adventures Expansion Pack
•The [testingcheatsenabled true] cheat activated
•The [restrictbuildbuyinbuildings off] cheat activated
•The [buydebug on] cheat activated
•Within the Options menu, the option [Enable Object Hiding] MUST be OFF!
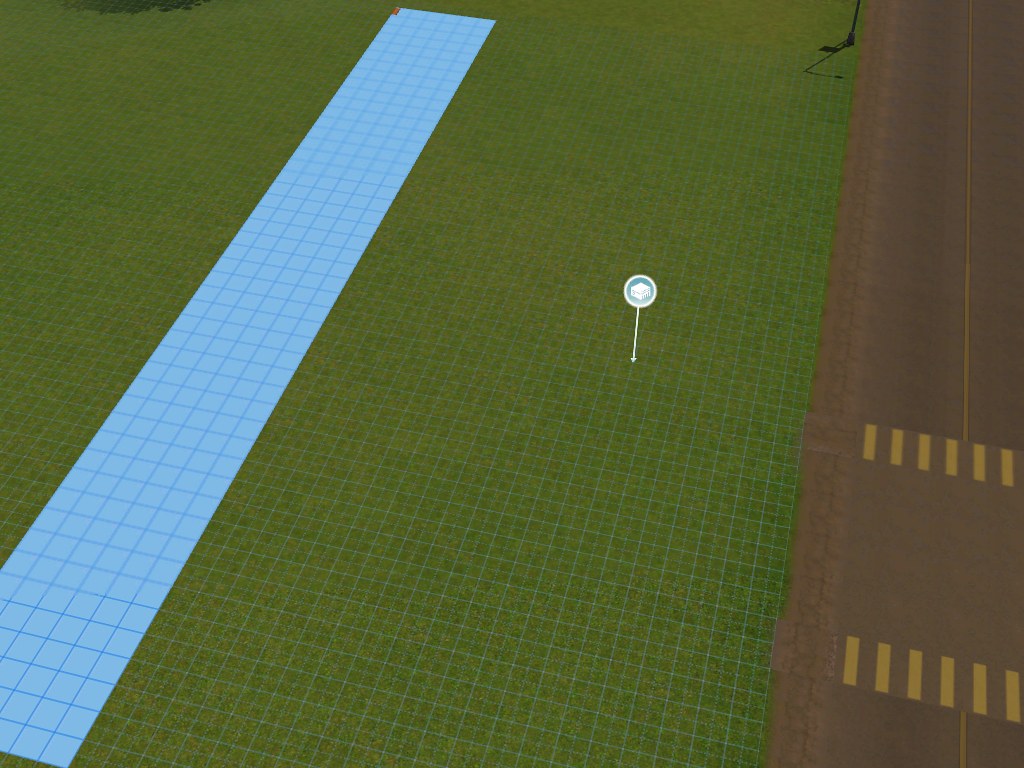
1) You'll first need to create a narrow underground "tunnel" of about 9 tiles wide, any length sideways, and any depth of floors that you want. But keep in mind these things while you create! They are EXTREMELY important:

- Be sure that you place the long end of the tomb somewhere that is far away enough from the edge of the lot that the camera won't be blocked from being able to view the top floor to the bottom floor that you're using with ease!
- Make sure that there is nothing important in another room of the tomb on the same floors that you are using for the 2-D tomb! Elevator shafts and stairs will work fine, if they completely skip that floor and move on down below or above. It is perfectly acceptable if there is more rooms of the tomb behind the top level of the 2-D tomb, but they MUST be behind it.
- Make sure that there are no tomb rooms which will obstruct the view of the 2-D tomb as you are going down! Even when still fogged out, tomb rooms can obstruct the view of whatever is behind them.
2) Once you have made your 2-D tomb, (make sure it's at least 9+ tiles wide, although if you want less have at least 6) take out the Create Pool tool.
Go to the 2nd to last floor of the 2-D tomb at the bottom, and hold Ctrl and delete the entire section of the long side of the tomb, making sure it's at least 3 tiles wide and running the whole length of the tomb.

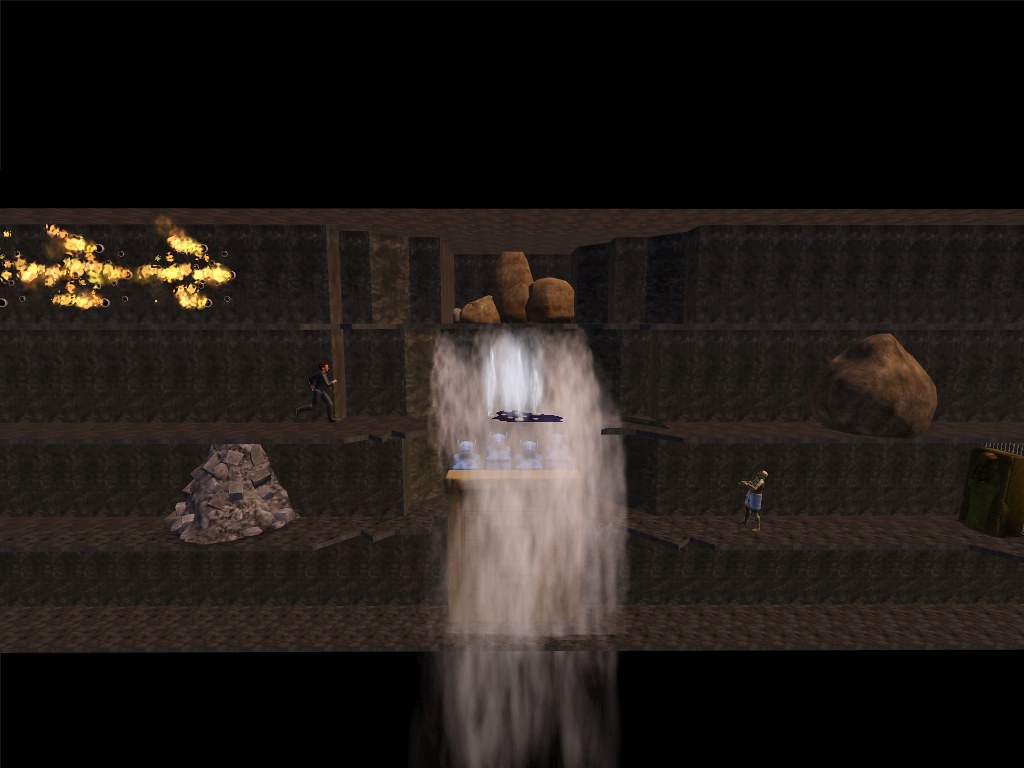
(NOTE: I've colored the walls and floors of the tomb to help you keep track of what you're looking at.)
3) Create an entrance to the 2-D tomb. Whether it's a doorway from behind or a staircase, for now, ALL entrances MUST be entering the top floor of the tomb!

I've attempted to make the staircase above look as if your Sims were climbing up and down a rope ladder from a perspective similar to that of a retro platformer game!
4) Wall-out all of the back areas of every level, so that only about 2 tiles remain on the edge of the tomb. You may make the walls curve in and out as you please, but leave at least 1 tile between each wall and the back of the tomb. If necessary, you can build more basement to deepen the width of areas that you want larger.
Additionally, if you want to "break" apart the floor (using [Ctrl+F] may be helpful), go on ahead!
Please remember that the larger the width of each level, the more difficult it will be for the player to view the tomb as they play through.

5) Go into the [Debug] section, and place a Level Skip Marker on every floor of the 2-D tomb except the top floor.
6) If you want a Final Tomb Room Marker to mark you reaching the end of the tomb, you'll need to do this step. If you do not care for this, skip to step #7).
This step is really simple to set up a Final Tomb Room, simply create a room running 1 tile long by the whole width of the area of the tomb that you wish it to be in, and place 2 doors or arches on both sides of the room!
Place a Tomb Marker down in it, and set it to be a Final Tomb Room Marker to whatever you want.
Make sure that the side of this room on the open edge of the 2-D tomb is walled off from the player!

7) Now, here comes the trickiest part of the tomb. Hopefully, as was instructed, there is at least 1 tile of nothing behind every level of the tomb. You're going to put in the Tomb Markers for these rooms, which is very tricky to set up without messing up the game!
First, place them down on every floor in the walled-out rooms wherever you'd like.
[Ctrl+Shift+Click] every Tomb Marker, and select:
[create the ability to add triggers and activated behaviors].
Once you have done this, place down a Hidden Switch panel in front of the entrance of the 2-D tomb, and link it to every Tomb Marker so that they all unfog when you activate the Hidden Switch panel.
Test this out and make sure that everything works fine! Make sure that your Sim enters the tomb correctly, and that you can follow them inside the tomb. If you cannot get it to work, wall off the entrance of the tomb, and place a door or archway to the main tomb area. Make sure that there is a Tomb Marker in this walled-off area!

8) Now, it is time for you to place a Tomb Marker for the 2-D tomb itself! ONLY PLACE 1 TOMB MARKER! It doesn't matter which floor that it is on, but place the Tomb Marker in the playing area anywhere ONLY ONCE!

If you have walled-off the entrance to the tomb in step #7), then you may need to do an extra step. If you did not wall-off the entrance, or if the entrance from the walled-off area to the 2-D tomb is an archway, then you are done! If the entrance is a doorway, you must do the following real quick:
[Ctrl+Shift+Click] the Hidden Trigger Panel that you placed in the last step, and link it up to [Unfog] the Tomb Marker for the 2-D tomb playing area.
And you've completed your basic 2-D tomb! However, if you'd like to read some very helpful steps to filling your 2-D tomb up with triggers traps, please read Post #4.
For advanced tomb-makers, you can try to create a 2-D Platform tomb in Post #2, or even a 3-D Platform tomb in Post #3 inside of the tomb as opposed to the outside of the edge of the lot!
Read the second post to learn how to build a 2-D Platform tomb inside of a tomb instead of on an open wall.
Read the third post to learn how to build a 3-D Platform tomb inside of a tomb instead of on an open wall, or outside of a tomb on an open wall.
Read the fourth post for tips on filling your tomb with triggers and traps inside of any type of 2-D Tomb!
Here's what you will need:
•The Sims 3: World Adventures Expansion Pack
•The [testingcheatsenabled true] cheat activated
•The [restrictbuildbuyinbuildings off] cheat activated
•The [buydebug on] cheat activated
•Within the Options menu, the option [Enable Object Hiding] MUST be OFF!
1) You'll first need to create a narrow underground "tunnel" of about 9 tiles wide, any length sideways, and any depth of floors that you want. But keep in mind these things while you create! They are EXTREMELY important:
- Be sure that you place the long end of the tomb somewhere that is far away enough from the edge of the lot that the camera won't be blocked from being able to view the top floor to the bottom floor that you're using with ease!
- Make sure that there is nothing important in another room of the tomb on the same floors that you are using for the 2-D tomb! Elevator shafts and stairs will work fine, if they completely skip that floor and move on down below or above. It is perfectly acceptable if there is more rooms of the tomb behind the top level of the 2-D tomb, but they MUST be behind it.
- Make sure that there are no tomb rooms which will obstruct the view of the 2-D tomb as you are going down! Even when still fogged out, tomb rooms can obstruct the view of whatever is behind them.
2) Once you have made your 2-D tomb, (make sure it's at least 9+ tiles wide, although if you want less have at least 6) take out the Create Pool tool.
Go to the 2nd to last floor of the 2-D tomb at the bottom, and hold Ctrl and delete the entire section of the long side of the tomb, making sure it's at least 3 tiles wide and running the whole length of the tomb.
(NOTE: I've colored the walls and floors of the tomb to help you keep track of what you're looking at.)
3) Create an entrance to the 2-D tomb. Whether it's a doorway from behind or a staircase, for now, ALL entrances MUST be entering the top floor of the tomb!
I've attempted to make the staircase above look as if your Sims were climbing up and down a rope ladder from a perspective similar to that of a retro platformer game!
4) Wall-out all of the back areas of every level, so that only about 2 tiles remain on the edge of the tomb. You may make the walls curve in and out as you please, but leave at least 1 tile between each wall and the back of the tomb. If necessary, you can build more basement to deepen the width of areas that you want larger.
Additionally, if you want to "break" apart the floor (using [Ctrl+F] may be helpful), go on ahead!
Please remember that the larger the width of each level, the more difficult it will be for the player to view the tomb as they play through.
5) Go into the [Debug] section, and place a Level Skip Marker on every floor of the 2-D tomb except the top floor.
6) If you want a Final Tomb Room Marker to mark you reaching the end of the tomb, you'll need to do this step. If you do not care for this, skip to step #7).
This step is really simple to set up a Final Tomb Room, simply create a room running 1 tile long by the whole width of the area of the tomb that you wish it to be in, and place 2 doors or arches on both sides of the room!
Place a Tomb Marker down in it, and set it to be a Final Tomb Room Marker to whatever you want.
Make sure that the side of this room on the open edge of the 2-D tomb is walled off from the player!
7) Now, here comes the trickiest part of the tomb. Hopefully, as was instructed, there is at least 1 tile of nothing behind every level of the tomb. You're going to put in the Tomb Markers for these rooms, which is very tricky to set up without messing up the game!
First, place them down on every floor in the walled-out rooms wherever you'd like.
[Ctrl+Shift+Click] every Tomb Marker, and select:
[create the ability to add triggers and activated behaviors].
Once you have done this, place down a Hidden Switch panel in front of the entrance of the 2-D tomb, and link it to every Tomb Marker so that they all unfog when you activate the Hidden Switch panel.
Test this out and make sure that everything works fine! Make sure that your Sim enters the tomb correctly, and that you can follow them inside the tomb. If you cannot get it to work, wall off the entrance of the tomb, and place a door or archway to the main tomb area. Make sure that there is a Tomb Marker in this walled-off area!
8) Now, it is time for you to place a Tomb Marker for the 2-D tomb itself! ONLY PLACE 1 TOMB MARKER! It doesn't matter which floor that it is on, but place the Tomb Marker in the playing area anywhere ONLY ONCE!
If you have walled-off the entrance to the tomb in step #7), then you may need to do an extra step. If you did not wall-off the entrance, or if the entrance from the walled-off area to the 2-D tomb is an archway, then you are done! If the entrance is a doorway, you must do the following real quick:
[Ctrl+Shift+Click] the Hidden Trigger Panel that you placed in the last step, and link it up to [Unfog] the Tomb Marker for the 2-D tomb playing area.
And you've completed your basic 2-D tomb! However, if you'd like to read some very helpful steps to filling your 2-D tomb up with triggers traps, please read Post #4.
For advanced tomb-makers, you can try to create a 2-D Platform tomb in Post #2, or even a 3-D Platform tomb in Post #3 inside of the tomb as opposed to the outside of the edge of the lot!
Post edited by EA_Solaire on
0
Comments
But later, maybe.
1) Placing Sarcophagi
This step will teach you about the Sarcophagus. Placing these isn't exactly an easy feat while trying to provide enough space for your tomb to look good.
Method 1) shown above.
1A) Although it's not necessarily the most space-favorable way to have a Sarcophagus, you can simply place the Sarcophagus against the wall. Although it doesn't save space, this set-up looks more like a retro platformer than the other methods.
1B) One alternative way to place a Sarcophagus is to simply place it in a "dent" in the back wall, where the Sarcophagus won't be reaching all the way out to the edge of the 2-D tomb. This method is still similar to the 1st method, although the effect may not appear the same as an indent may ruin the feel of a retro platformer style, but it is still more organized-looking and space-saving.
1C) This method may ruin the feeling of a platformer the most, but it is somewhat neat! If the tomb was constructed correctly, 3 tile widths of space were deleted to open up the side of the tomb. This is to allow placement of "props" and additional floor tiles outside of the tomb in case they are needed.
In the pictures shown, a small line on the edge of each floor may be noticed. This was made so the real edge of the 2-D tomb may be recognized.
Place floor tiles outside of the 2-D tomb, as displayed in the photo, to allow space for the Sarcophagus to be rotated.
2) Secret Rooms
These steps will teach methods of creating secret rooms!
This previously shown image displays the use of Method 2A).
2A) This method is the simplest method. It may not always look that great, but in certain setups, the results can be amazing! It is also the most effective method.
First, move back the total with of the tomb in the area that you want to place the secret. Place a Secret Door in front of the secret area. No walls are required, but if you wish to, use the techniques of Method 2B) to create the secrets so that the player can reach them.
2B) This method of making secret rooms is a bit more "innovative," in a sense, but not as sneaky as Method 2A).
Create a room 2 tiles wide behind the wall of the main platform area. This will be your secret room. Place several archways along the secret room, connecting the secret room to the main tomb. [Ctrl+Shift+Click] all of the archways, and lock them all, unless you want the secret room to already be available without having to unlock it. Then, either place a Secret Door, a normal door, or another archway on the end, but don't lock it.
This works in that as you're playing through the tomb, you can click on the inside of the room through the archway as if you were playing through the wall, while still not being able to walk through into the room from just anywhere!
But remember, don't choose an archway that is so low that you can't see the wall if you decide to place items such as Hidden Levers or Wall Holes inside the secret room!
Now, if you want to lock it and make it unlockable by something else, go ahead!
Here's a very helpful tip for doing this so it looks good: For the most part, most archways have a matching doorway; meaning that for almost every archway, there is a doorway that can fit into that archway's hole. If you want to make it look somewhat realistic, try using the archways to show the inside of the room and the doorway entering the room so that it appears as if the archways are just like the doors or part of the wall, but the door is cut away just like you can do with the walls!
If you want to "hide" this area a little more, first, make sure no lights are shining through the archways from the main tomb. Then, whatever your light source is, get out 2 of them for every 1 light. [Ctrl+Shift+Click] the first light, and set a Custom Intensity to something very, very low. Something invisibly dark is good, but make sure that the light is on! For extra measures, I entered {0.00001} to make sure that it was super low! Entering {0.2} is still too high!
Place the first light down on top of where you want it to go. For the second light, turn it off, but have it linked up with a Hidden Trigger floor panel right behind the entrance to the Secret Room or something else, so that when your Sim enters the room, the second light turns on, and the first light turns off. The second light can be of any intensity that you want it to be. Once you've done this, place the second light exactly on top of the first light.