Forum Announcement, Click Here to Read More From EA_Cade.
A New Hair Tutorial - by HarryWasHere
 HARRYwasHERE
Posts: 3,298 Member
HARRYwasHERE
Posts: 3,298 Member
WARNING! This is a long read (sorry about that), to fully understand it you should read it all since it is quite complicated without full understanding of what you are doing!
Hi guys! Here is a tutorial that is going to show you how to draw hair using photoshop. This tutorial will take the idea of my last one, but instead this time we will be using the pen tool to try and get a cleaner result, and yes that means no tablets needed!")
Before we start I want to apologize for my terrible ability to explain things, so if there are any questions ask below.
What you need:
• Photoshop
• A basic understanding of photoshop
• A bald headshot of your sim
• Knowledge of how to use the pen tool
• The brush I made
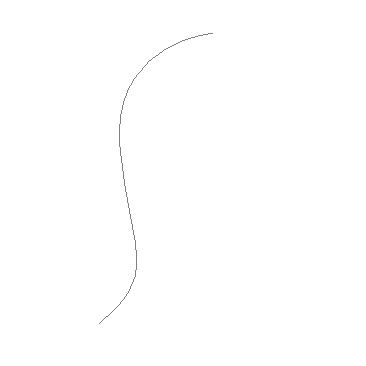
1. First of all before we do anything you need to know how to use the pen tool so watch this video and practice by yourself to see how it works
 http://www.youtube.com/watch?v=IDrtyNmp3A4
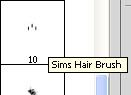
2. Next you need to download this brush and install it into photoshop using these instructions. You will then find the brush in the brush menu, and it will look like the image below.
Here is the brush download: http://www.mediafire.com/?mh06ds621cp3oid
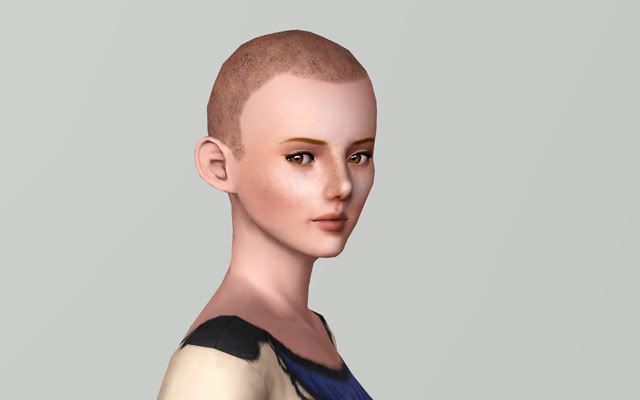
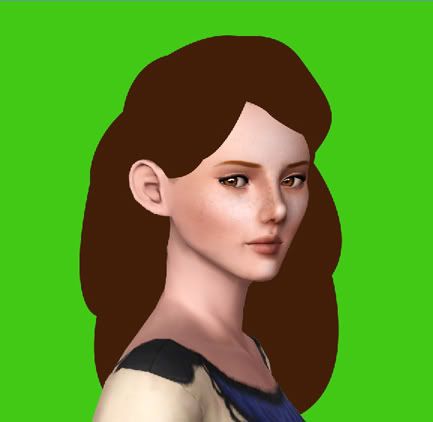
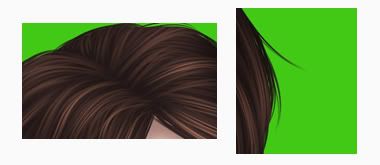
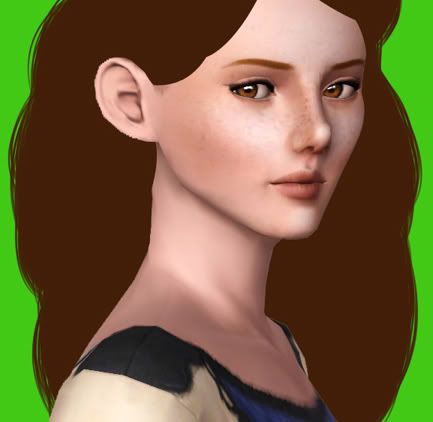
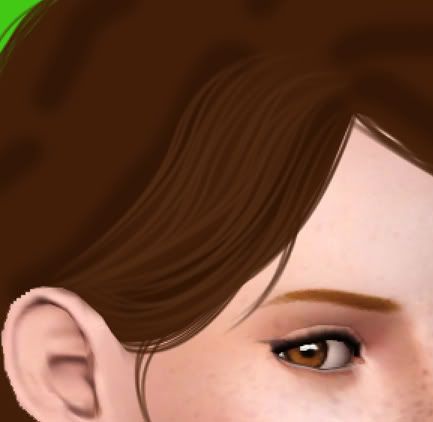
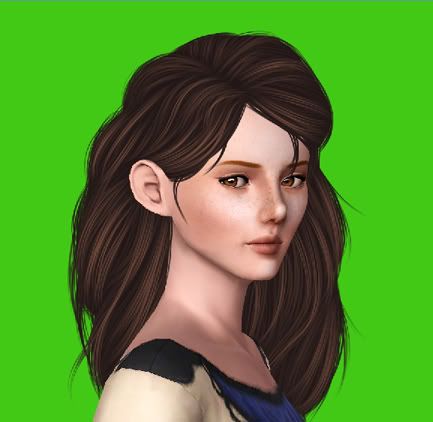
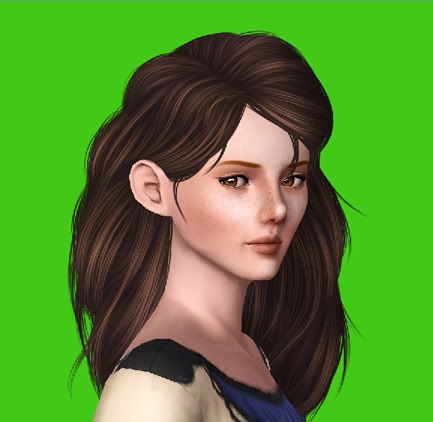
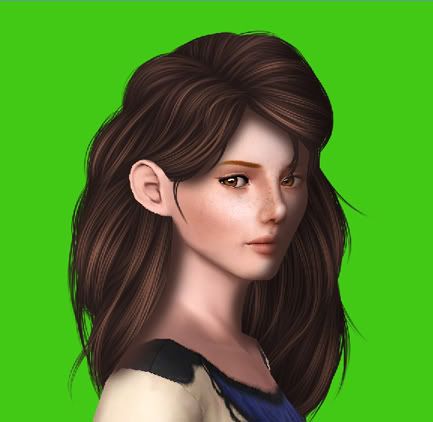
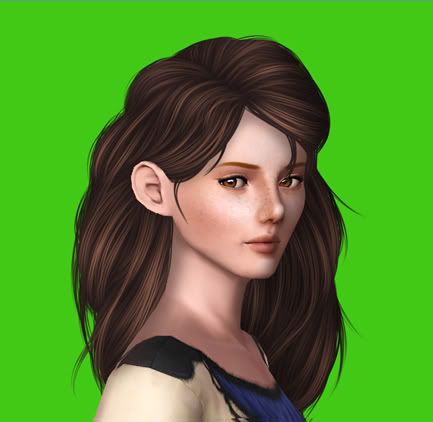
3. Next you need an in-game screenshot to work with. I’m going to be using the one below (you guys are free to use it for practice). As you can see I have used the bald haircut, this means it will be easy to work with and will let me do any style I wish to do. I have also used a dark brown colour, and this is because it is easier to see where the hairline is so you can get a much more realistic result.
(click for full size)
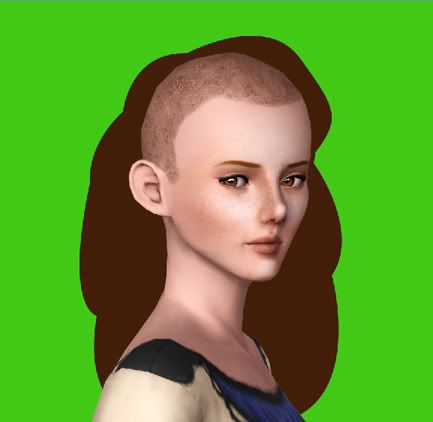
4. To start off we are going to cut out the sim from the background, there are many methods for this. I have seen many people using Rexy’s method using a green screen. However since this is a bald shot with a clear white background you can easily use the magic wand tool and select the white areas and cut out your sim.
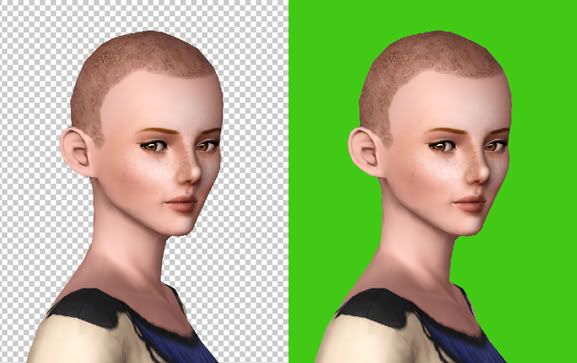
(I have added green layer as a background so that I can clearly see what I am doing with the hair)
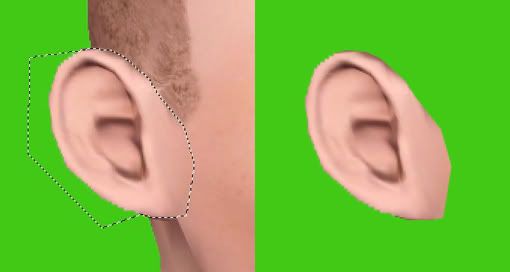
5. This next step depends on the hair style. I often like to show one ear in the hairstyles I create, so to make sure no hair goes on top of the ear I usually copy and paste the ear so it is on a separate layer
6. In this next step we are going to get a base shape for the hair. I am going to mess around with the brush tool to get a basic shape that I like, and when I am happy I will use the pen tool and select this shape and fill it in on a new layer to clean it up (to fill in a shape, right click and select 'fill path'), I will then delete the messy brush layer.
I am hoping to create a brunette coloured hair so for the base colour I have gone for this colour

Here is the shape I have gone for:
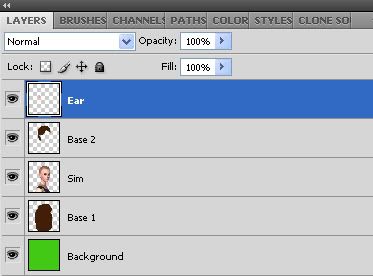
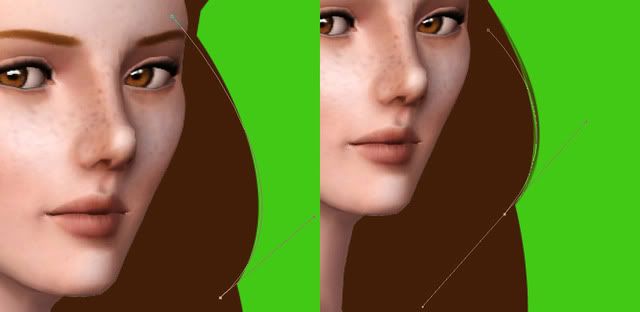
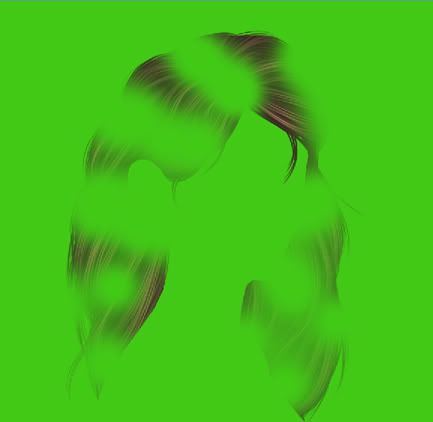
In this step there is a great advantage to having the sim cut out onto a layer of its own. This makes the line between the body, chin, cheeks really neat. What I did was create a layer below and above the sim.
On the layer below the sim we are going to create a shape that is the outline of the hair, for example:
For the layer above the sim we are going to create the shape of the hair that will cover the head, for example:
And with all the layers turned on, it looks like this:
And here is a screenshot of the layers box to see how I have set it out
7. Before we go onto the next step I’m going to show you how to use the brush that I have created and the ways it can be used to make different effects, so first start by selecting the brush you have just downloaded and then select the pen tool.
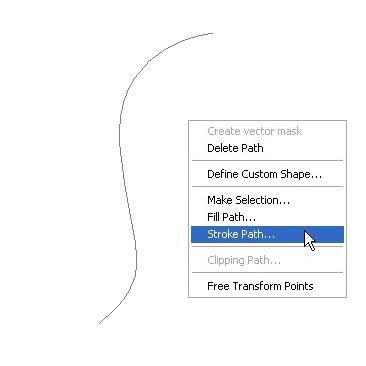
In this tutorial we are going to be making a lot of strokes, and this can be done by first creating the shape of the strand you want (you should know how to do this using the video)
Then when the shape has been created you are going to right click and select ‘Stroke Path’
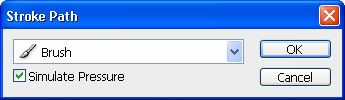
Next an option box will open, make sure ‘brush’ is showing in the drop down menu and then make sure the ‘simulate pressure’ box is checked
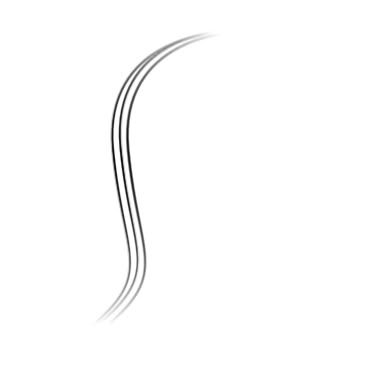
After this is done you should get something like this:
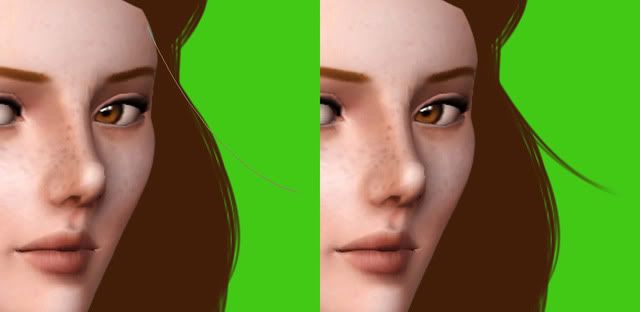
Here is a picture showing you what changing the angle can do (The option to change the angle can be found by going to ‘Window, brushes, brush tip shape’)
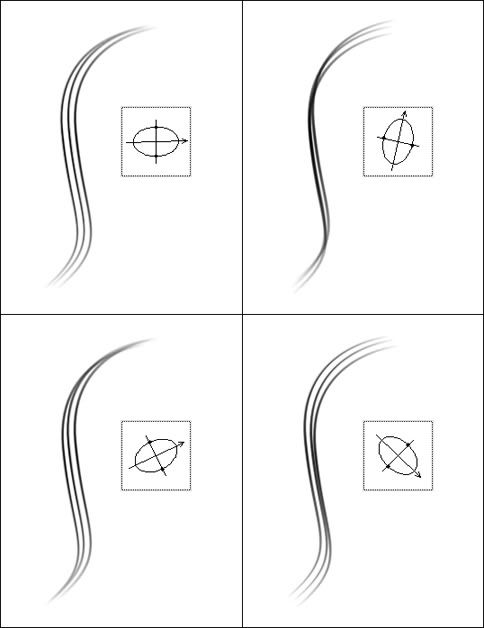
When you apply this to your hair you should change the angle often so you add variety to the texture.
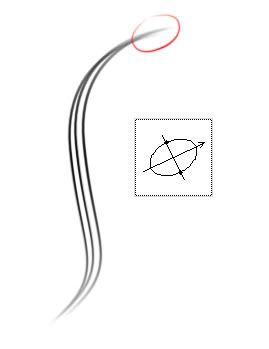
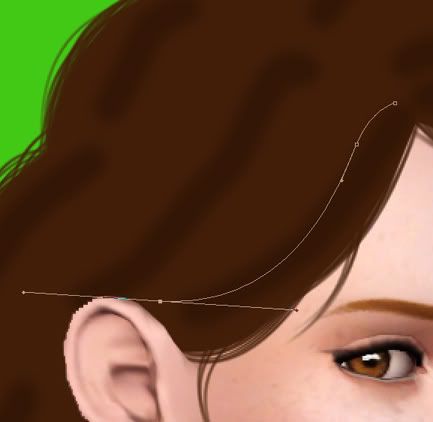
However when you create strands in places such as the hairline, or where the hair ends etc.
Make sure the angle is always in a position so that the strands end in a point, this will make it much more realistic. For example:
(Note: there is no specific size you should use for the brush since it depends on the picture size, just keep messing around until you get a size that looks right)
8. Now we are going to start by giving the base a much more realistic edge. This is done by using the method in the previous step.
Start off by creating a layer on top of the layer I called ‘Base 1’ (shown above) since we will be working on the outside of the hair first. It is on a new layer so if any mistakes are made it can easily be changed or deleted without ruining any previous work. You also need to use the same colour as the base so that it mixes in with the rest of the hair.
You need to create stokes in a position like this:
Once this has been done all around the hair it should look a little like this
(Note: you should keep doing this until you can no longer see the sharp edge of the base shape, if it helps you can duplicate the layer so it becomes thicker, you may need to do multiple strokes in one area to get a realistic effect)
Make sure you also add some free strands of hair like this so it looks like it flows more, and looks less frizzy
Once you have done this around the whole hair it should look like this

Remember to end the lose hairs in a point!
(Note: The hair should look more lose and spread out near the end than on top so it looks more realistic as it follows the laws of gravity, notice how I haven’t done this effect too much to the top of the hair)
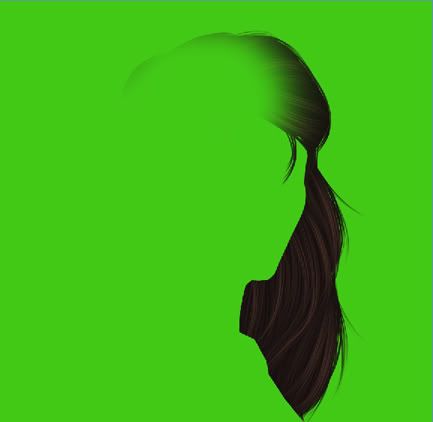
Once you are happy merge down this layer onto ‘Base 1’ so it all becomes one layer. This can be done by selecting ‘layer/ merge down’
9. Now we are going to repeat the process from the previous step except this time its going to be for the layer above the face which I called ‘Base 2’ (shown above). Once this has been completed it should look like this:
(Note: If you are using the ear on an extra layer make sure the strands falling from the hair don’t interfere with the outline of the ear layer so they don’t just randomly disappear. To make it easier you might want to rub out part of the ear so that you have more space on the face to add falling hair strands)
10. Now we have the shape ready we are going to work on the texture of the hair
You need to create a layer on top of the other layers and you are going to select a colour that is darker than the base colour. You are going to then draw lines to show how the hair is going to flow, these are going to be guidelines for when you create the strands.This layer will be deleted later since it creates too much contrast.
It should look like this:

11. Create a new layer on top of the previous one, and then select a colour that is lighter than the colour for the base.
We are then going to create strands like in the previous steps
Repeat this again and again, it is best to work in clumps to help with the flow, for example:
At this point it doesn't matter if some of the strands go onto the sims face from the areas like the cheek, since this will be solved in step 14
I can’t really help you too much in this step since it really depends on what you think looks right. Just remember to follow the guidelines and keep changing the angle of the brush so you create a variety in the texture. (Note: at the hair parting you should make sure the strands end in a point)
Most important thing to remember at this point is to be patient! Yes this is going to be time consuming, but if you take care you will get great results. It will show if you tried to rush it.
Once you have covered the whole hair area it should look a bit like this
Next I’m deleting guidelines layer to get rid of the contrast

12. This step is almost exactly the same as the previous one however the changes involve a lighter colour, and making sure it is less concentrated as the last one (it doesn’t cover as much space as the previous layer)
Here is an example of what I am talking about

Here is the layer on its own to show it is covering less space
And here is what it looks like over the whole hair

13. Now we are going to repeat the last step again except now with an even lighter colour and even less space. Once this is done it should look like this
By building up the layers we are creating more depth
14. In this step we are going to try and get the hair onto just one layer so we can easily edit it.
To get the hair onto one layer you need to follow my instructions exactly! You also need to have the layer window open for this to work (Window, layers)
1. Holding ‘Shift’ select every layer (excluding the green background sim and ear layers)
2. Once all the layers are selected go to ‘Layer/ duplicate layers’
3. Then go to ‘Layer/ merge layers’
4. This will create a new layer, name it ‘final hair’
5. Hold down ‘ctrl’
6. Click on the thumbnail of the lower base layer (Base 1) behind the sim
7. Then hold down ‘ctrl’ and ‘alt’
8. Click on the thumbnail of the sim layer (and ear layer if used)
9. Then hold down ‘shift’ and ‘ctrl’
10. Click on the thumbnail of base layer above the sim (Base 2)
(This should make a selection of the hair you want to keep)
11. Now with the ‘final hair’ layer selected click the mask button at the bottom of the layers window
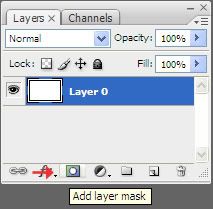
12. Hide all the previous layers so that these are the only layers that can be seen: The green background layer, the sim layer (ear layer if used), the ‘final hair’ layer
Now this has been done you should be able to edit the hair easily
13. If you see any green gaps between the sim and the hair select a dark colour and fill in those gaps in a layer behind the sim layer
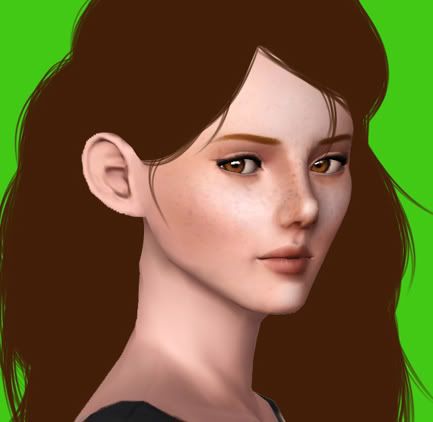
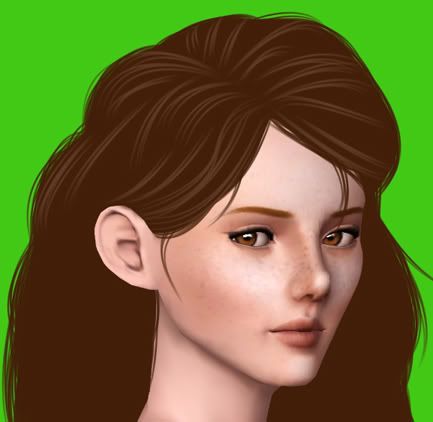
15. This step is optional. I am usually never happy with the colour of the hair so to change it I go to ‘Image/ adjustments’ and use both ‘Hue/ Saturation’ and ‘Colour balance’
Here is what it looks like afterwards
16. In this step we will be adding the shadows and highlights to the hair. Usually I would use the dodge and burn tool, but for this tutorial it makes the colours look weird, so instead I have decided to use a different method:
1. I duplicate the hair layer two times so there are three versions of the hair layer
2. Then with one of the hair layers I go to ‘Image/ adjustments/ ‘brightness/contrast’ and make this layer lighter
3. I then chose another layer and follow the previous step, except this time I make it darker
4. Next on each layer I rub out the areas so that light is only applied where I think it should be, and so that darkness is applied where I think it should be
Here is what the layers look like:
Light:
Dark:
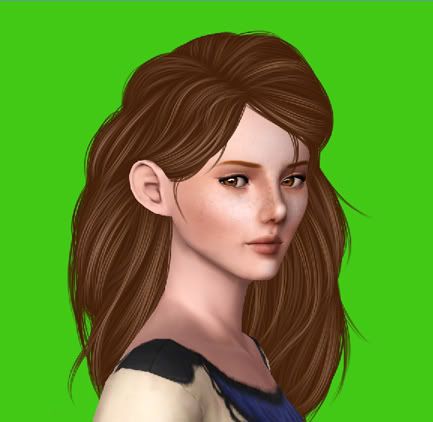
With all the hair layers merged together it looks like this:
17. This step will add a last bit of realism as we are going to try and add shadow to the sim
I have chosen this colour

Using the brush tool on a new layer between the hair and sim layer draw where you think shadows would be on the sim using the colour shown above.
For example:
Then lower the opacity of the shadow so it looks realistic
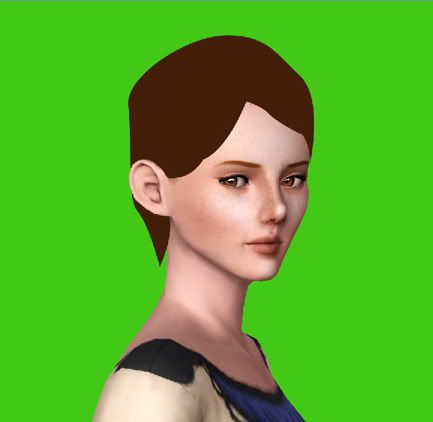
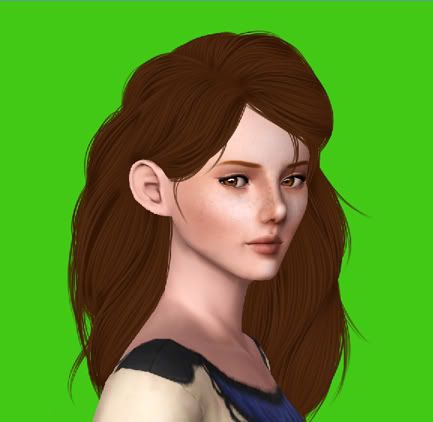
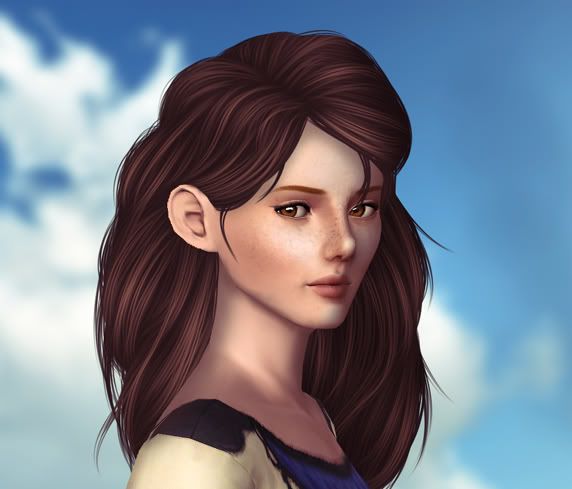
18. In this last step do whatever you want to finish your picture. In my picture I added a background and added a faint filter to get this final result.
I really hope you found this tutorial helpful, I understand it is long and complicated which is why you are free to ask me any questions, and please do show me what you guys can do
Good luck with your pictures!
*! If the Brush does not work or cannot be used in photoshop!*
I cannot guarantee this will work depending on what version of photoshop you have, but I can help you make the brush yourself.
1. Firstly load this image into photoshop

2. Select the whole image (this can be done by holding down 'ctrl' and 'a')
3. Follow step 6 of these instructions (Ignore the beginning bit)
4. Finally whenever you use the brush make sure that 'spacing' is at 1% (this option can be found by going to Window/ Brushes/ Brush Tip Shape, and it will be found at the bottom of the brush window)
!Please Do NOT Quote This Post!
Hi guys! Here is a tutorial that is going to show you how to draw hair using photoshop. This tutorial will take the idea of my last one, but instead this time we will be using the pen tool to try and get a cleaner result, and yes that means no tablets needed!
Before we start I want to apologize for my terrible ability to explain things, so if there are any questions ask below.
What you need:
• Photoshop
• A basic understanding of photoshop
• A bald headshot of your sim
• Knowledge of how to use the pen tool
• The brush I made
1. First of all before we do anything you need to know how to use the pen tool so watch this video and practice by yourself to see how it works
http://www.youtube.com/watch?v=IDrtyNmp3A42. Next you need to download this brush and install it into photoshop using these instructions. You will then find the brush in the brush menu, and it will look like the image below.
Here is the brush download: http://www.mediafire.com/?mh06ds621cp3oid
3. Next you need an in-game screenshot to work with. I’m going to be using the one below (you guys are free to use it for practice). As you can see I have used the bald haircut, this means it will be easy to work with and will let me do any style I wish to do. I have also used a dark brown colour, and this is because it is easier to see where the hairline is so you can get a much more realistic result.

(click for full size)
4. To start off we are going to cut out the sim from the background, there are many methods for this. I have seen many people using Rexy’s method using a green screen. However since this is a bald shot with a clear white background you can easily use the magic wand tool and select the white areas and cut out your sim.
(I have added green layer as a background so that I can clearly see what I am doing with the hair)
5. This next step depends on the hair style. I often like to show one ear in the hairstyles I create, so to make sure no hair goes on top of the ear I usually copy and paste the ear so it is on a separate layer
6. In this next step we are going to get a base shape for the hair. I am going to mess around with the brush tool to get a basic shape that I like, and when I am happy I will use the pen tool and select this shape and fill it in on a new layer to clean it up (to fill in a shape, right click and select 'fill path'), I will then delete the messy brush layer.
I am hoping to create a brunette coloured hair so for the base colour I have gone for this colour
Here is the shape I have gone for:
In this step there is a great advantage to having the sim cut out onto a layer of its own. This makes the line between the body, chin, cheeks really neat. What I did was create a layer below and above the sim.
On the layer below the sim we are going to create a shape that is the outline of the hair, for example:
For the layer above the sim we are going to create the shape of the hair that will cover the head, for example:
And with all the layers turned on, it looks like this:
And here is a screenshot of the layers box to see how I have set it out
7. Before we go onto the next step I’m going to show you how to use the brush that I have created and the ways it can be used to make different effects, so first start by selecting the brush you have just downloaded and then select the pen tool.
In this tutorial we are going to be making a lot of strokes, and this can be done by first creating the shape of the strand you want (you should know how to do this using the video)
Then when the shape has been created you are going to right click and select ‘Stroke Path’
Next an option box will open, make sure ‘brush’ is showing in the drop down menu and then make sure the ‘simulate pressure’ box is checked
After this is done you should get something like this:
Here is a picture showing you what changing the angle can do (The option to change the angle can be found by going to ‘Window, brushes, brush tip shape’)
When you apply this to your hair you should change the angle often so you add variety to the texture.
However when you create strands in places such as the hairline, or where the hair ends etc.
Make sure the angle is always in a position so that the strands end in a point, this will make it much more realistic. For example:
(Note: there is no specific size you should use for the brush since it depends on the picture size, just keep messing around until you get a size that looks right)
8. Now we are going to start by giving the base a much more realistic edge. This is done by using the method in the previous step.
Start off by creating a layer on top of the layer I called ‘Base 1’ (shown above) since we will be working on the outside of the hair first. It is on a new layer so if any mistakes are made it can easily be changed or deleted without ruining any previous work. You also need to use the same colour as the base so that it mixes in with the rest of the hair.
You need to create stokes in a position like this:
Once this has been done all around the hair it should look a little like this
(Note: you should keep doing this until you can no longer see the sharp edge of the base shape, if it helps you can duplicate the layer so it becomes thicker, you may need to do multiple strokes in one area to get a realistic effect)
Make sure you also add some free strands of hair like this so it looks like it flows more, and looks less frizzy
Once you have done this around the whole hair it should look like this
Remember to end the lose hairs in a point!
(Note: The hair should look more lose and spread out near the end than on top so it looks more realistic as it follows the laws of gravity, notice how I haven’t done this effect too much to the top of the hair)
Once you are happy merge down this layer onto ‘Base 1’ so it all becomes one layer. This can be done by selecting ‘layer/ merge down’
9. Now we are going to repeat the process from the previous step except this time its going to be for the layer above the face which I called ‘Base 2’ (shown above). Once this has been completed it should look like this:
(Note: If you are using the ear on an extra layer make sure the strands falling from the hair don’t interfere with the outline of the ear layer so they don’t just randomly disappear. To make it easier you might want to rub out part of the ear so that you have more space on the face to add falling hair strands)
10. Now we have the shape ready we are going to work on the texture of the hair
You need to create a layer on top of the other layers and you are going to select a colour that is darker than the base colour. You are going to then draw lines to show how the hair is going to flow, these are going to be guidelines for when you create the strands.This layer will be deleted later since it creates too much contrast.
It should look like this:
11. Create a new layer on top of the previous one, and then select a colour that is lighter than the colour for the base.
We are then going to create strands like in the previous steps
Repeat this again and again, it is best to work in clumps to help with the flow, for example:
At this point it doesn't matter if some of the strands go onto the sims face from the areas like the cheek, since this will be solved in step 14
I can’t really help you too much in this step since it really depends on what you think looks right. Just remember to follow the guidelines and keep changing the angle of the brush so you create a variety in the texture. (Note: at the hair parting you should make sure the strands end in a point)
Most important thing to remember at this point is to be patient! Yes this is going to be time consuming, but if you take care you will get great results. It will show if you tried to rush it.
Once you have covered the whole hair area it should look a bit like this
Next I’m deleting guidelines layer to get rid of the contrast
12. This step is almost exactly the same as the previous one however the changes involve a lighter colour, and making sure it is less concentrated as the last one (it doesn’t cover as much space as the previous layer)
Here is an example of what I am talking about
Here is the layer on its own to show it is covering less space
And here is what it looks like over the whole hair
13. Now we are going to repeat the last step again except now with an even lighter colour and even less space. Once this is done it should look like this
By building up the layers we are creating more depth
14. In this step we are going to try and get the hair onto just one layer so we can easily edit it.
To get the hair onto one layer you need to follow my instructions exactly! You also need to have the layer window open for this to work (Window, layers)
1. Holding ‘Shift’ select every layer (excluding the green background sim and ear layers)
2. Once all the layers are selected go to ‘Layer/ duplicate layers’
3. Then go to ‘Layer/ merge layers’
4. This will create a new layer, name it ‘final hair’
5. Hold down ‘ctrl’
6. Click on the thumbnail of the lower base layer (Base 1) behind the sim
7. Then hold down ‘ctrl’ and ‘alt’
8. Click on the thumbnail of the sim layer (and ear layer if used)
9. Then hold down ‘shift’ and ‘ctrl’
10. Click on the thumbnail of base layer above the sim (Base 2)
(This should make a selection of the hair you want to keep)
11. Now with the ‘final hair’ layer selected click the mask button at the bottom of the layers window
12. Hide all the previous layers so that these are the only layers that can be seen: The green background layer, the sim layer (ear layer if used), the ‘final hair’ layer
Now this has been done you should be able to edit the hair easily
13. If you see any green gaps between the sim and the hair select a dark colour and fill in those gaps in a layer behind the sim layer
15. This step is optional. I am usually never happy with the colour of the hair so to change it I go to ‘Image/ adjustments’ and use both ‘Hue/ Saturation’ and ‘Colour balance’
Here is what it looks like afterwards
16. In this step we will be adding the shadows and highlights to the hair. Usually I would use the dodge and burn tool, but for this tutorial it makes the colours look weird, so instead I have decided to use a different method:
1. I duplicate the hair layer two times so there are three versions of the hair layer
2. Then with one of the hair layers I go to ‘Image/ adjustments/ ‘brightness/contrast’ and make this layer lighter
3. I then chose another layer and follow the previous step, except this time I make it darker
4. Next on each layer I rub out the areas so that light is only applied where I think it should be, and so that darkness is applied where I think it should be
Here is what the layers look like:
Light:
Dark:
With all the hair layers merged together it looks like this:
17. This step will add a last bit of realism as we are going to try and add shadow to the sim
I have chosen this colour
Using the brush tool on a new layer between the hair and sim layer draw where you think shadows would be on the sim using the colour shown above.
For example:
Then lower the opacity of the shadow so it looks realistic
18. In this last step do whatever you want to finish your picture. In my picture I added a background and added a faint filter to get this final result.
I really hope you found this tutorial helpful, I understand it is long and complicated which is why you are free to ask me any questions, and please do show me what you guys can do
Good luck with your pictures!
*! If the Brush does not work or cannot be used in photoshop!*
I cannot guarantee this will work depending on what version of photoshop you have, but I can help you make the brush yourself.
1. Firstly load this image into photoshop
2. Select the whole image (this can be done by holding down 'ctrl' and 'a')
3. Follow step 6 of these instructions (Ignore the beginning bit)
4. Finally whenever you use the brush make sure that 'spacing' is at 1% (this option can be found by going to Window/ Brushes/ Brush Tip Shape, and it will be found at the bottom of the brush window)
!Please Do NOT Quote This Post!
0
Comments
I'm off to learn this method now!
| My Tumblr |
Thanks a million Harry! <333
"If you don't talk to your cat about catnip... who will?"
"Before you criticize someone, you should walk a mile in their shoes.
That way, when you criticize them, you're a mile away and you have their shoes."
@ Cele
Anyway I'm glad this is helpful
thanks harry i will give this a shot
For clothes tutorials I think Jillie is person to talk to about it. When I do clothes I mess about for ages trying to get it to look right, but from what I have seen from Jillie, she has got it perfect.
I can point out many flaws... Ima try again later and hopefully next try won't look so crappy :P
But keep working at it, because I'm sure in no time it will start looking amazing
@imameerkat thank you
Your soo good!
This is seriously such an amazing tutorial! I never would have thought about doing that. The end result is simply amazing! I think I'm going to have to try this out, just to see how much easier it is to get the desired look.
♔ download my sims 4 poses on my tumblr account ♔
A little better. Already getting used to the pen tool... My hand hurts now :P
I need to try this out
Sorry that I used your picture Harry, I didn't have any good ones of my own to edit
I know I stuffed up a bit but I'm pretty happy with it.