Forum Announcement, Click Here to Read More From EA_Cade.
Water Plane Tutorial - Hopefully! (LOL) - Pictures are working again!
 flstrider
Posts: 1,912 Member
flstrider
Posts: 1,912 Member
Water Plane Tutorial by FLSTRider
Part 1: The Initial Steps
Before we begin you will need the following external programs:
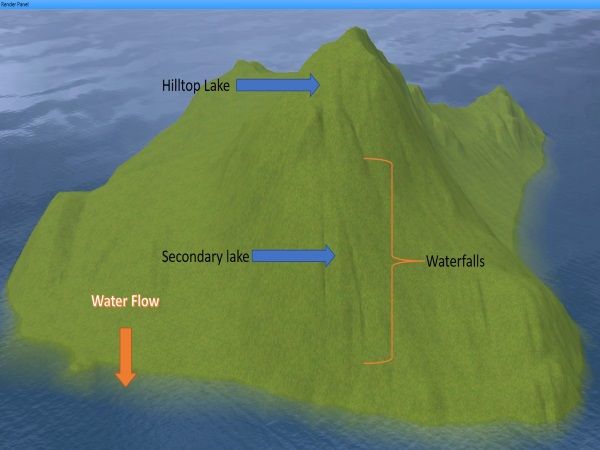
Water planes can create a whole new look to your world, and does not limit you to create lakes only at your current sea level. EA has been using these (i.e. Moonlight Falls, Twinbrook, Bridgeport) so why should we not be able to use them as well. Lets get started………..
1. The first thing is to decide where you want your lake, stream, river, or whatever water feature you want to add. You may also want to pay attention to the flow of the water already in your world. By looking at the water flow it will help give your lake, and waterfalls a bit more natural flow.
2. Flatten your lake area and make sure to flatten an area larger than the lake you wish to add. You may want to begin any additional terrain sculpting around your lake, but know that once the water plane has been added, you will be doing additional sculpting as well.
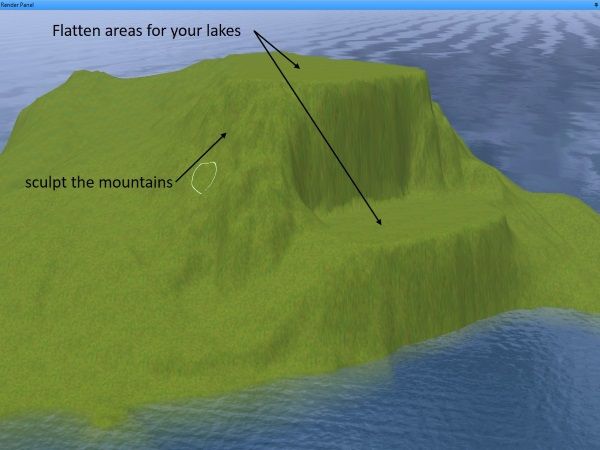
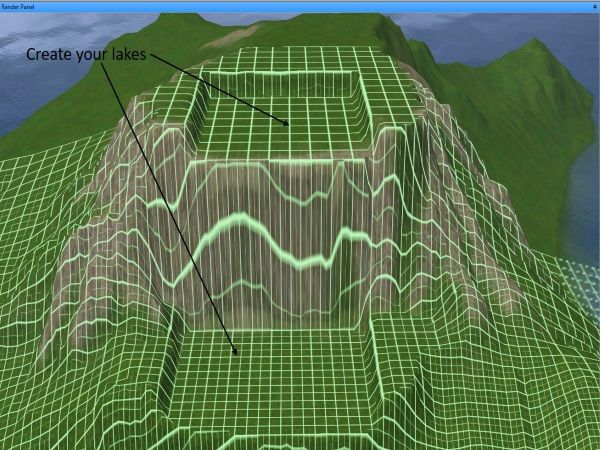
3. Next. You will begin to sculpt your lakes. As you see in the picture these lakes are square, you want to do the same for now, as you will learn, water planes are rectangular and you will need to do some sculpting to create the look you want.
4. Now we start the confusion….LOL! In order to create your square (or rectangular) water plane you need to find three things, two points (for the program to draw the square) and its height relative to sea level. I use the Birch Tree because of its thin point, in order to find these points. A few things to know about this.
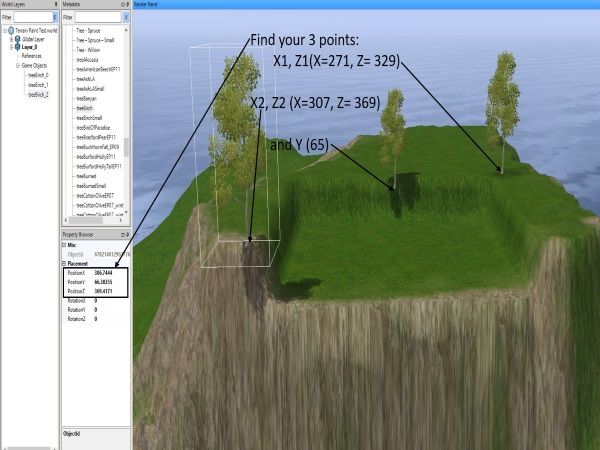
5. First at the left of your world render panel you will see the property browser, this is where you will find the X,Y, and Z, for your water plane. You only need one Y value and I will talk about this a bit later.
6. As I said you need two points to create your plane, by using two birch trees you can find these points easily. But there is a catch, your first points (X1,Z1) must be less than your second point (X2,Z2) as you see in the example pictured.
7. I use a third birch tree to help find the Y value, this value is the height (or altitude) above sea level your water plane will be set at. Use this birch tree to set your water plane's depth in the sculpted lake. I generally will set the point a bit lower than what would look good for a natural lake shore to allow for the additional sculpting that we will be doing later. Something to note here, just as the water lightens and darkens when you adjust sea level as it gets closer or farther away from from the ocean bottom, your water plane will do the same, so keep this in mind. The deeper your lake, the darker your water plane and vice versa.
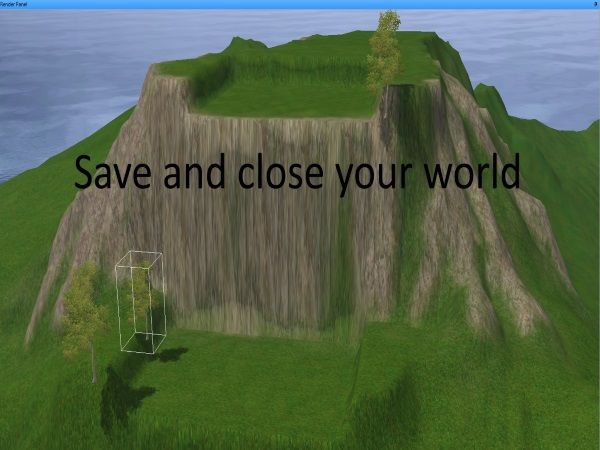
8. Once you have all of your initial sculpting done, your values written down, save and close CAW.
Next Part Two: The Technical Headaches!!!
Part 1: The Initial Steps
Before we begin you will need the following external programs:
- S3pe - Available at Simlogical.com
- A Hex Editor - (I like HxD, it is a free program that works very well for this) You can find it here HxD – Freeware Hex Editor
- SandrineD’s Hex generator - available at Mod The Sims
- Some Patience!!!
Water planes can create a whole new look to your world, and does not limit you to create lakes only at your current sea level. EA has been using these (i.e. Moonlight Falls, Twinbrook, Bridgeport) so why should we not be able to use them as well. Lets get started………..
1. The first thing is to decide where you want your lake, stream, river, or whatever water feature you want to add. You may also want to pay attention to the flow of the water already in your world. By looking at the water flow it will help give your lake, and waterfalls a bit more natural flow.
2. Flatten your lake area and make sure to flatten an area larger than the lake you wish to add. You may want to begin any additional terrain sculpting around your lake, but know that once the water plane has been added, you will be doing additional sculpting as well.
3. Next. You will begin to sculpt your lakes. As you see in the picture these lakes are square, you want to do the same for now, as you will learn, water planes are rectangular and you will need to do some sculpting to create the look you want.
4. Now we start the confusion….LOL! In order to create your square (or rectangular) water plane you need to find three things, two points (for the program to draw the square) and its height relative to sea level. I use the Birch Tree because of its thin point, in order to find these points. A few things to know about this.
5. First at the left of your world render panel you will see the property browser, this is where you will find the X,Y, and Z, for your water plane. You only need one Y value and I will talk about this a bit later.
6. As I said you need two points to create your plane, by using two birch trees you can find these points easily. But there is a catch, your first points (X1,Z1) must be less than your second point (X2,Z2) as you see in the example pictured.
7. I use a third birch tree to help find the Y value, this value is the height (or altitude) above sea level your water plane will be set at. Use this birch tree to set your water plane's depth in the sculpted lake. I generally will set the point a bit lower than what would look good for a natural lake shore to allow for the additional sculpting that we will be doing later. Something to note here, just as the water lightens and darkens when you adjust sea level as it gets closer or farther away from from the ocean bottom, your water plane will do the same, so keep this in mind. The deeper your lake, the darker your water plane and vice versa.
8. Once you have all of your initial sculpting done, your values written down, save and close CAW.
Next Part Two: The Technical Headaches!!!
My World's thread linked in Sig

Post edited by EA_Solaire on
5
Comments
I am in no way even close to a computer guy so this part really had me pulling my hair out!!! Hopefully I can explain these steps so everyone does not go through the same pain I did.
Again Before we begin take a moment to do some preparation:
This is a very time consuming process, and one I do not totally understand, but I will walk you through the steps I use to get through this.
1. Go to the Water Plane Generator found here. This will generate the actual water plane files for CAW.
2. Enter your Y Value, X1,Z1 & X2,Z2 values in the spaces provided. You must denote an instance for this water plane, your first plane will begin at Zero (0) and any additional water planes will be numbered 1,2,3…ect for each additional instance. Note: If there is a difference of less than 30 in the values of X1,Z1 & X2,Z2 (for example X1=200,Z1=150 and X2=225, Z2=190 a difference of less than 30 between X1 and X2) Click on the show advanced button and select “Force One Tile” Leave everything else as it is! Click on the download button. Repeat for additional Water Planes.
3. This will generate your water plane information file, save it in the folder you created at the beginning of this part of the tutorial. It should look like this:
4. In order to work around the error I was getting when trying to place these files into my world an additional step was needed to correct this problem. Once your file(s) have been downloaded you will need to rewrite them, WHAT?!?! I can’t do that!!!! Well do not worry there is a not so simple step to do this. Open SandrineD’s Hex generator (the file is called 707 Gen). You will need the same X1,Z1 X2,Z2 and Y information for this.
5. In the upper right corner of the screen you will see the entry boxes for your values. Add them into the generator and click the “Create Hex” button. You will see a small box with 6 numbers appear, ok that window and your hex will be displayed. Keep this window opened and minimize it.
Let us take a small break here to prevent a total brain melt! We will continue this in Part 3 - The Technical Headaches (Cont.)!!!
OK, now that we have relaxed our brain a bit, and gotten a nice cup of coffee, let’s continue with the technical stuff for a water plane. These steps may seem like they take forever and are not worth the time but once you have this down, it actually is not to bad, and the end result is worth the extra work in my opinion.
So we have just finished creating a hex code in SandrineD’s Hex generator, now what do we do with this? Let us look at the next few steps in this process:
1. Open your Hex editor ( I am using HxD for this Tutorial). Download information can be found in the Part 1 preparation section
2. Click on File/Open and locate your downloaded water plane file from the web based generator in the folder you created in Part 2.
3. As you can see the Hex Code in this file is very large, so go to Edit/Select All to highlight the entire code.
4. Once you have the code highlighted, go to Edit/Delete and delete the entire code. You will receive a warning box, just click on OK and get rid of the code.
5. Now we have an empty file and need to re-write the code for our water plane. Bring up the SandrineD generator and copy that code to your clipboard.
6. In HxD select Edit/Paste Write to paste the new code into the file. You will receive the same warning box as you did in step 4, just OK that box. When you initially paste the code, it will appear red do not worry about this, all this means is that the new code has not been saved as yet.
7. Click on save and the lettering will turn black and the new Hex Code will be ready to use for CAW.
8. Repeat these steps for all of your water plane files you have generated from the web based generator. Using the web based program gives you all the files properly named and saved in order to keep the instances in tact in the file name, and as such there will be no need to rename your files if you only use one file to rewrite each water plane.
Now we have a working Water Plane file but we cannot put it into CAW just yet there is still one more part we must do to complete this process. In Part 4 – Even More Headaches! We will complete the final technical steps for our Water Planes……
Another cup of coffee, and a light snack (Popcorn is such great brain food…HAHA) and now back to work on the last of the technical stuff for our water planes. This part is not as bad as those above so this should go a bit better than the other sections (I hope…LOL).
Once again let me remind you to BACKUP YOUR WORLD FILE before going further!!!!
Now we need to get into S3pe and change our world file to ensure the water plane files we add will show up when we open CAW. There is only one file that needs to be changed in S3pe in order for the water planes to work properly.
1. Open S3pe and open your .world file (not the folder, the actual world file)
2. Click on the “type” tab on top and search for the file “0x90624C1B”
3. Once you find the string, highlight it and click on Resources then on Export – to file. Export this file to the folder you created in Part 2. Close S3pe.
4. Next we need to open our hex editor program (again I will use HxD) then open the 0x90624C1B file we just exported.
5. Looking across the top of the code you see the numbers in sequence 00 – 0F (hex), and down the side you see 00000000 – 00000020 (in multiples of 10) we need to adjust the number 12 hex key to ensure our water planes display in CAW. So going down the side to 00000010 then over to 02 we see that the value there is currently 00. Since this tutorial is using two water planes we need to adjust this key to show those planes, change 00 to 02. Of course if you are using more water planes this number will show the number of water planes you will be using.
6. The change will initially be in red again to demonstrate that the file has been changed but not yet saved, click on save and close your hex editor.
7. Open S3pe and open your world file once more. Once your world is open go straight to resources, then click on import from file. When the window opens, go to your save folder (the one you created in Part 2) and all the files will be there ready to import. NOTE: there will be two sets of the same file one is BNRY and one is BAK DO NOT import the BAK files!!
8. Highlight all of the BNRY files and select open at the bottom of the window. A window will appear showing the files that will be imported, be sure that the Replace duplicates button is checked and use resource name is also checked. Click on import. (this may take a few moments depending on the number of water planes you are importing).
9. Once the import is complete you will notice a line going through a 0x90624C1B file, do not worry about this, that file is the one that will be replaced by the file you just imported. Click on save, then close S3pe The technical stuff is finally completed!!!
Finally, we can get back into CAW and start to work on our new lake!!!! Let us get back into CAW and see what we have…..
Before we begin I just want to say a couple of things here. First please excuse the terrain painting and décor of this project as it is only meant to be used in this tutorial and nothing more. I know that this is not the best work but was just done quickly for demonstration purposes. Also I have been away from CAW for a few months so I am a bit rusty, or just old not sure which (LOL) so I hope you all can forgive me.
We can now go back into CAW and look at our newly formed lakes. Remember from Part 1 that the water planes are rectangular and I do not know of any square lakes around so we still need to finish things up.
1. OK, so the two points were a bit off and there are a few mistakes in our water planes. No problem CAW gives us the tools to easily correct these miscalculations.
2. First we need to sculpt around the lake raising the terrain to cover up the ends where the water plane is sticking out from the hillside, then form the shape of our lake. One important note about water planes, the center of the plane MUST NOT be under land, if you wish to have an island in the middle of the lake you will need to create two water planes around your island.
3. We just cannot leave that big open gap between the plane and the lake bottom open so we need to create our waterfall wall. Play with the different rocks, rotate them, slide them around to get a nice look (suggestion here is to try to keep the top of the rock low enough to cover the water plane but yet appear to give the water a place to flow)
4. After our wall is complete we can then add the waterfall effects. Try to use the rock wall as a guide and imagine how would the water flow down the falls, this image should help you place your effects.
5. Finally you can decorate the area to match your world, and tada!! New lakes and waterfalls for your Sims to enjoy!!! Oh do not forget to complete the other water planes as well!!
I hope this tutorial has helped you understand the complexities of the water plane, and has given you enough information to work them into your worlds. If you have any non-technical questions I can definitely answer those, the technical ones, not too sure about those, but I will try my best!
And as always…….HAPPY SIMMING!!!!!
@flstrider , WOW! That was quick .... I'm very impressed!!!
It looks an awesome and 'easy' enough to follow tut ... even though my brain is experiencing a complete meltdown at the moment ... but that could be just age related
Definitely bookmarked for future reference!
Happy CAW-ing!
The Cowboy and the Mermaid
The top falls took me about 3 or 4 hours to complete so as you can see this is not something that you can do quickly.
RUSH
My Worlds
RUSH
My Worlds
Before using the developer tools unlocked by this patch you should know that some tools and features may be problematic. Notably, the 'Pond Tool' is apparently abandoned and not used by EA, due to 'known problems internally'.
I have run into several problems using the pond tool in super caw that is why I use this method instead, never had a problem with this method.
No pictures but the information is there.
> This is a very time consuming process, and one I do not totally understand, but I will walk you through the steps I use to get through this.
> 1. Go to the Water Plane Generator found here. This will generate the actual water plane files for CAW.
>
So sorry to Necro a thread-- but the Water Plane Generator at this link does not seem to work anymore. It generates only a page with a lot of bizarre characters and error messages...
Notice: Use of undefined constant Y - assumed 'Y' in /storage/ssd2/228/373228/public_html/makewaterplane.php on line 119 Notice: Use of undefined constant X1 - assumed 'X1' in /storage/ssd2/228/373228/public_html/makewaterplane.php on line 120 Notice: Use of undefined constant Z1 - assumed 'Z1' in /storage/ssd2/228/373228/public_html/makewaterplane.php on line 121 Notice: Use of undefined constant X2 - assumed 'X2' in /storage/ssd2/228/373228/public_html/makewaterplane.php on line 122 Notice: Use of undefined constant Z2 - assumed 'Z2' in /storage/ssd2/228/373228/public_html/makewaterplane.php on line 123 Notice: Use of undefined constant opacity - assumed 'opacity' in /storage/ssd2/228/373228/public_html/makewaterplane.php on line 124 Notice: Use of undefined constant G1scale - assumed 'G1scale' in /storage/ssd2/228/373228/public_html/makewaterplane.php on line 125 Notice: Use of undefined constant G1spiral - assumed 'G1spiral' in /storage/ssd2/228/373228/public_html/makewaterplane.php on line 126 Notice: Use of undefined constant make - assumed 'make' in /storage/ssd2/228/373228/public_html/makewaterplane.php on line 127 Notice: Use of undefined constant instance - assumed 'instance' in /storage/ssd2/228/373228/public_html/makewaterplane.php on line 128 Notice: Use of undefined constant debug - assumed 'debug' in /storage/ssd2/228/373228/public_html/makewaterplane.php on line 129 Notice: Use of undefined constant forceOneTile - assumed 'forceOneTile' in /storage/ssd2/228/373228/public_html/makewaterplane.php on line 130 Warning: Cannot modify header information - headers already sent by (output started at /storage/ssd2/228/373228/public_html/makewaterplane.php:119) in /storage/ssd2/228/373228/public_html/makewaterplane.php on line 246 Warning: Cannot modify header information - headers already sent by (output started at /storage/ssd2/228/373228/public_html/makewaterplane.php:119) in /storage/ssd2/228/373228/public_html/makewaterplane.php on line 247 Warning: Cannot modify header information - headers already sent by (output started at /storage/ssd2/228/373228/public_html/makewaterplane.php:119) in /storage/ssd2/228/373228/public_html/makewaterplane.php on line 248 C{;¥â’D cD| €ÿ€€ÿ€€ÿ€€ÿ€€ÿ€€ÿ€€ÿ€€ÿ€€ÿ€€ÿ€€ÿ€€ÿ€€ÿ€€ÿ€€ÿ€€ÿ€€ÿ€€ÿ€€ÿ€€ÿ€€ÿ€€ÿ€€ÿ€€ÿ€€ÿ€€ÿ€€ÿ€€ÿ€€ÿ€€ÿ€€ÿ€€ÿ€€ÿ€€ÿ€€ÿ€€ÿ€€ÿ€€ÿ€€ÿ€€ÿ
Yes, that's what I ran into. What you do is download the files for the water planes from Bridgeport http://modthesims.info/t/425205 and use the steps here
https://forums.thesims.com/en_US/discussion/comment/15629853/#Comment_15629853
to over write the the ones you need - 0,1,2,3,4 in order of what you want. Then import the edited planes and the file into your world.- as instructed.
complete forum tutorial
Thank you @MDianaSanders for halloween-fying Golluma