The latest update for The Sims 4 is now live. Click here to read the latest notes.
Forum Announcement, Click Here to Read More From EA_Cade.
Advanced tutorial "Tweaking your worlds, custom sea/sky/rabbit holes/emitters"
 Stw402
Posts: 772 New Member
Stw402
Posts: 772 New Member
The following information is for reference, I wanted to pass some of my findings over to the community, it might help you think about designing even more unique worlds.
PART 1
Before you read any more I strongly recommend that you read this first:-
http://www.modthesims.info/showthread.php?t=388840
Now that you understand what they where trying to do over at mod the Sims, I started to investigate on how to edit Sea colors inside CAW, I failed in this, not sure why, I think the game overrides' the files. But it was not a complete loss, I did get something working that was rather novel.
To do this you need a basic understanding s3pe find this here:-
http://forums.modthesims.info/showthread.php?t=362412
To do this the easy way you can download the 6 files I've already completed for you, you can find them here:-
http://www.4shared.com/file/_uBBeFeS/china.html
So what are the files?
The files are for testing certain setup for Caw neighborhoods, I will give you what I think the files do, but remember this is only for testing and use this only on a backup.
If you use the files I've sent you, you will change the Initiate files to that of china
1 Change the LotRenderSettings and changes LotLODHeightThresh
2 Lighting, this is little more interesting it deals with SunlightScale, I think thats something to with the sunlight beams, I might be wrong
3 Tunable Parameters Related to Sky, you can change sunrise times, sun and moon radius
4 Misc Params with this file you can change cloud layers, star intensity, fog distance, I think fog distance is a mist that you can surround your neighborhood with.
5 Fly though proof of concept, even if you don't use any of the above, this file might be worth getting, this allows a Fly though when you fist play the neighborhood for the first time, the current file is set for china, good luck on getting the setting right for your own world
So how do you add them into my CAW worlds, that parts is very easy, use s3pe and just, open your World from you Caw folder and then click resource and import and import each file into the game remember backup and save first.
If you need to delete them just open your world in s3pe and delete the INI files, your world will not currently have any INI until you export the game.
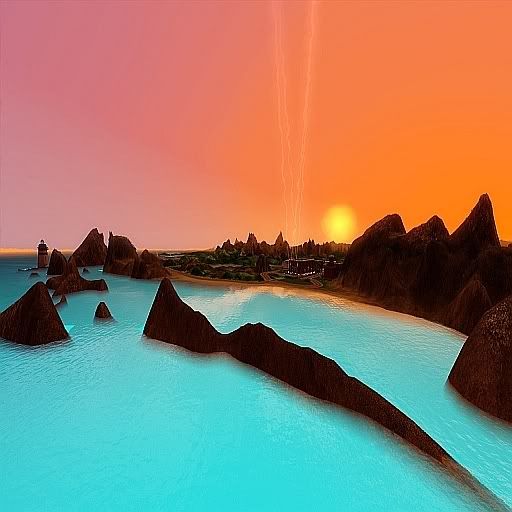
Can I edit them files, like change the sunrise times?
Feel free to test this, I've not fully tested what you can and can't do with them files.
When will I see some changes?
Some changes do not happen until you load in the game, but say you wanted to make a vampire town, always dark, try changing the sunrise times and you will see the changes in caw.
This photo was taken 2pm game time

A alien sunset

Now I'm starting to get inpressed, will this damage my game?
All the changes should be for the current neighborhood, but I said and will repeat this again this is still being tested, I did notice that I changed the top colors of my walls, this seems to be global, if you use that file I've uploaded the top of all your walls while building will turn brown, instead of bright white, this is much better for you builders, who like things to blend in better.
Where did you get the INI files?
You can take INI files from completed worlds, so lets say you wanted the Egypt files, with that bright sun, hot glow, just extract the INI files from Egypt world file found in your programs/sim 3/ world adventures folder, using s3pe and then import the files into your CAW world. On a side note for players of the game who wish to see longer days, you can edit the Egypt, world adventure file, for personal use.
That about all I can say about this, I'm sure the people who use this, in neighborhood designs, will increase downloads and the look and design of your worlds.
Feel free to update this with you own findings should you explore this in more detail.
PART 2 Custom Sea's/ponds

There is little point in repeating the mod the Sims tutorial, I could not say it any better, what most people found was that it was hard to get the custom sea's to work in CAW. So I recommend you follow that tutorial:-
http://www.modthesims.info/showthread.php?t=388840
The only thing you need to do different than this tutorial, is that you need to export the Custom Sea files into a completed world and then extract the same files out of a completed world. I understand this sounds odd, but when you extract them out again, it sets up the file names that you need for it to work in caw. The last stage is then using s3pe again export the files to your world.
You now have custom sea's in CAW, but when you exit CAW, after a save, it will delete the INI files, it will not save them inside caw. All is not lost, when you export your world, the INI files go with the world and then work correctly with the exported world.
So the truth is that you use CAW only to test the sea's and it should be the last thing you place in your world prior to exporting the world, just remember if you save you loss the INI and you will need to replace them again, so make sure you have backup of the files you will be using.
PART 3
Extra objects and Animation, the builders dream
Strictly speaking this guide is aimed at lot builders more than neighborhood designer, but you can get some very useful stuff to help you design your world, I wanted to include this guide, due to part 4 deals with the animated train
The tutorial guide on how to include extra objects and animation in your lots, if your interested in this keep reading.
I think back in the days of the sims 2, it was frillen who unlocked the 229 ingame Maxis objects in
collection files you can all about this on the following link:-
http://www.modthesims.info/download.php?t=131127
To builders back in the days of the sims 2, them extra objects added a new dimension to building, it was one area I was starting to miss in the sims 3, something builders can have, that gives them a step up, above more casual player.
With the sims 3 to get access to them objects we use a very simple cheat, on a very basic level this is no more difficult than using the money cheat, so what I was going to do was try and show you, more on how to use the objects in the cheat at 3 different levels, Basic, advanced and jedi levels.
WARNING you will need ambitions installed for this to work and use only a test lot while playing about with this tutorial.
BASIC LEVEL
Ok this is the easy part, the cheat is very easy to use:-
1 Load up a test sim family and open the cheat menu ctrl+shift C and type the
following code testingCheatsenabled true.
2 Next type buydebug on and enter the debug objects, this is the ? in the object list for anybody who
as never used this cheat before.
3 Goto misc.objects and look for the fog emitter

drag and drop this object onto the game and start playing, many players will be already aware that after about 5 seconds of playing the area around the test object will fill up with mist.
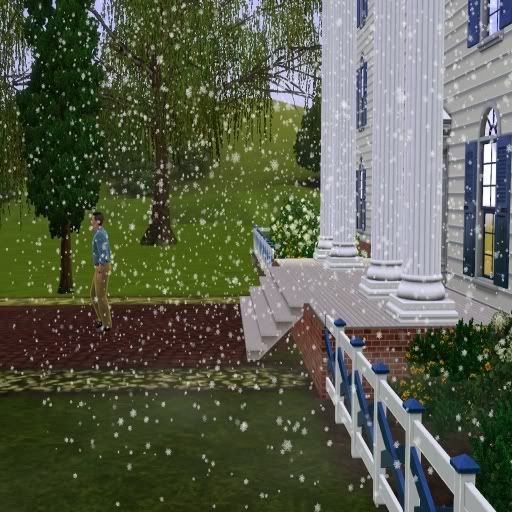
4 Ok lets try something new, lets make some weather, snow would be a good start, lets drop another fog emitter onto a test lot, then hold down ctrl+shift and left click on the emitter, you should see
a new menu:-

click on set visual effects you will see ep2spiritfog, change this to snowfallingheavyday, without any spaces, now test, you should see something like this:-
 .
.
5 Thats really about all you need to understand, the rest of this tutorial will be about my findings, so
lets finish the Basic level by using the cloning, if you where going to design a winter wonderland
you will probable need about 10+ fog emitters, so lets clone the fog emitter that we used for the
snow, crtl+shift on the emitter and click clone, yes nothing seems to happen, but you do have the
object in your hand, you just can't see the clone, try dropping the snow emitter down and test in
game. the next time you enter build mode you will see the clone will appear so you move it around if your unhappy with the placement.
6 A great tip, when your building it's best to build with a active sim in the lot, so you can test the emitters, if your building for a long time, don't forget you have testingcheatenabled on, so you can click on the energy bars if your sim starts to die. If you wont to have a little play about at this point here are few more emitter codes to try
alarmclockcheapfx
bubbles
bubblessuds
fire
fireworksa
timemachinelights
tombstonefog
train
waterbuoy
windmill
ADVANCED
When I say advanced the objects need a little(I really mean a little) work from the builder, many of the
objects that are needed to be used in water need to be placed prior to building your pool or pond, so if you want to use water jets in your lot you need to place them prior to building the
pool, for example:-

I placed all the waterjets prior to building the pool. Another example

I placed the water rapids prior to building the water, for the best results your best dropping the area that you wish to place the rapids/waterjets a few clicks, so when you make the pool/pond it does not look like the rapids are 5cm off the floor. Ok lets build a simple waterfall, build yourself a nice raised square, something like this

next drop a emitter and rename the emitter waterfall_1_short and drop the emitter at the back of the hill and start playing,

you can see this did not work very well, I wonted the water at the front of the hill, to do this just enter build mode and turn the waterfall around, it should look like this.

that looks better, the next step for me would be to clone a few more emitters, add some rocks, boolprop the hill and you should then end up with something like this:-

still not that great to look at but you must remember while building you will adding trees and other intresting objects, I found also adding rapids to the base of the waterfall looks pretty cool, to do this type rapidsnorock and place the emitter at the base of the waterfall and then I used rapidsrock emitter and placed that at the base of the pond. Then perhaps this would be a good time to place the pond in, don't worry the emitters do not move when you boolprop, but should if you change your mind, you will not be able to replace the emitter in the same location, it will always drop to the lowest point, so thats why you need to place them first. Just to be aware only a few emitters work under water, seaweed for example, rapids need to be placed on top of water.

Top tip, when building rivers or using sea waves, test how far the water animation will go. you don't wont that wave moving into the house that you just spent 3 days building.
Here is a list of things you might wish to try and play about with:-
poolbubbles
pooldrownbubbles
poolsimsteam
seaweed
rapidsnorock
rapidsrock
rapidswaternarrow
rapidswaterwide
waterfall_1_short
waterfall_1_shortsplash
waterspout
oceansurf
oceansurfreduced
fountainscience (the water jets I used in the pool lot)
JEDI
This part more information than anything else, and a few idea's, I was not the first person to work any
of this out, that honor should goto, Goggalor over on the more awesome than you web page, well at
least I think he is the first, you can download a complete list of extracted codes from the following
page:-
http://www.moreawesomethanyou.com/smf/index.php/topic,18664.0.html
So what next, well I found a number of the objects in the list can be used with triggers, a example,
you wanted to make a haunted house, you can use a trigger for a rat to run accross the floor. So many
of the objects can be used with the World adventure dungeon triggers. You could make a scientist sim
flick a switch to make it snow, with of course the correct trigger in place. You could even build a
an Olympic stadium and when you light the torch, hundreds birds will fly up into the sky. Many of
that goes beyond this tutorial, but it's all possible. So if you want one final play with your new toy, try a few animals from the list Bird, rat and crow, you can watch them fly around your lot, but they will disappear after a short time, so to make the best use of them, use the trigger events.
Many thanks for reading, please report any good findings.
UPDATE 30/06/10
WILL MY GAME SLOW DOWN
Good question, I've done some research into this and this was my conclusion, directly no, but like anything in the game to much of anything then yes it can.
I will give you some example of how this can slow down your game, Your playing in the game with a very large heavy detailed lot that uses loads of animations, the lot on it's own, should not slow the game. But lets say your neighbor contains a large number of electrical animations, you might start to notice a very small slow down, lets say your other neighbor is a big lot, full of animations, this will start to get hard for most PCs' to handle, it's trying to animate from 3 different locations. In testing what I found the game will slow down if you use to many large animated lots in around the same area, my advice is to split up the animated lots around the neighborhood. That should reduce all slowdown, just don't have them all together in the same place.
Some animation are worse than others, for example the waterfalls are very minor, but the large electric discharges are high in power. I'm not saying not use them, just don't use to many in the same location.
I've not done that much research into this, but I think the game loads your active lot and upto 12 lots around your active lot, they will run in the background, so simple maths tells you, to keep any large electrical animated lots, a few streets away from each other and the game will be running like clockwork.
In conclusion, I'm happy to use them, I've noticed no slow down in my main neighborhood, but in extreme testing, with all settings on top, the FPS will drop if you use multiple very high animated lots in the same area. At the end of the day you could also say that if you build a massive world with CAW or use 1000s of custom objects, or even if you have 7 expansions installed.
A little about the test I did, the test was this, I placed my shimmer lot (full of electric energy discharges) around the neighborhood at various points and tested the FPS, more or less they where all about the same, I placed 4 shimmers next to each other and tested, the FPS did drop a little, it was not unplayable, but I could see how the FPS could drop more if shimmer used more animation or was on a bigger lot.
I will update the first page with this info, if anybody wishes to do any more test into this, please print your findings.
UPDATE 19/07/10
CREATE A WORLD & EMITTERS
This is more a knowledge update, should you set up a lot in create a world that contains emitters, when that world is first installed, some of the emitters temporary reset to fog emitters. This is a minor setback, all you need to do to get the emitters to work as normal, is save your world, exit to the main menu and reload the save and the emitters will turn back to normal, all test I've done confirm this.
The reason this happen, CAW only contains Fog emitters, so when the world is installed you only get fog, until of course you save the game, then the game will recognize your emitter codes, this currently effects all lots installed by CAW.
PART 4 The animated train
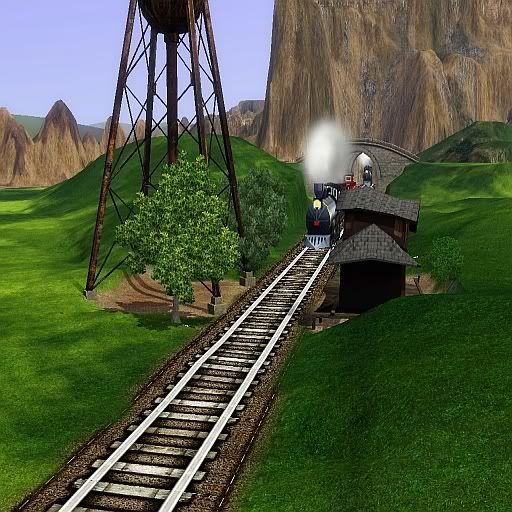

The train was made using a simple emitter placed inside a lot, of course I also needed to make the train track, that is a simple texture.
You can see the emitter in the center of the lot built over the train tracks, if you have read part 3 of the guide you will understand how to change the emitter code:-
the code for the animated train is:-
ep1train

The downside, of the train, it does not stay in the world forever, I needed to place 4 emitters in 4 different lots, so when one emitter runs out, hopefully inside a tunnel another emitter kicks in, to give the illusion that train is going from when one end of my world to another.
PART 5 custom neighborhood objects, recolors
By the time you get to this part you should be upto speed with using S3pe, and you will need this for the last part of this guide
The more I play about with CAW, the more I see to edit:-

In fact the truth of the matter and all my test confirm this so far, you can edit just about anything in the game and keep your game custom content free. You can use your world to edit the, neighborhood objects


The way you do this is to extract the texture using S3pe, you can find the textures here:-
C:\Program Files (x86)\Electronic Arts\The Sims 3\GameData\Shared\Packages
FullBuild2 file contains most of the building recolors, just extract the file you wish to change and when you have finished the edit, you need to move the file into your CAW world, using S3pe.
The textures work much like INI files, your best editing the texture and check they work ok in backup copy of your world, if everything work, then like the INI files they should be last thing you do prior to exporting your world.
WILL THIS WORK WITH CUSTOM SIM CLOTHES?
Not tested this yet
WILL THIS WORK ON PLAYER MADE CUSTOM CONTENT & STORE OBJECTS?
I did test this on custom made object I downloaded, it did not work, I've not tested on store objects.
Other information:-
Most of the info is still being tested, so you should consider all the guides are open to change, should any problems or any new info comes about.
So you use the info at your own risk, the last thing I want is somebody to damage a world they are building so please make backups and test what you use from this guide.
If you wish to read more info of a more detailed description of how to use some of the guides I've started thread over on TS3 CREATORS CONSORTIUM,over the next few weeks I will update the guide here:-
http://builders.forumotion.net/caw-101-f122/building-a-world-part-1-t1007.htm
The guides will contain more a step by step on how to do things, so if your a little new to extracting files, using programs to edit your world, this thread will be easier to understand.
If you wish to follow the progress of the exotic world I'm building you can view this thread here:-
http://builders.forumotion.net/wip-f7/hope-island-20-07-2010-t941.htm
or
http://forum.thesims3.com/jforum/posts/list/232499.page
Many thanks for getting this far, I suppose I want my world I'm building to be about the world not how I turned the sea turquoise, or how I made a green balloon.
Cya later
PART 1
Before you read any more I strongly recommend that you read this first:-
http://www.modthesims.info/showthread.php?t=388840
Now that you understand what they where trying to do over at mod the Sims, I started to investigate on how to edit Sea colors inside CAW, I failed in this, not sure why, I think the game overrides' the files. But it was not a complete loss, I did get something working that was rather novel.
To do this you need a basic understanding s3pe find this here:-
http://forums.modthesims.info/showthread.php?t=362412
To do this the easy way you can download the 6 files I've already completed for you, you can find them here:-
http://www.4shared.com/file/_uBBeFeS/china.html
So what are the files?
The files are for testing certain setup for Caw neighborhoods, I will give you what I think the files do, but remember this is only for testing and use this only on a backup.
If you use the files I've sent you, you will change the Initiate files to that of china
1 Change the LotRenderSettings and changes LotLODHeightThresh
2 Lighting, this is little more interesting it deals with SunlightScale, I think thats something to with the sunlight beams, I might be wrong
3 Tunable Parameters Related to Sky, you can change sunrise times, sun and moon radius
4 Misc Params with this file you can change cloud layers, star intensity, fog distance, I think fog distance is a mist that you can surround your neighborhood with.
5 Fly though proof of concept, even if you don't use any of the above, this file might be worth getting, this allows a Fly though when you fist play the neighborhood for the first time, the current file is set for china, good luck on getting the setting right for your own world
So how do you add them into my CAW worlds, that parts is very easy, use s3pe and just, open your World from you Caw folder and then click resource and import and import each file into the game remember backup and save first.
If you need to delete them just open your world in s3pe and delete the INI files, your world will not currently have any INI until you export the game.
Can I edit them files, like change the sunrise times?
Feel free to test this, I've not fully tested what you can and can't do with them files.
When will I see some changes?
Some changes do not happen until you load in the game, but say you wanted to make a vampire town, always dark, try changing the sunrise times and you will see the changes in caw.
This photo was taken 2pm game time
A alien sunset
Now I'm starting to get inpressed, will this damage my game?
All the changes should be for the current neighborhood, but I said and will repeat this again this is still being tested, I did notice that I changed the top colors of my walls, this seems to be global, if you use that file I've uploaded the top of all your walls while building will turn brown, instead of bright white, this is much better for you builders, who like things to blend in better.
Where did you get the INI files?
You can take INI files from completed worlds, so lets say you wanted the Egypt files, with that bright sun, hot glow, just extract the INI files from Egypt world file found in your programs/sim 3/ world adventures folder, using s3pe and then import the files into your CAW world. On a side note for players of the game who wish to see longer days, you can edit the Egypt, world adventure file, for personal use.
That about all I can say about this, I'm sure the people who use this, in neighborhood designs, will increase downloads and the look and design of your worlds.
Feel free to update this with you own findings should you explore this in more detail.
PART 2 Custom Sea's/ponds
There is little point in repeating the mod the Sims tutorial, I could not say it any better, what most people found was that it was hard to get the custom sea's to work in CAW. So I recommend you follow that tutorial:-
http://www.modthesims.info/showthread.php?t=388840
The only thing you need to do different than this tutorial, is that you need to export the Custom Sea files into a completed world and then extract the same files out of a completed world. I understand this sounds odd, but when you extract them out again, it sets up the file names that you need for it to work in caw. The last stage is then using s3pe again export the files to your world.
You now have custom sea's in CAW, but when you exit CAW, after a save, it will delete the INI files, it will not save them inside caw. All is not lost, when you export your world, the INI files go with the world and then work correctly with the exported world.
So the truth is that you use CAW only to test the sea's and it should be the last thing you place in your world prior to exporting the world, just remember if you save you loss the INI and you will need to replace them again, so make sure you have backup of the files you will be using.
PART 3
Extra objects and Animation, the builders dream
Strictly speaking this guide is aimed at lot builders more than neighborhood designer, but you can get some very useful stuff to help you design your world, I wanted to include this guide, due to part 4 deals with the animated train
The tutorial guide on how to include extra objects and animation in your lots, if your interested in this keep reading.
I think back in the days of the sims 2, it was frillen who unlocked the 229 ingame Maxis objects in
collection files you can all about this on the following link:-
http://www.modthesims.info/download.php?t=131127
To builders back in the days of the sims 2, them extra objects added a new dimension to building, it was one area I was starting to miss in the sims 3, something builders can have, that gives them a step up, above more casual player.
With the sims 3 to get access to them objects we use a very simple cheat, on a very basic level this is no more difficult than using the money cheat, so what I was going to do was try and show you, more on how to use the objects in the cheat at 3 different levels, Basic, advanced and jedi levels.
WARNING you will need ambitions installed for this to work and use only a test lot while playing about with this tutorial.
BASIC LEVEL
Ok this is the easy part, the cheat is very easy to use:-
1 Load up a test sim family and open the cheat menu ctrl+shift C and type the
following code testingCheatsenabled true.
2 Next type buydebug on and enter the debug objects, this is the ? in the object list for anybody who
as never used this cheat before.
3 Goto misc.objects and look for the fog emitter
drag and drop this object onto the game and start playing, many players will be already aware that after about 5 seconds of playing the area around the test object will fill up with mist.
4 Ok lets try something new, lets make some weather, snow would be a good start, lets drop another fog emitter onto a test lot, then hold down ctrl+shift and left click on the emitter, you should see
a new menu:-
click on set visual effects you will see ep2spiritfog, change this to snowfallingheavyday, without any spaces, now test, you should see something like this:-
.5 Thats really about all you need to understand, the rest of this tutorial will be about my findings, so
lets finish the Basic level by using the cloning, if you where going to design a winter wonderland
you will probable need about 10+ fog emitters, so lets clone the fog emitter that we used for the
snow, crtl+shift on the emitter and click clone, yes nothing seems to happen, but you do have the
object in your hand, you just can't see the clone, try dropping the snow emitter down and test in
game. the next time you enter build mode you will see the clone will appear so you move it around if your unhappy with the placement.
6 A great tip, when your building it's best to build with a active sim in the lot, so you can test the emitters, if your building for a long time, don't forget you have testingcheatenabled on, so you can click on the energy bars if your sim starts to die. If you wont to have a little play about at this point here are few more emitter codes to try
alarmclockcheapfx
bubbles
bubblessuds
fire
fireworksa
timemachinelights
tombstonefog
train
waterbuoy
windmill
ADVANCED
When I say advanced the objects need a little(I really mean a little) work from the builder, many of the
objects that are needed to be used in water need to be placed prior to building your pool or pond, so if you want to use water jets in your lot you need to place them prior to building the
pool, for example:-
I placed all the waterjets prior to building the pool. Another example
I placed the water rapids prior to building the water, for the best results your best dropping the area that you wish to place the rapids/waterjets a few clicks, so when you make the pool/pond it does not look like the rapids are 5cm off the floor. Ok lets build a simple waterfall, build yourself a nice raised square, something like this
next drop a emitter and rename the emitter waterfall_1_short and drop the emitter at the back of the hill and start playing,
you can see this did not work very well, I wonted the water at the front of the hill, to do this just enter build mode and turn the waterfall around, it should look like this.
that looks better, the next step for me would be to clone a few more emitters, add some rocks, boolprop the hill and you should then end up with something like this:-
still not that great to look at but you must remember while building you will adding trees and other intresting objects, I found also adding rapids to the base of the waterfall looks pretty cool, to do this type rapidsnorock and place the emitter at the base of the waterfall and then I used rapidsrock emitter and placed that at the base of the pond. Then perhaps this would be a good time to place the pond in, don't worry the emitters do not move when you boolprop, but should if you change your mind, you will not be able to replace the emitter in the same location, it will always drop to the lowest point, so thats why you need to place them first. Just to be aware only a few emitters work under water, seaweed for example, rapids need to be placed on top of water.
Top tip, when building rivers or using sea waves, test how far the water animation will go. you don't wont that wave moving into the house that you just spent 3 days building.
Here is a list of things you might wish to try and play about with:-
poolbubbles
pooldrownbubbles
poolsimsteam
seaweed
rapidsnorock
rapidsrock
rapidswaternarrow
rapidswaterwide
waterfall_1_short
waterfall_1_shortsplash
waterspout
oceansurf
oceansurfreduced
fountainscience (the water jets I used in the pool lot)
JEDI
This part more information than anything else, and a few idea's, I was not the first person to work any
of this out, that honor should goto, Goggalor over on the more awesome than you web page, well at
least I think he is the first, you can download a complete list of extracted codes from the following
page:-
http://www.moreawesomethanyou.com/smf/index.php/topic,18664.0.html
So what next, well I found a number of the objects in the list can be used with triggers, a example,
you wanted to make a haunted house, you can use a trigger for a rat to run accross the floor. So many
of the objects can be used with the World adventure dungeon triggers. You could make a scientist sim
flick a switch to make it snow, with of course the correct trigger in place. You could even build a
an Olympic stadium and when you light the torch, hundreds birds will fly up into the sky. Many of
that goes beyond this tutorial, but it's all possible. So if you want one final play with your new toy, try a few animals from the list Bird, rat and crow, you can watch them fly around your lot, but they will disappear after a short time, so to make the best use of them, use the trigger events.
Many thanks for reading, please report any good findings.
UPDATE 30/06/10
WILL MY GAME SLOW DOWN
Good question, I've done some research into this and this was my conclusion, directly no, but like anything in the game to much of anything then yes it can.
I will give you some example of how this can slow down your game, Your playing in the game with a very large heavy detailed lot that uses loads of animations, the lot on it's own, should not slow the game. But lets say your neighbor contains a large number of electrical animations, you might start to notice a very small slow down, lets say your other neighbor is a big lot, full of animations, this will start to get hard for most PCs' to handle, it's trying to animate from 3 different locations. In testing what I found the game will slow down if you use to many large animated lots in around the same area, my advice is to split up the animated lots around the neighborhood. That should reduce all slowdown, just don't have them all together in the same place.
Some animation are worse than others, for example the waterfalls are very minor, but the large electric discharges are high in power. I'm not saying not use them, just don't use to many in the same location.
I've not done that much research into this, but I think the game loads your active lot and upto 12 lots around your active lot, they will run in the background, so simple maths tells you, to keep any large electrical animated lots, a few streets away from each other and the game will be running like clockwork.
In conclusion, I'm happy to use them, I've noticed no slow down in my main neighborhood, but in extreme testing, with all settings on top, the FPS will drop if you use multiple very high animated lots in the same area. At the end of the day you could also say that if you build a massive world with CAW or use 1000s of custom objects, or even if you have 7 expansions installed.
A little about the test I did, the test was this, I placed my shimmer lot (full of electric energy discharges) around the neighborhood at various points and tested the FPS, more or less they where all about the same, I placed 4 shimmers next to each other and tested, the FPS did drop a little, it was not unplayable, but I could see how the FPS could drop more if shimmer used more animation or was on a bigger lot.
I will update the first page with this info, if anybody wishes to do any more test into this, please print your findings.
UPDATE 19/07/10
CREATE A WORLD & EMITTERS
This is more a knowledge update, should you set up a lot in create a world that contains emitters, when that world is first installed, some of the emitters temporary reset to fog emitters. This is a minor setback, all you need to do to get the emitters to work as normal, is save your world, exit to the main menu and reload the save and the emitters will turn back to normal, all test I've done confirm this.
The reason this happen, CAW only contains Fog emitters, so when the world is installed you only get fog, until of course you save the game, then the game will recognize your emitter codes, this currently effects all lots installed by CAW.
PART 4 The animated train
The train was made using a simple emitter placed inside a lot, of course I also needed to make the train track, that is a simple texture.
You can see the emitter in the center of the lot built over the train tracks, if you have read part 3 of the guide you will understand how to change the emitter code:-
the code for the animated train is:-
ep1train
The downside, of the train, it does not stay in the world forever, I needed to place 4 emitters in 4 different lots, so when one emitter runs out, hopefully inside a tunnel another emitter kicks in, to give the illusion that train is going from when one end of my world to another.
PART 5 custom neighborhood objects, recolors
By the time you get to this part you should be upto speed with using S3pe, and you will need this for the last part of this guide
The more I play about with CAW, the more I see to edit:-
In fact the truth of the matter and all my test confirm this so far, you can edit just about anything in the game and keep your game custom content free. You can use your world to edit the, neighborhood objects
The way you do this is to extract the texture using S3pe, you can find the textures here:-
C:\Program Files (x86)\Electronic Arts\The Sims 3\GameData\Shared\Packages
FullBuild2 file contains most of the building recolors, just extract the file you wish to change and when you have finished the edit, you need to move the file into your CAW world, using S3pe.
The textures work much like INI files, your best editing the texture and check they work ok in backup copy of your world, if everything work, then like the INI files they should be last thing you do prior to exporting your world.
WILL THIS WORK WITH CUSTOM SIM CLOTHES?
Not tested this yet
WILL THIS WORK ON PLAYER MADE CUSTOM CONTENT & STORE OBJECTS?
I did test this on custom made object I downloaded, it did not work, I've not tested on store objects.
Other information:-
Most of the info is still being tested, so you should consider all the guides are open to change, should any problems or any new info comes about.
So you use the info at your own risk, the last thing I want is somebody to damage a world they are building so please make backups and test what you use from this guide.
If you wish to read more info of a more detailed description of how to use some of the guides I've started thread over on TS3 CREATORS CONSORTIUM,over the next few weeks I will update the guide here:-
http://builders.forumotion.net/caw-101-f122/building-a-world-part-1-t1007.htm
The guides will contain more a step by step on how to do things, so if your a little new to extracting files, using programs to edit your world, this thread will be easier to understand.
If you wish to follow the progress of the exotic world I'm building you can view this thread here:-
http://builders.forumotion.net/wip-f7/hope-island-20-07-2010-t941.htm
or
http://forum.thesims3.com/jforum/posts/list/232499.page
Many thanks for getting this far, I suppose I want my world I'm building to be about the world not how I turned the sea turquoise, or how I made a green balloon.
Cya later
Post edited by EA_Solaire on
0
Comments
Lots and lots of information to soak up. :shock:
I need to sit down and really go over this. I'm making a Halloween town, so I'll be wanting the rivers full of blood of course! :twisted: and tweaking the sky will also be a must. I've not used s3pe before so this will be a first.
Thank you for taking all the time required to write all this out.
The Sims Creators' Consortium
lots to read 8) but i know this will be useful, reminds me i need to check out your terrain textures, they look amazing in your photos,
was changing the rabbit hole colours complicated? i need to read over everything more carefully, i just sort of skimmed through it so far, but thankyou for this!
your a genius :XD:
i am excited! going to experiment tonight 8)
so im probably getting a little over ambitious ... i want my sky to look like this haha
if i keep commenting i will probably get it in the neck for spamming :roll:
also ... the train track ? im looking at it and im thinking its terrain paint ? is this true ? it looks amazing :shock:
p.s i think your my hero :oops:
drowssap - The rabbit hole recolours it's not that complicated but you do need the correct tools, a copy gimp with the DDS plugin, so that you can edit them,also something like Infraview with the DDS plugin will be helpful for viewing the files, much of the guide is aimed at somebody who as used the tools before, a more step by step approach will follow. But in the mean time, when you open the Fullbuild2 file, all the files that are img files that are for the rabbit holes that you wish to edit, you should click on the export to file, you can multi select the files if you hold shift down. You can edit them files in Gimp, usual the files that contain the full texture pics are the files that will change the pictures. On a side note I'm currently working on a pack that will contain many of the neighborhood objects already extracted and ready for editing, this pack will be ready soon.
The billboards are a good place to start, easy to edit, they are actual ADS files not IMG files, just extract all the ADS files you find in Fullbuild2. It includes the cinima pictures:-
siimoneeee - Yes I'm currently making a world it's a few weeks away from going into beta testing
http://builders.forumotion.net/wip-f7/hope-island-20-07-2010-t941.htm
or
http://forum.thesims3.com/jforum/posts/list/232499.page
once i get in i will read over this more accurately,
one thing im wondering though ... sorry if you've already covered this, i will need to check, but with rabbit holes/billboards would re-colouring over write the original files ? or would they be a copy ... or would it be just for the particular world ? i remember reading over the water changing one on mod the sims before, and i think it was only on the particular world it changes the water colour,
but then if this is the same for rabbit holes, surely theres a way just to have them as a 'recolour' option ? because i remember looking round mod the sims before, and noticing someone re-coloured all the rabbit holes into a 'Tudor' style
mmmm
sorry if im rambling on abit, i will have to tackle these issues when i get to them, and if i have any luck i will post some pics of the results
@auntielynds ... halloween town ?!?!! ohhh i want to see it :-o
All recolors are just for that world, nothing over write any main files, how it actual works is this: you are using the same code as the EA codes so while your playing that world, because you have installed the files inside your world you will use your recolors instead. But lets say you wanted to play sunset valley, 2 hours after playing your world, all you need to do is exit the game and reload the game and all the custom recolor will be that of sunset valley. The changes you make will stay inside the world you edit.
The rabbit holes from mod the sims, the tudor style are Objects that have there own unique codes, so therefore they are custom content and load regardless of what world your playing, you can use them in any world. This is a good thing, but they are still custom content and will needed to be downloaded separate from your world, should you choose to use them.
im sorry if it seems like dumb questions, but im really happy you've uploaded this,
i will let you know how i get on anyway, theres so many files in fullbuild02
its the restaurant thing im after, i think it looked loads better in its original blue-ish colours,
found the files ... they all seem to be broken down into little parts,
sorry i dont know much technical words,
i cant quite understand how these control colour, suppose it all done in layers,
OHH i get it :oops: silly me
this is what i want to get, i know some things like the leaves and things would have to stay, but the lighter blue and brick 8)
[img]http://0.tqn.com/d/compsimgames/1/0/S/4/2/bistro_chat_G4W.jpg "width=400"[/img]
I wanted to make a beta sunset valley in CAW but I wanted that restaurant recolor cause it does look much better.
im getting the files together, think im getting the hang of this, iv changed the blue lighter,
still bit unsure about how to import them into a caw world, but well i shall see when i get to it
but what file am i looking for to import it back into ?
okk ... getting closer ... the building changed ... but all brown .. mm that cant be right ... haha
Next open your test world in s3pe, stick to using a test world, while we work this out, and import the texture you have just edited in Gimp to the world, save and exit.
Next load in CAW to test, this is a simple grocery store recolor, I've made:-
So if you see some changes like this then it worked, so what you need to do then, is make a folder called completed Neighborhood rabbit holes and drop the files in this folder. Now continue building your world, when your world in completed, just prior to exporting your world, you then import all your completed graphic changes and then export your world. Test the world in game, it will contain all the edited graphic and will be ready to be uploaded.
If the building changed to just one color, try scrolling towards the building and see if the texture change, rabbit holes contain a file that's as a LOD in it's name, so the grocery file will be called something like this:-
S3_00B2D882_00000000_ACEB01D38A3E031E_grocery_lodOne_0xaceb01d38a3e031e%%+_IMG
This file deals with distant viewing, so to see the changes far away you will need to edit this also.
I hope this helps, I'm still playing about with this myself but I'm sure we will get something working for you.
anyway i keep coming up with brown :shock:
[IMG]http://i32.tinypic.com/155gnys.jpg "width=400"[/IMG]
mm i will read what you did again ... mm :?
think i understand now .... i shall try again... thankyou so much for this
you make it look to easy
Im over the moon now!
[IMG]http://i29.tinypic.com/2j421qr.jpg "width=400"[/IMG]
THANKYOU SO SO MUCH
one little thing :oops: sorry if im bugging you, is there a way to filter though for certain things in s3pe ? iv tried the ctrl+F and the search option, but neither seem to work, anyway
THANKYOU!
i gotta tone down that blue, and add some more too it, but yes! 8)
Finished result...
[IMG]http://i27.tinypic.com/16t7va.jpg "width=500"[/IMG]
still gotta tone down that blue perhaps ..
now im wondering if its possible to add these to packaged worlds,
this is so great
As for adding them to Packaged worlds, once you have exported your world, you should test the world in the game, just to check the graphics have changed. If all systems a go, then there is no reason I can think off, why you can't then upload the world with the custom rabbit holes. You must remember it will increase your upload size, but that the only downside I can see. Oh and you might get a hundred question on how you did it
If you do this, please post a link on this thread, it will be a good example, should anybody else wishes to do this.
The custom rabbit hole you made looks very good
The Sims 3 contains 1000s of images you could change for your world, your only enemy is how much time you will spend getting the best from them textures, to make your world really unique.
all i need to do now is figure out a way to get the sun/moon to have rings like Saturn, and some freaky cloud patterns and s'all good 8)!
thankyou so so much for your help!
perhaps you should copy this information onto mod the sims, people there are heavily into customising there game
Stw402, could you please just explain me hot to recolor objects please ? I read most of your links but i still don't unerstand
So, i just downloaded S3Pe. What do i have to do next if i wanna recolor a bridge from CAW ?
Ok I will try and help you do that:-
I've recently just recolored a bridge for my new world, so for this guide I will be using that bridge.
First load in S3Pe
You will see this picture:-
Click on open at the top of the page
Now navigate to this location:-
C:\Program Files (x86)\Electronic Arts\The Sims 3 Ambitions\GameData\Shared\Packages
Open the file called FullBuild_p04
For this guide we are going to extract the broken bridge from Ambitions, if you you wish to use another bridge, you can find more bridge in the other package files that are located in your sims 3 folders, namely
FullBuild2 & FullBuild1
Located here:-
C:\Program Files (x86)\Electronic Arts\The Sims 3\GameData\Shared\Packages
You can also find other bridges in the world adventure files.
Lets not make this any more complex, we will recolor the broken bridge from ambitions
After opening the folder you will be faced with this:-
Click on the Tag menu and the sort menu.
Now you can scroll down until you see the IMG files in the Tag menu, you can see that I've highlighted the Bridge Train Broken Image file:-
You can hold down control to select more than one image
Next right click on the highlighted images, then export them to file, save them to your desktop, or make a folder called Broken Train Bridge.
For the next part I use GIMP with a DDS plugin
Both free to download, but if you already now how to edit DDS graphics with your current paint package, stick with what you now, if not download:-
GIMP
http://www.gimp.org/
DDS Plugin
http://code.google.com/p/gimp-dds/
The file that we are going to edit in this example is called:-
S3_00B2D882_18000000_FF5D6A1EE4F95D41_bridgeTrainBrokensS_0xff5d6a1ee4f95d41%%+_IMG
So when you have installed Gimp with the plugin, open this file in gimp, you should see this:-
Now you can edit the file, I would not change the size of the picture, but anything else should be ok
When your happy with the result, you should click File, then Save as and the save again, this time you will be faced with this menu:-
Set the compression to BC3/DXT5
Generate Mipmaps tick this and save.
Something of note, I've found if you Generate Mipmaps then you will increase the size of the file by a large amount, but the quality will be greater when you view the object from afar, but if size is a problem in the world you are designing, you might wish to see what the object looks like without Mipmaps generated.
Right now, we need to get the object into your world, I will show you two ways of doing this, one is for testing your object and the other way is for uploading your world.
TESTING YOUR OBJECT
First install your world into the game, when your world is installed, navigate to my documents and look for a folder called InstalledWorlds, open your world using S3PE and click Resource at the top of the screen then Import and then from file, like so-
Navigate to your bridge file and import this file, remember to save the world file before you exit S3pe, next you need to load the game and test the result.
UPLOADING WITH EDITED IMAGE OBJECT
More or less like above, in your last saved file found here:-
Documents\Electronic Arts\The Sims 3 Create A World Tool\UserToolData\Worlds
You need to Import this file, prior to extracting the file for export, I would test the world prior to uploading just to make sure everything is ok with the edited graphics.
If you have any problems finding the right image file, tell me what your trying to edit and I will try and narrow down the search for you, I can probable tell you where most files are, I've spent some time looking at all the image files.
I'll try this out after dining because now i'm really hungry
The very object i want to recolor is a bridge from WA. The one from France. I just wanna recolor him into grey and also recolor replace the paving on it by asphalt like this :
So i'll try this out in a moment and let you know if there's anything wrong !
Thanks a lot,
Estyle
PS : I don't know if i'm totally clear, hehe, i'm french but i do my best in english :P
Ok i feel really noob at the moment because now i can't edit it to put another resized image ...
Anyway, here it is :
Is it the right one ? And is it me or this image is pretty lighty ?
I hope i'm not taking you too much of your time